
A Cinderella Birthday Party for a princess-loving 4 year old. Complete with a dessert table and Cinderella Birthday decorations to fit the theme, including a Cinderella Cake!

For Ava's 4th birthday, she asked for a Cinderella Birthday Party. She decided this more than 6 months in advance, shortly after her Frozen Birthday Party. Kind of like when little kids decide what they want to be for Halloween next year the day after Halloween.
Cinderella was my favorite Disney movie as a kid. Granted, there were far fewer Disney Princess movies back then, but it was one of the only Disney movies I owned (VHS of course).
In fact, when we took the girls to Disney World in 2018, we each did the Pick a Pearl at the Japan Pavilion of EPCOT, and I surprised the girls with Cinderella Coach cage necklaces to hold their pearls. Because I have one too, they ask to wear them on holidays so they can match me. The days of them getting excited to match mom are limited, so I'm going to soak them up while I can!
I was so glad that even at age 4, Ava seemed to feel the same way I did about Cinderella, and I had so much fun planning this party for her. I scoured the internet looking for Cinderella party ideas, and I chose my favorites to incorporate into this party. At the time I "only" had 2 children and apparently much more time than I do now!
ALSO CHECK OUT THIS SNOW WHITE DOLL CAKE AND BELLE DOLL CAKE!
Jump to:
Cinderella Birthday Theme Dessert Table
I did a fairly simple dessert table for this party with two homemade desserts and some store-bought candy. I also wanted to include some Cinderella birthday decorations. It was close to the holidays, so I put up the snowflake decorations from her Frozen Birthday to match the color scheme. The snowflakes were strung on clear fishing line and then attached to small clear Command hooks that I adhered to the top of the mini blinds.
I hung some pearlized light blue balloons over the table using the Command hooks attached to the ceiling. The balloons were tied together using fishing line and looped onto the hooks. I use these hooks all the time when decorating for parties because they are clear and can support light decorations such as balloons or tissue paper poufs (or snowflake ornaments!) Fishing line is one of my favorite tricks for decorating - because it's clear and so thin it gives the illusion that your decorations are floating.
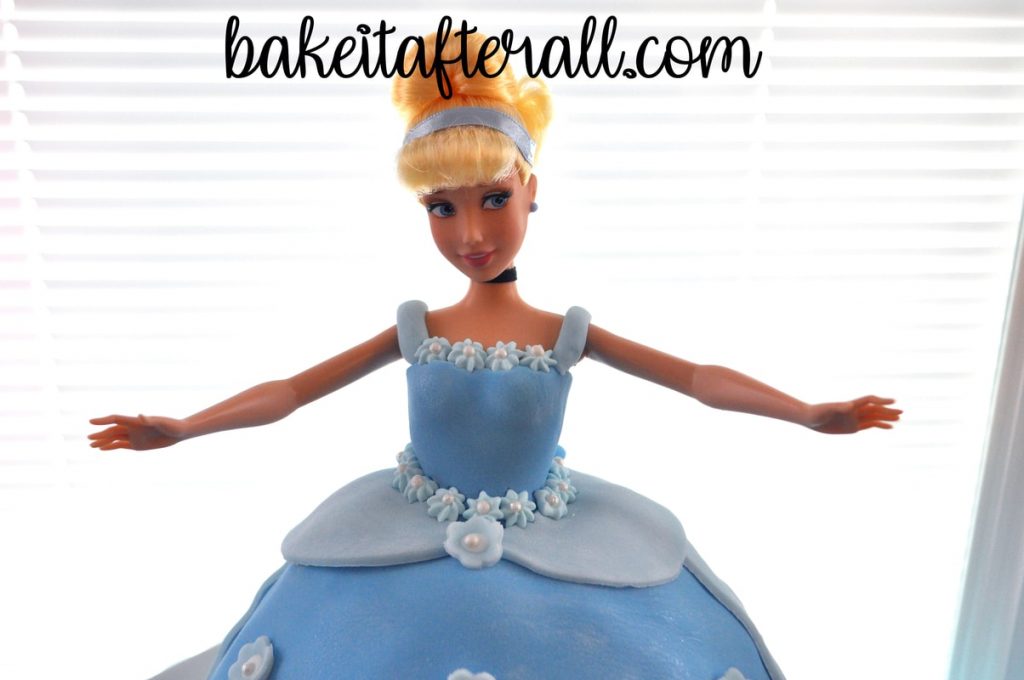
The main focus of the dessert table was the Cinderella Birthday Cake. I am including details below on how I made this cake. My girls LOVE these princess cakes that have the actual doll in the cake!
We also had to include a clock about to strike midnight in fitting with the plot of the fairytale.

I made Frosted Sugar Cookie Bars decorated with Wilton Cake Sparkles as a second dessert option. These were really good and are easy to serve at a party because guests can just grab them on their own anytime, versus the cake which must be cut and served later on.

I made this silhouette of Cinderella and the Prince using my Silhouette Portrait. I mounted it on scrapbook paper and put it in an 8x10-inch frame.

These little Jaq and Gus ornaments are from when I was a kid - they may have been toys from McDonald's Happy Meals?!

Blue rock candy on a stick gave more color to the table.

I found these adorable plastic "glass slipper" candy holders to decorate the tables. I filled them with shimmery light blue Sixlets candies. I also ended up using these with red Sixlets for a Wizard of Oz birthday to represent Dorothy's ruby slippers.

Since Ava decided on the theme of her party so far in advance, I had ample time to plan and bought these pumpkin candies in the fall when they were still in stores.

The table for the kids was decorated with a Cinderella tablecloth, paper plates, and napkins, with the glass slippers and pumpkin candies running down the center.

A few more glass slippers on the different tables.


I made little food label picks from wooden kabob skewers to distinguish between the two types of sandwiches we served and the two kinds of pasta.

Most of the parties in our family are pitch in where each family brings a dish to share. I asked my sister to bring fruit, and she made these adorable fruit kabob magic wands! The kids LOVED them, and then proceeded to poke each other with the sticks if I recall! Haha!

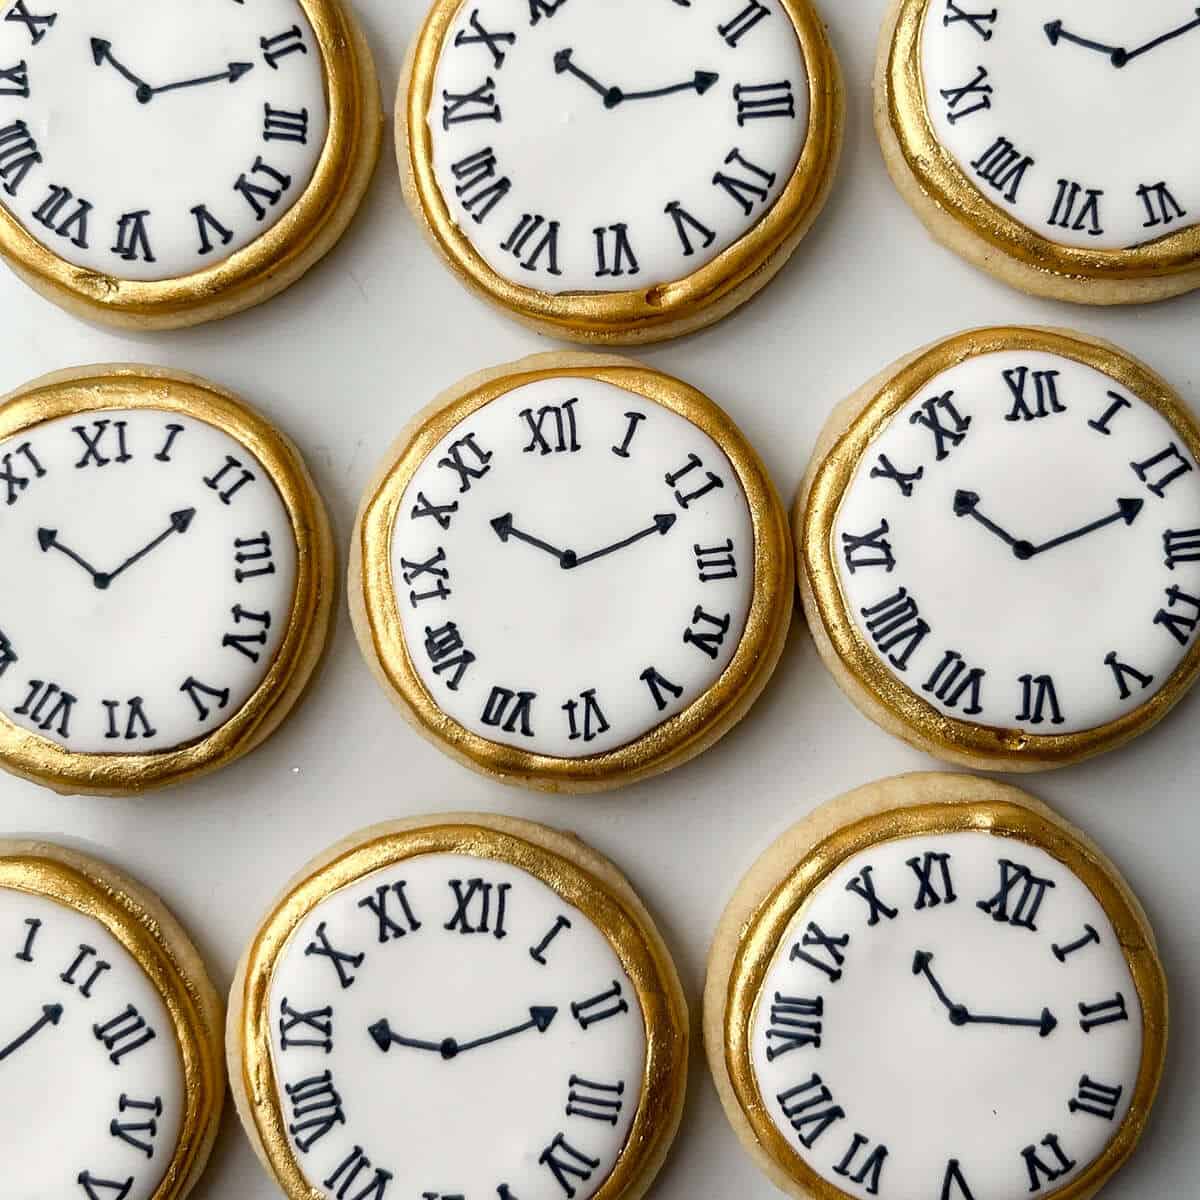
I made these Royal Icing Clock Cookies for an Alice in Wonderland Party, but they would be perfect for a Cinderella Party!
Cinderella Cake

Designing the Cake
To design the cake, I searched for different Cinderella Cake ideas to decide what elements would work for this cake. I knew I wanted to do a Cinderella Cake where the cake portion is her ball gown that the Fairy Godmother makes her. I remember seeing these kind of dress cakes as a kid and thinking they were so cool!
To achieve a smooth look, I wanted her dress to be predominantly fondant, but I also wanted some details that could only be achieved with other types of sugar.
While this cake may look complicated, nothing about it was particularly difficult. It just required some advance planning. I like to sketch out my designs and figure out exactly what I will need before I begin.
Baking the Cake
Years ago my aunt gave me this Wilton Wonder Mold Doll Cake Pan for making these doll dress cakes. It comes with a doll torso pick (just a torso on a stick, no legs), and you can purchase different dolls. It's not meant for a full size (Barbie size) doll, but I wanted to use the Disney Cinderella Doll because her hair is already fixed and she has a choker necklace on.
The cake mold comes with instructions on how much cake to put in the mold and how to bake it. There is a center rod that runs down the inside to help the inside of the cake bake. I've mentioned this before, but when I'm in party planning mode, especially parties that require decorations in addition to food, I like to use cake mixes instead of homemade cakes to save time.
When baking the cake, I realized that it was not going to end up tall enough for a full sized doll, so I tried putting her into the cake at an angle. Her feet ended up breaking through the front of the cake! I was able to patch it, but the next time I made one of these cakes (coming soon!), I baked an extra 8 or 9-inch layer to add some height and then trimmed off the top edge to make it continuous with the dome shape.
Because this was one of Ava's actual dolls and I didn't want it getting full of cake and buttercream, I wrapped Cinderella's legs in plastic wrap. This also served to protect the cake from the doll to be more "sanitary" in a cake that would be served to many guests.
Decorating the Cinderella Cake
Rolled Fondant
Although I have used Homemade Marshmallow Fondant in the past, when I need a lot of fondant to cover an entire cake, I usually purchase white Wilton Decorator Fondant. I use gel icing colors to achieve the colors I want (either Wilton or AmeriColor brands).
I wanted to make the bodice of the dress and the main part of her skirt a medium blue, then have the back of the dress and the little side flaps to be a lighter blue. Side flaps is probably the worst way to describe those, but I have no clue what to call them! You can see her dress in the original Disney movie has them!


I used a small food grade paint brush from this Wilton brush set to brush edible shimmer dust all over the fondant to add some sparkle. I love using edible shimmer and glitter, and find a way to incorporate them in just about every baking project!

In order to cover the cake, I needed large pieces of rolled fondant. I have two fondant rolling pins. A large rolling pin is useful for rolling big pieces of fondant, like the ones that cover the cake portion. I use the small rolling pin when making designs and small pieces, like the bodice piece. I used my favorite Easy Vanilla Buttercream to frost the cake before adding the fondant. Not only is this buttercream delicious, it allows the fondant to stick to the cake. I also used it at the bottom of her dress to make a fancy design.
Fondant is very much like Play Doh. You can just sort of play around with it and get creative. I rolled it out into long "snakes" to make the straps of her dress and the little bow on the back.

Royal Icing
As I explained in detail in my Dark Chocolate Cupcakes post, I often make decorations with Royal Icing by piping the icing on waxed paper, adding a sugar pearl, and then letting them air dry for a few days. Then I carefully peel them off the waxed paper and store them in an airtight container. They dry rock hard and can be stored for a very long time. These are the tiny blue decorations that I used to line the neckline and waist of her dress. I attached them to the fondant with tiny dots of Royal Icing.
Fondant Shapes
I wanted to decorate Cinderella's ball gown with some flowers. For the cake I made for my sister's Bridal Shower Dessert Table, I made gum paste flower blossoms. Gum paste dries super hard if left out at room temperature. Fondant will also dry hard eventually, but it takes a little longer and may not get quite as hard as gum paste.
Because I was already using fondant for the rest of this cake, I decided to use small gum paste cutters to cut out pieces of fondant into small flowers. Then I shaped them to be 3 dimensional using some gum paste tools and added a dot of Royal Icing to the center to adhere a sugar pearl.
I allowed the fondant flowers to dry out for several days before decorating the cake. These flowers are the ones all over the skirt of her gown and at the bottom of her dress. Again, I used a tiny dot of Royal Icing to attach these to the fondant. At the bottom of her dress where I added decorative Easy Vanilla Buttercream, I just stuck the flowers to the buttercream.
I was really happy with how this ball gown cake of Cinderella turned out!

This Cinderella Birthday Party was one magical day for our little girl!
Sources
With the exception of the glass slippers and the Command hooks, I got these party supplies locally but will provide links to specify a comparable product. I purchased the cake decorating supplies both online and at local craft and cake decorating supply stores.
Party Supplies:
Command hooks
Fishing line
Pearlized light blue balloons
Rock candy
Glass slippers
Sixlets
Pumpkin candies
Cinderella Cake Decorating Supplies:
Wilton Doll Cake Mold
Wilton decorator fondant
Large fondant rolling pin
Small fondant rolling pin
Wilton food gels
AmeriColor food gels
Cake sparkles
Shimmer dust
Wilton brush set
Gum paste cutters
Gum paste tools
Sugar pearls
Meringue powder
Looking for more Themed Party Ideas?
Check out these other posts:
Alice in Wonderland Party
Snow White Birthday Party
Starbucks Birthday Party
Parisian Cafe Birthday Party
Golden Birthday Party
Sofia the First Princess Birthday Party
Under the Sea Birthday Party
Very Hungry Caterpillar Birthday Party
Very Hungry Caterpillar Cupcake Cake
Mermaid Ice Cream Birthday Cake
Oyster Pearl Cookies
Bridal Shower Dessert Table
Tea Party Ideas for Kids
Penelope Bird Birthday Party
Daniel Tiger Birthday Party
Sesame Street Birthday Party
FROZEN Birthday Party
Winder Wonderland Birthday Party
My Little Pony Rainbow Unicorn Ice Cream Cake
Rainbow Brownie Ice Cream Sandwiches
Oreo Truffle Gender Reveal
Cupcake Gender Reveal
📖 Recipe

Cinderella Cake
Equipment
- Wilton Wonder Mold Doll Cake Pan
- 1 Cinderella doll (Barbie size)
- food grade paint brush
- gum paste flower cutter
Ingredients
For the Fondant and Royal Icing Flowers:
- fondant (such as white Wilton Decorator Fondant)
- blue food coloring gel
- Royal icing (see note)
- white sugar pearls
For the Cake:
- 2 boxes of cake mix (flavor of choice)
- 2 batches Easy Vanilla Buttercream (see note, or frosting of choice)
- white rolled fondant
- blue gel coloring
- edible shimmer dust
Instructions
To Make the Fondant and Royal Icing Flowers:
- Color the fondant a light blue color. The easiest way to do this is to put on food grade disposable gloves and add a small amount of gel coloring to a ball of fondant with a toothpick and then use your hands to work the color in, kneading and squish it to fully incorporate the color.
- Roll the fondant evenly and thin. Use small flower gum paste cutter to cut small flower shapes. Use a gum paste tool to shape the flowers into 3 dimensional shapes. Add a small dot of royal icing to the center of each flower and place a sugar pearl on top.
- Color royal icing light blue. Pipe little stars using a star tip onto waxed paper. Adhere a white sugar pearl into the center of each star. (See note below.)
- Allow fondant and royal icing decorations to dry at room temperature for several days before using to decorate the cake. Carefully peel the dried royal icing decorations from the waxed paper before use. They can be stored in an airtight container at room temperature for many months.
Bake the Cakes:
- Prepare the Wilton Wonder Mold cake pan according to package directions. Grease and flour two 8- or 9-inch round cake pans. Attach magic baking strips around the pans if desired.
- Prepare the cake batter according to package directions. Pour 1 box of batter into the Wilton Wonder Mold pan and divide the other box worth of batter evenly between the two round pans.
- Bake the Wilton Wonder Mold cake according to the instructions that come with the pan. Bake the round cakes according to the instructions on the box, which will vary depending on the mix and the size and finish of the pans.
- For the Wilton Wonder Mold cake, follow package instructions for how to unmold the cake. For the round cakes, allow them to cool for 10 minutes then carefully turn over onto cooling racks and allow to cool completely.
Assemble the Cake:
- On a cake plate or platter, smear a small circle of buttercream and then place one of the round cakes in the center on top. The buttercream will prevent the cake from sliding. Slip strips of waxed paper underneath the bottom edges of the cake to protect the platter from frosting when decorating. The second round cake can be frozen for another use or made into cake pop or cake truffles (see note).
- Add buttercream on top of the round cake and smooth evenly into a thin layer. Stack the Wonder Mold cake on top with the dome facing up. Trim the top edges of the round cake as necessary to make the entire cake a dome shape.
- Lightly apply buttercream to the entire exterior of the cake.
- Undress the Cinderella doll and wrap her legs and torso in plastic wrap to protect her from the cake and frosting. Carefully slide her into the top of the cake, straight down the middle.
Decorate the Cake:
- Color a large portion of fondant with blue food coloring gel to make 2 shades of blue: a medium blue and a light blue.
- Using a fondant rolling pin or regular rolling pin, roll out the fondant into a thin, even layer large enough to cover the front half of the skirt with the dark blue and the back half of the skirt with the light blue. Cut the fondant as needed with a sharp knife.
- Gently apply the fondant to the surface of the cake, pressing carefully to adhere the fondant to the cake through the buttercream.
- Roll out a small piece of medium blue fondant to cover the doll's torso. Cut moon shapes of the lighter fondant for the little flaps on the side of the dress that come out from each side of her waist. Roll a thin piece of medium blue fondant into a long snake and then form into a bow to place at the back of her waist. Do the same with the light blue fondant to make straps on her dress. Customize the dress to your desired vision.
- Using small dots of royal icing, adhere the gum paste flower and royal icing flowers to the skirt of the dress, along her waist, and along the neckline of the dress.
- To finish, remove the waxed paper strips from the bottom of the cake and discard. Pipe a line of buttercream around the bottom of the dress where it meets the cake plate. Stick gum paste flowers in the buttercream to decorate. Use a small food grade paint brush to apply edible shimmer dust all over the fondant to add some sparkle.
- Store cake in refrigerator until a few hours before serving. Allow to come to room temperature before serving so the buttercream is soft and creamy.

Leave a Reply