
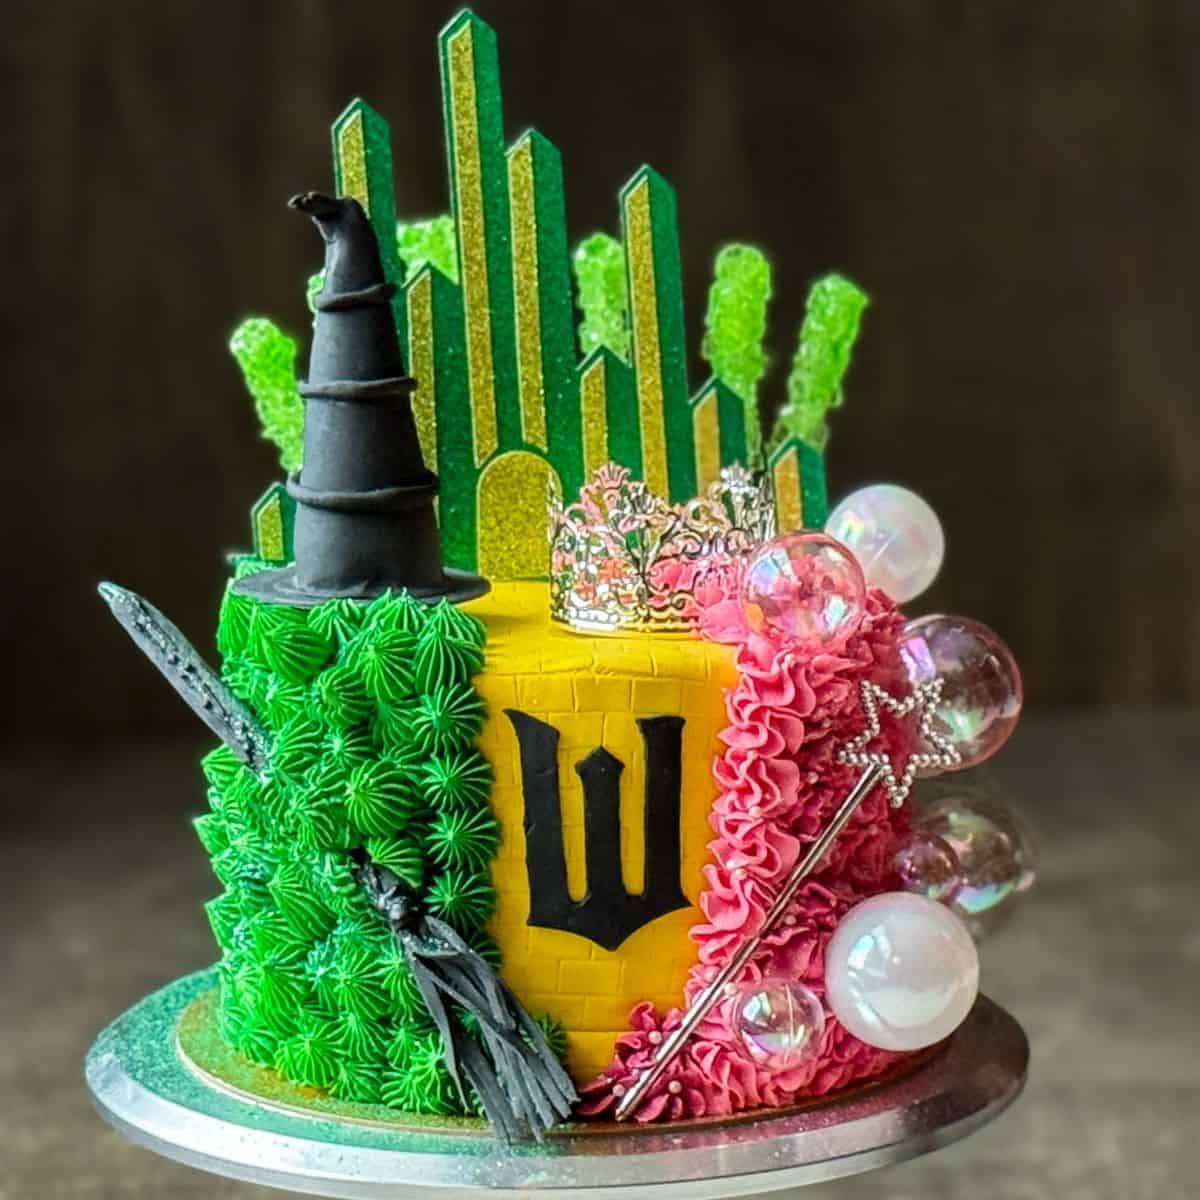
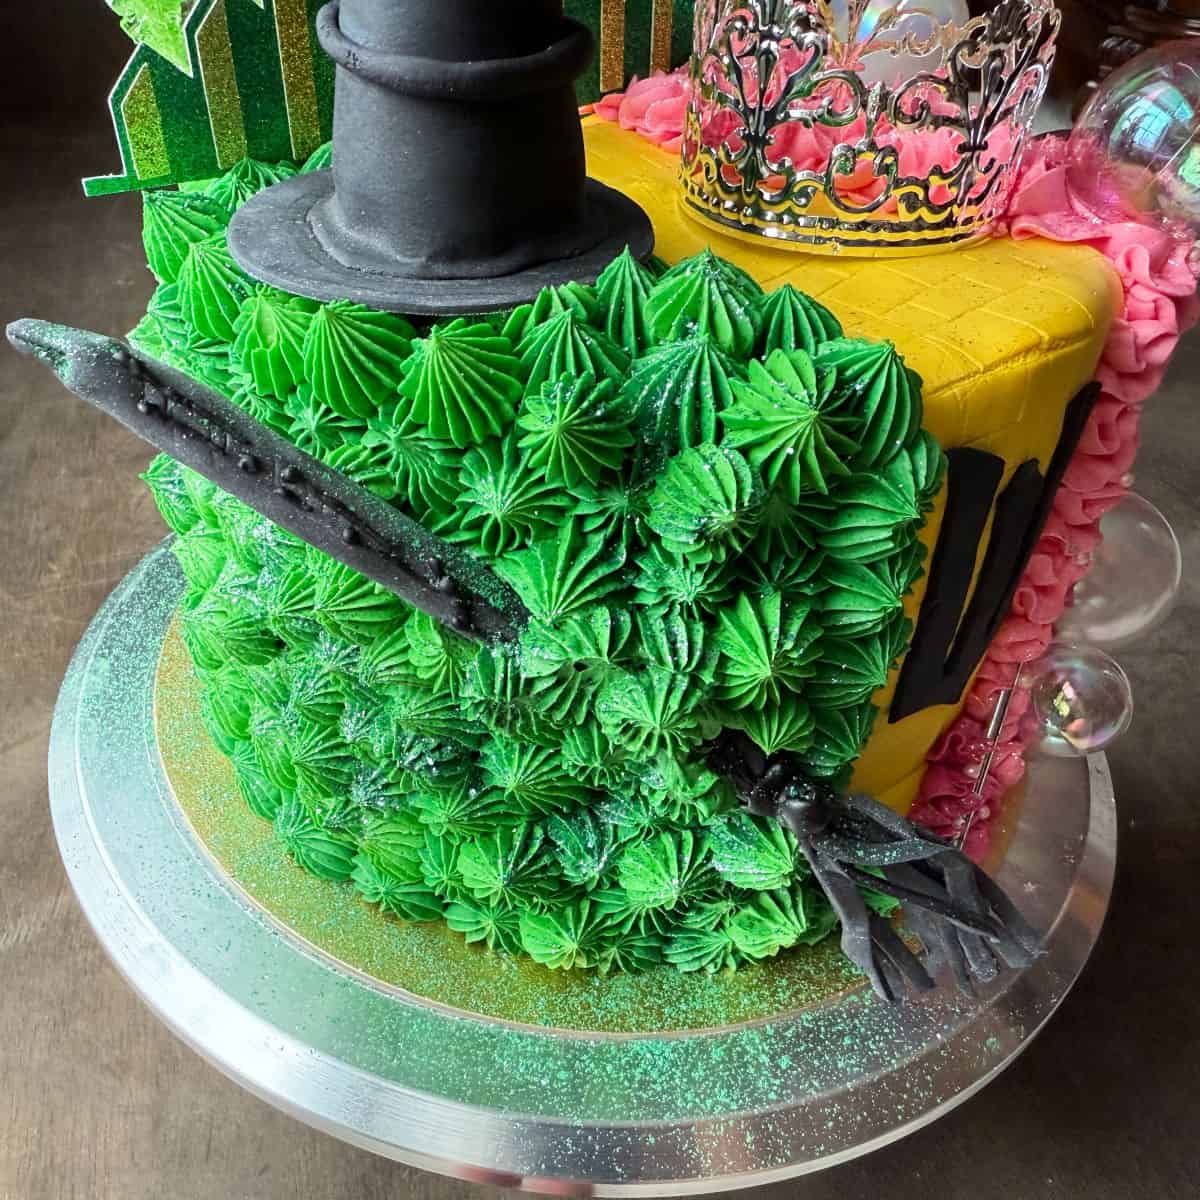
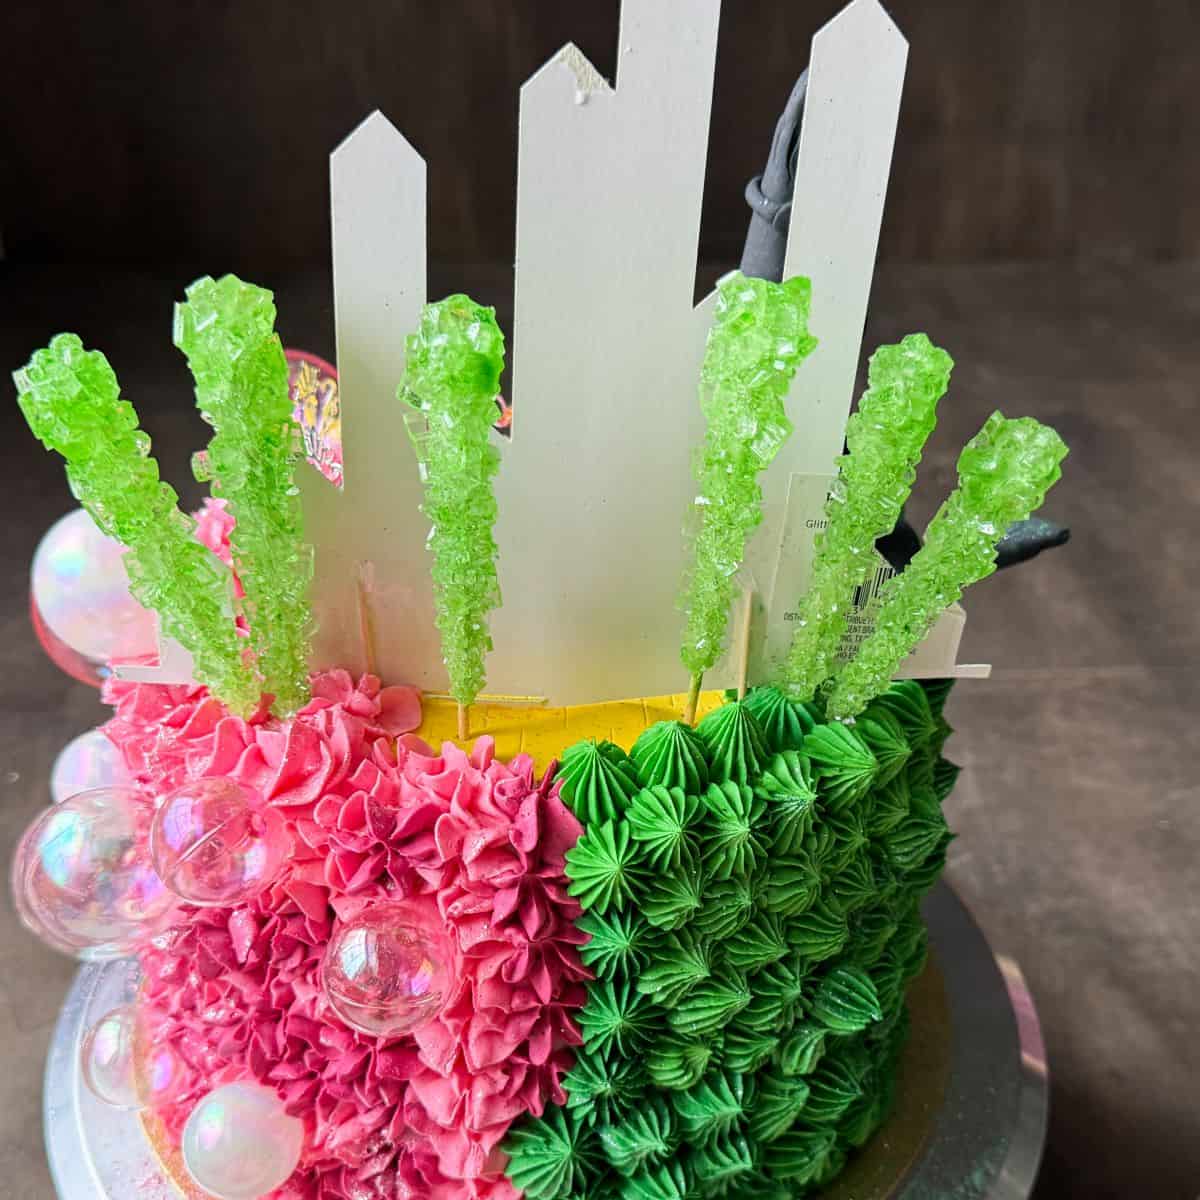
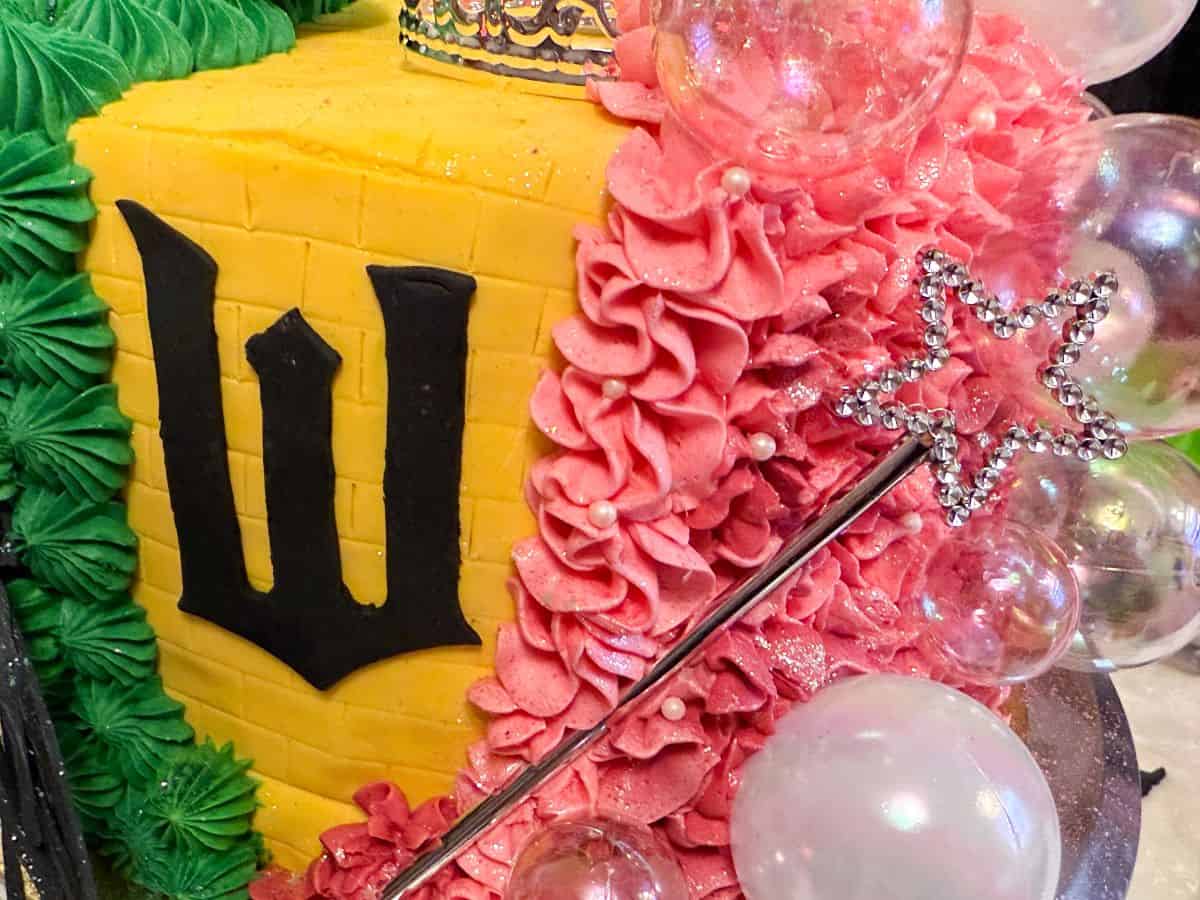
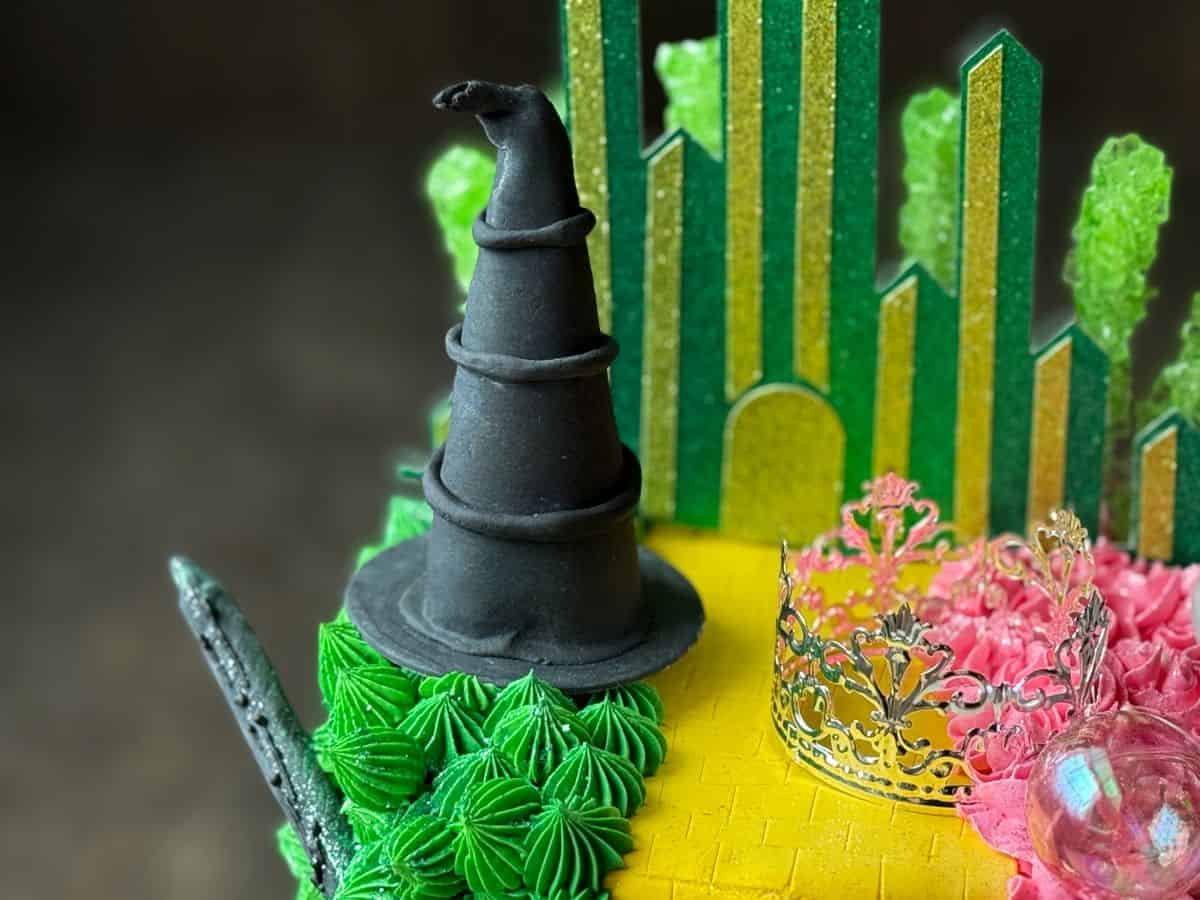
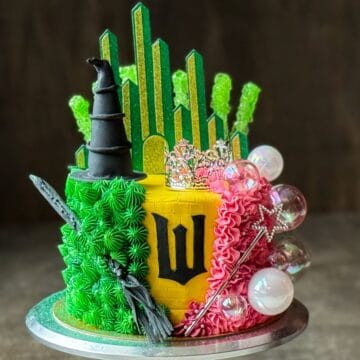
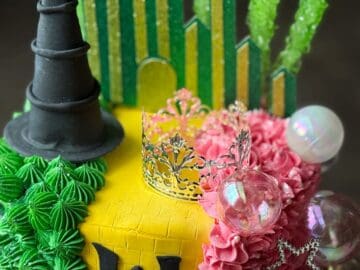
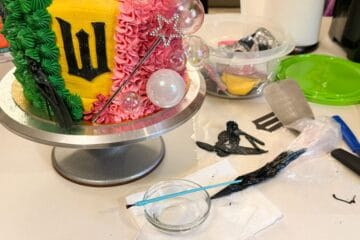
This Wicked Birthday Cake is decorated with a yellow brick road down the center to divide an Elphaba side and a Glinda side. The road leads to the Emerald City. The Elphaba side features green buttercream, a witch hat, and a broom. The Glinda side is covered with pink buttercream, a silver crown, a silver wand, and iridescent bubbles.
I made this Wicked Birthday Cake for my daughter's Wicked Birthday Party. She helped me design it. This was a fun party to plan after already doing the Wizard of Oz for her younger sister years earlier.
After lots of searching on Pinterest, we decided on an Elphaba side and a Glinda side, separated by a yellow brick road that leads to the Emerald City.
This cake has a mixture of homemade and store bought elements.
I used the same cardstock Emerald City that I made for this Wizard of Oz Birthday Cake and the same type of green rock candy sticks to go behind it.
I made the witch hat and broom out of fondant, in addition to the yellow brick road and the W in the Wicked font on the front of the cake. The wand, crown, and plastic bubbles were all purchased items.
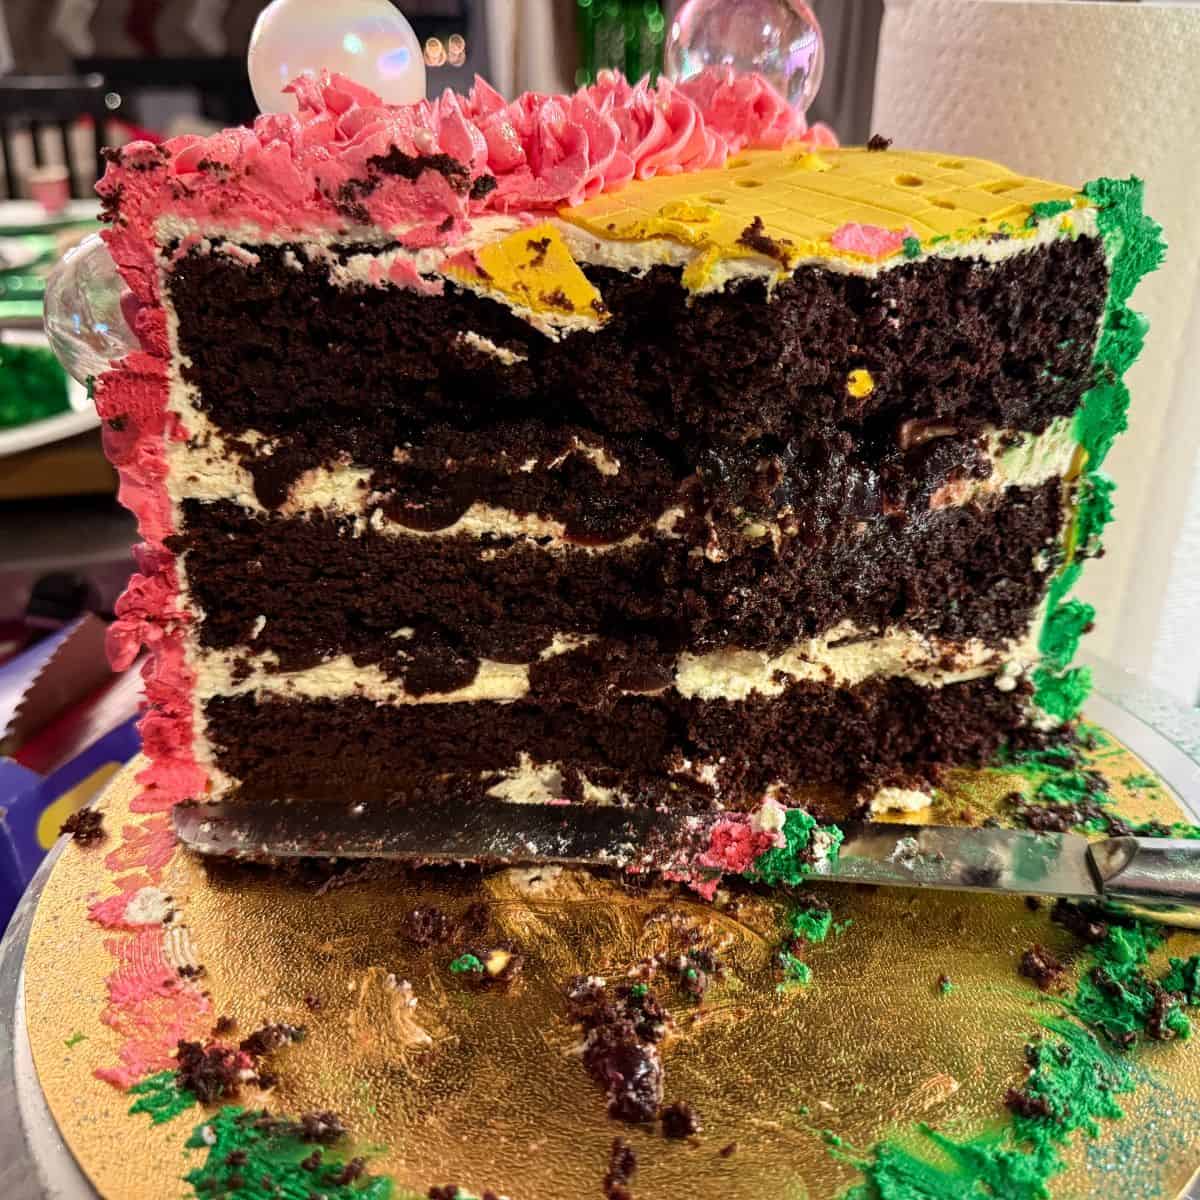
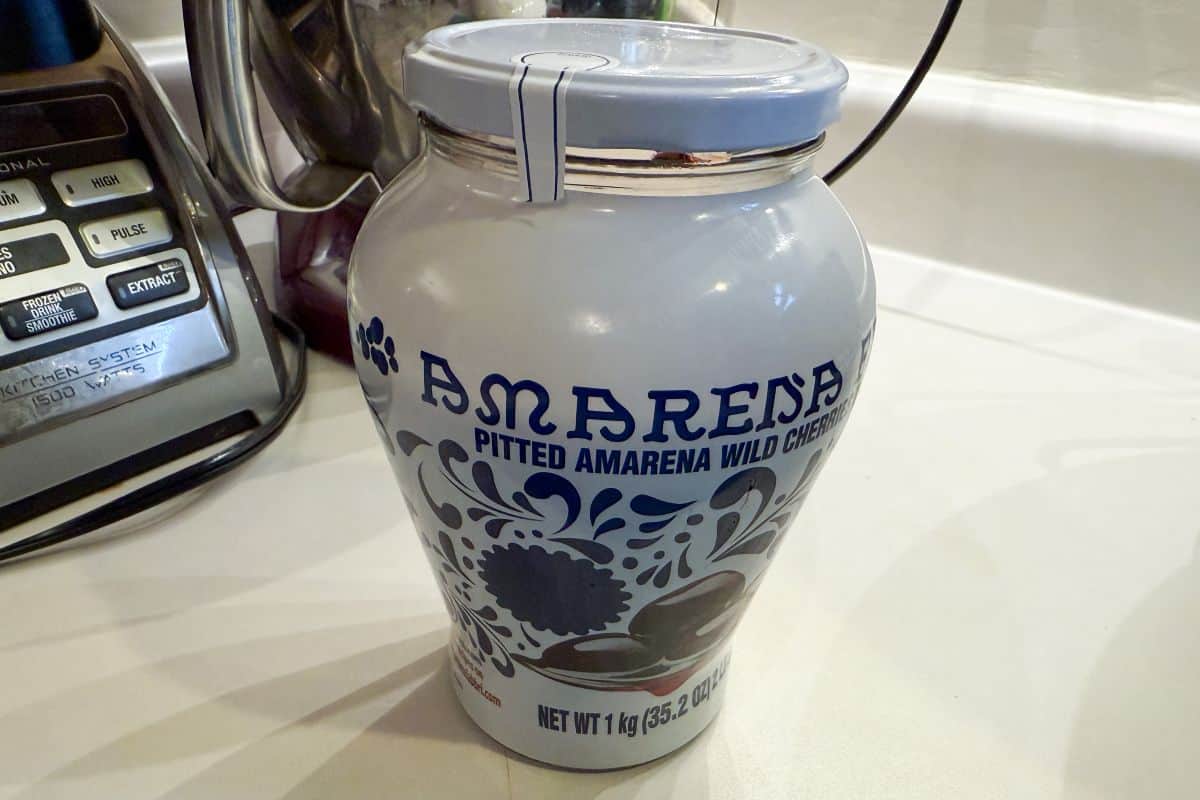
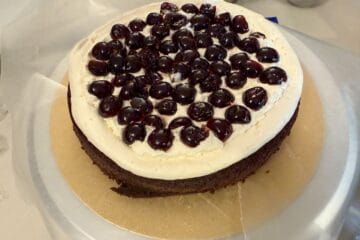
My daughter wanted her cake to have the flavors of Black Forest Cake, so we did our favorite homemade chocolate cake recipe filled with whipped cream and chopped Amarena cherries in syrup. This ended up being a great choice!
Everyone loved this cake for both the flavors and design! It may look complicated, but it's actually pretty easy to make following the steps I outline here.
PLANNING A WICKED PARTY? CHECK OUT THIS EMERALD CITY PUNCH RECIPE!
Jump to:
Supplies
- 3 layers of cake, such as Chocolate Layer Cake
- 5 batches Easy Vanilla Buttercream
- Dark green and light green glitter cardstock
- Silhoutte cutting machine
- Toothpicks
- Scotch tape
- large circular biscuit cutter
- round gold cake board
- spinning cake decorating stand
- wooden skewers for cake support
- metal cake scraper
- Green, pink and yellow food coloring gels
- Disposable piping bags
- Plastic tip couplers
- #2D piping tip
- #6B piping tip
- white rollable fondant or gum paste
- black rollable fondant or gum paste
- small fondant rolling pin with guides
- powdered sugar, for rolling the fondant
- food grade paintbrush, optional
- clear alcohol, like Everclear or vodka, optional
- Plastic silver wand, similar to these
- Plastic bubbles
- Metal silver crown
- Green rock candy on a stick
- Pink sugar pearls
- Green edible glitter
- Pink edible glitter
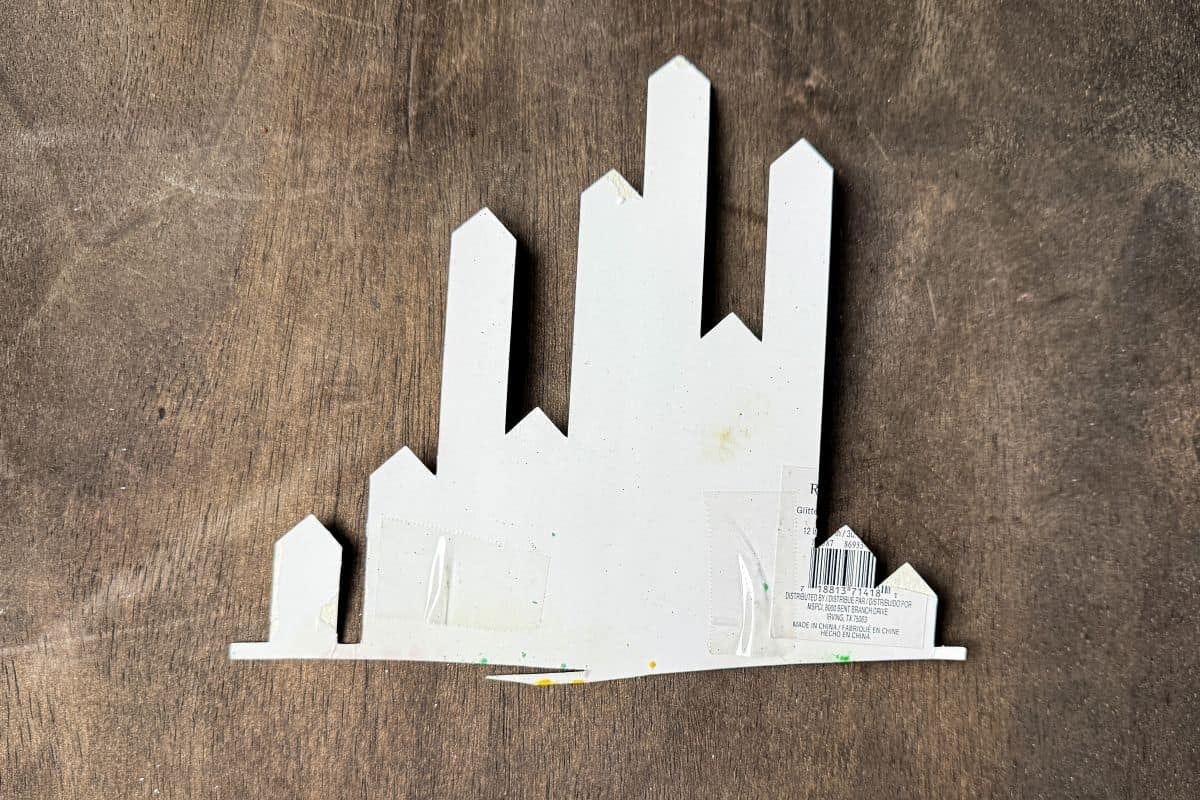
Emerald City Cardstock
I made this Emerald City cardstock cake topper for a Wizard of Oz Birthday Cake and saved it to use again.
I found a free silhouette on Google and placed the design into the Silhouette cutting machine software.
Then, I cut the outline in dark green glitter cardstock and the small details in light green glitter cardstock. I glued the light green onto the dark green.
If you do not own a Silhouette, I'm sure there are cake toppers for sale on Etsy that would give you a similar look.

After the pieces were glued, I taped toothpicks to the back bottom of each side so it could be inserted into the decorated cake. In the photo below, the toothpicks had been removed since I had already taken the design out of the cake.
Make the Fondant Hat and Broom
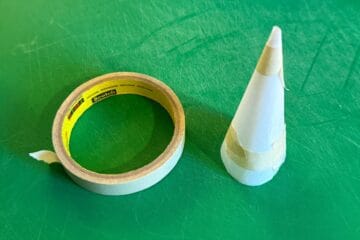
To make a large witch hat for the top of the cake, I rolled up a piece of parchment paper into a cone shape and secured it with masking tape.

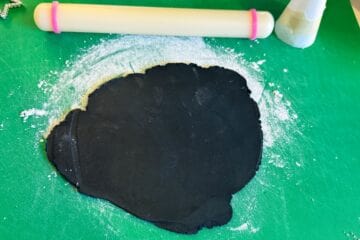
I rolled out some black fondant on a powdered sugar dusted cutting mat with a small fondant rolling pin to an even thickness.

Then, I rolled the fondant around the parchment cone and used a sharp paring knife to trim the excess, pressing together the fondant at the seam.

I used a large biscuit cutter to cut out a circle for the brim of the hat and pressed the cone on top to secure. Lastly, I rolled out some black fondant and wrapped it around the cone to create the layered look of Elphaba's hat.
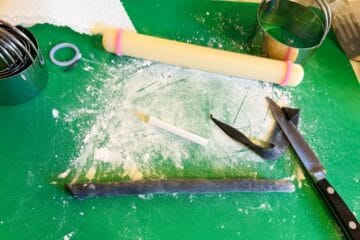
To make the broom, I wrapped thinly rolled black fondant around a white drinking straw and cut the straw to fit the length of broom I wanted.

Then, I cut strings of fondant to make the broom bristles and gathered them into a bunch, pushing the ends up into the straw and pressing the fondant at the end of the straw around the strings to secure.
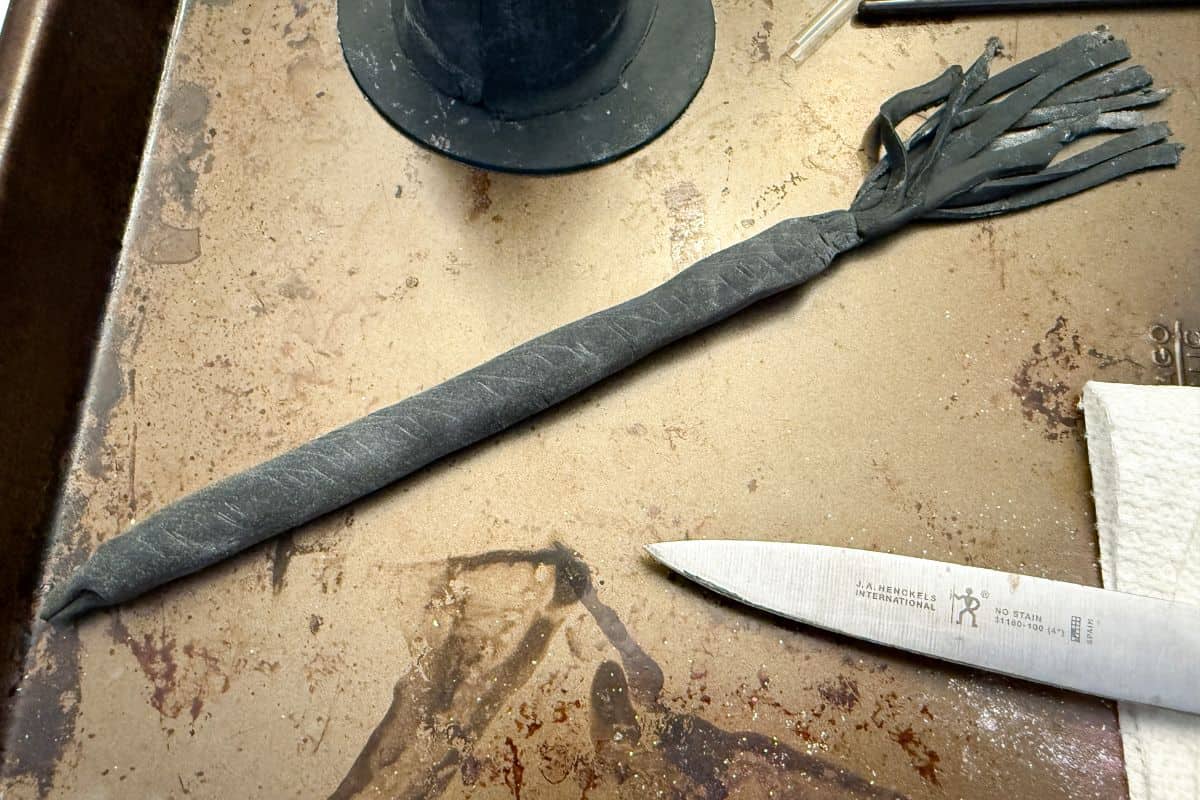
At this point, both black fondant components had some white powdered sugar on them, so I brushed Everclear over the surface to dissolve the sugar and give them a finished appearance.
I allowed the fondant to dry for at least a day before starting the cake. If you use gum paste instead of fondant, you may not have to wait as long.
Assemble the Cake
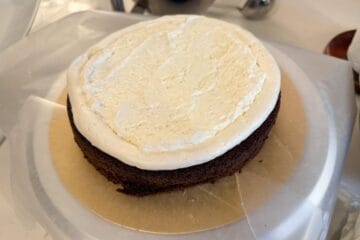
You can use any flavor of cake that you like. I used the cake from this Chocolate Layer Cake, which is one of the best chocolate cakes I've ever had.
Per my daughter's request, between each cake layer I did a border of Easy Vanilla Buttercream with stabilized whipped cream in the center and chopped Amarena Fabbri wild cherries and the syrup.
I almost exclusively use Easy Vanilla Buttercream when decorating cakes. Occasionally, I'll use Vanilla Swiss Meringue Buttercream.
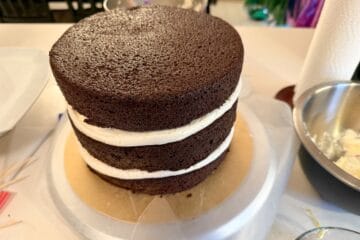
I used a spinning cake stand to assemble the cake. The cake became very heavy when decorated since it was a 3 layer cake with lots of filling. I ended up leaving it on the spinning cake stand for the party. It's a basic silver and looked nice with the rest of the decor.
To begin assembling the cake, I placed a gold cake board on top of the spinning cake stand. I was able to reuse the round gold cake board from this Polar Bear Cake.
I added pieces of waxed paper around the edges of where the cake layer would be to protect the board. Then, I smeared some buttercream in the center to adhere the cake.
On top of the buttercream, I stacked the first cake layer and added a ring of buttercream around the perimeter. This served as a barrier to prevent the whipped cream filling from spilling out the sides under the weight of the next 2 cake layers.
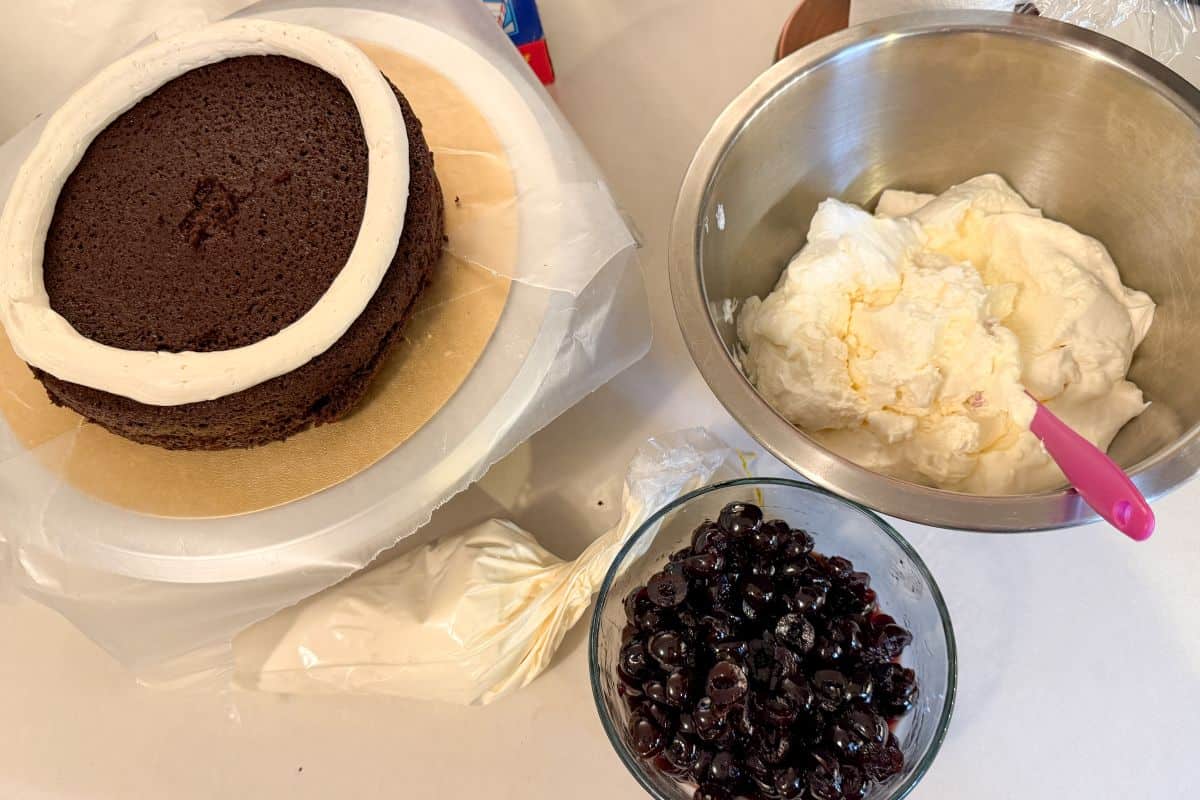
I added the whipped cream inside the border in an even layer.

Next, I placed the chopped cherries on top of the whipped cream with some of the syrup.

I stacked the second layer on top.

Then, I repeated the process with the buttercream border.

I made sure to pack in the cherries since I knew we would be cutting the pieces small with such a tall cake.
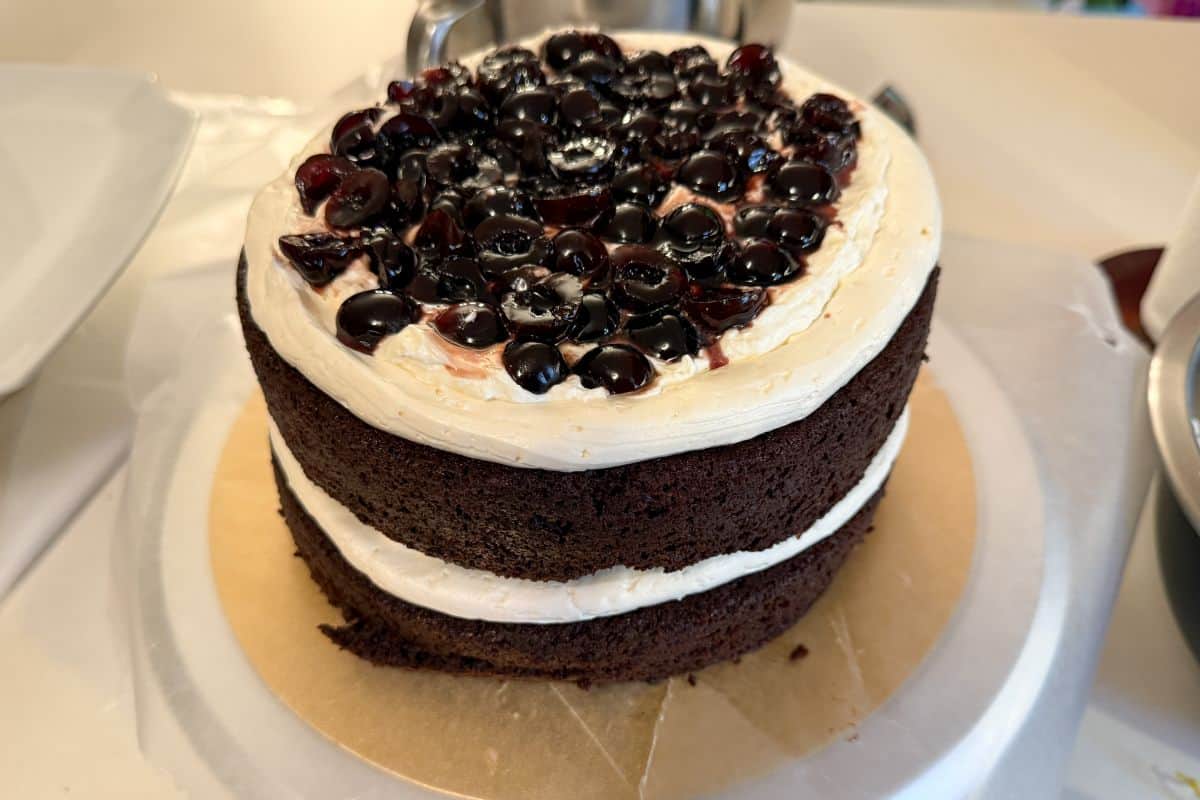
The third and final cake layer is placed on top.

Insert 3 wooden skewers into the cake so the layers do not slide. Make sure the skewers are about 1 inch shorter than the cake because will settle and compress, becoming shorter. You want to press them down into the cake so they don't pop through the top as the cake compresses.
Now, it's time to crumb coat. I used an offset spatula and a metal cake scraper while spinning the cake stand to add a thick crumb coat because I would be piping colored buttercream on top.
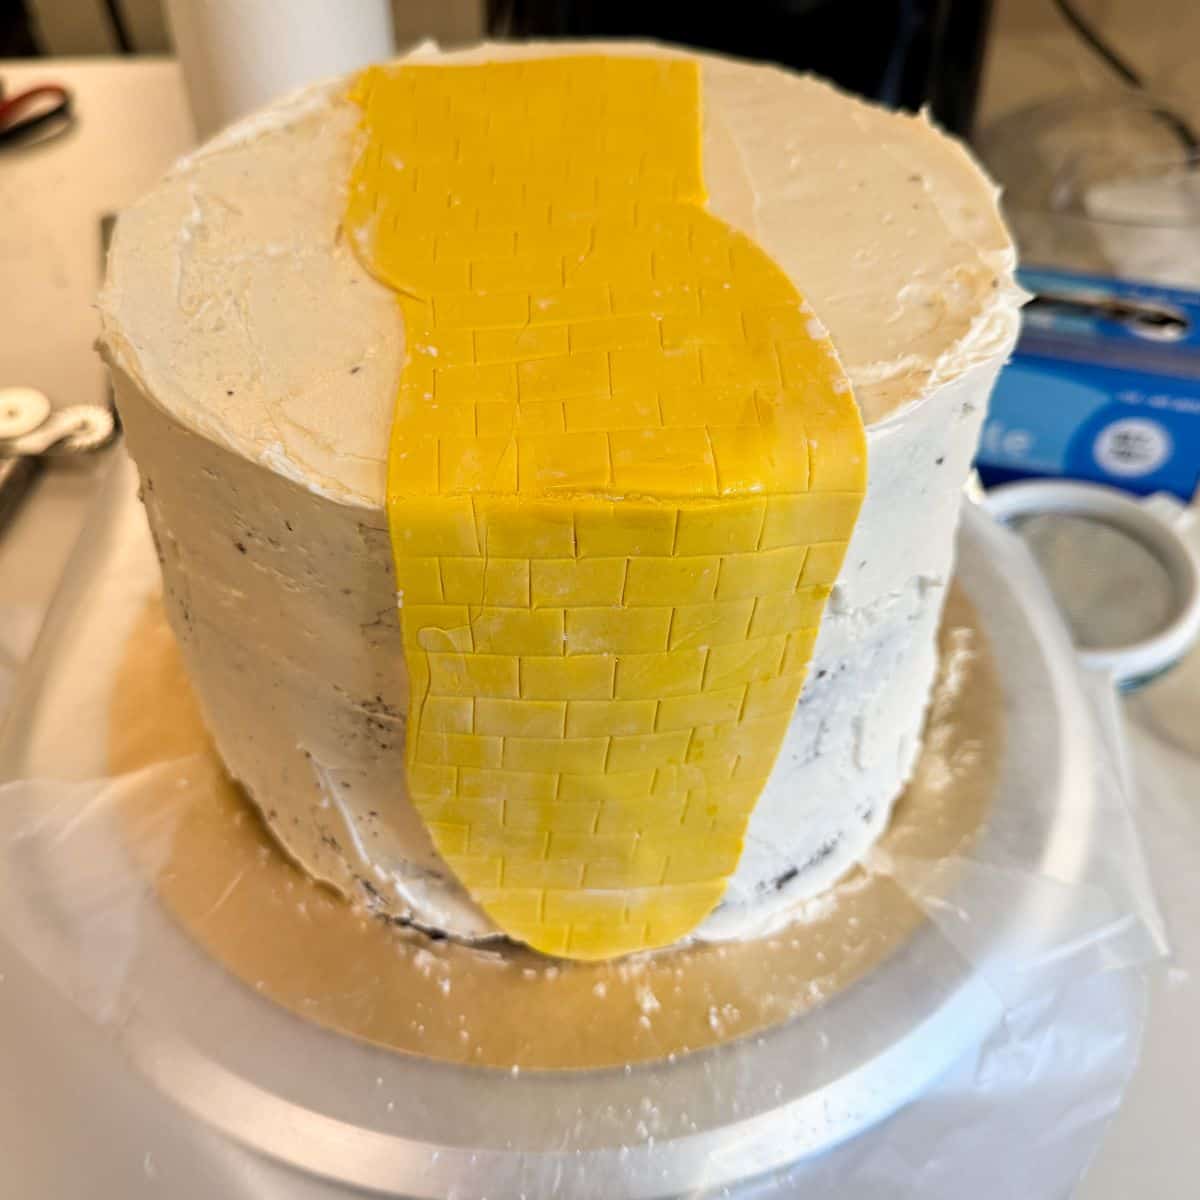
Set the cake aside, at room temperature, to make the yellow brick road. You want the buttercream to remain soft so the road will stick to the cake, so I do not recommend refrigerating it unless your work space is very warm and you are worried about your buttercream melting or your cake sliding.
Make the Yellow Brick Road
I recommend making the yellow brick road after you have stacked the cake and added the crumb coat. The reason for this is that you need the road to be malleable and curve around the top and side of the cake. Fondant dries out and becomes stiff very quickly, so it's best to roll it out and immediately place it on the cake.
Wearing food safe nitrile gloves, tint some white rollable fondant yellow by working the yellow food coloring gel into the white fondant with your hands.
Roll the fondant out using a small fondant rolling pin with guides to achieve an even thickness. I recommend measuring the height and diameter of your assembled cake with a ruler to know how long and wide to make the road. You will overlap the sides of the road with piped buttercream, but you want to make sure it's wide enough for the full effect.
Use a pastry wheel or sharp paring knife to make parallel horizontal lines down the entire length of the road.

Then, use a sharp paring knife to make the offset vertical lines to create an offset brick pattern.

As soon as you've finished the bricks, drape the fondant over the top and front side of the cake, pressing down gently to adhere it to the buttercream.
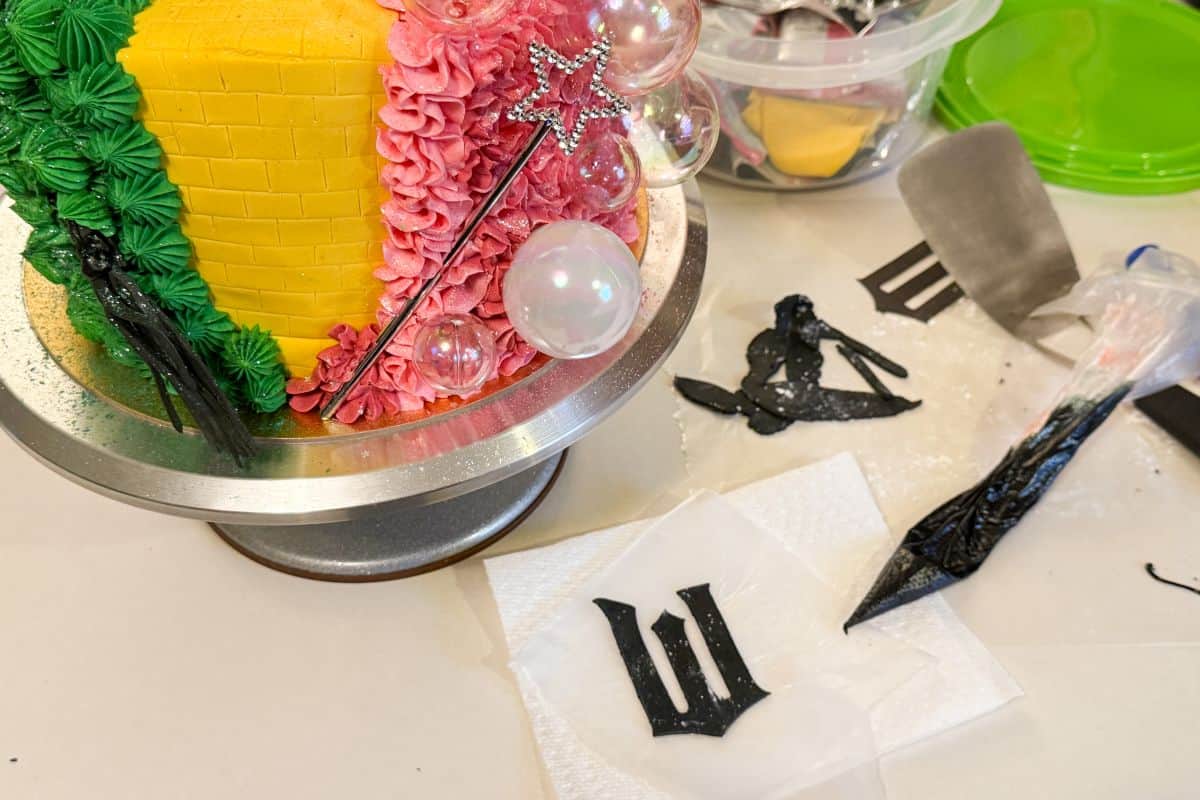
Make the W
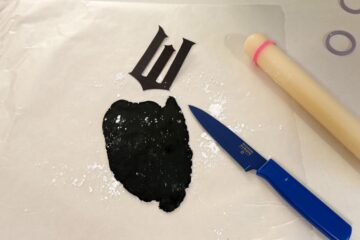
Right after placing the yellow brick road on the buttercream, I made the black fondant W.
To do this, I saved the Wicked: For Good logo as a jpg, then placed it into PowerPoint. I measured the width of the yellow brick road, taking into account that buttercream would cover the edges of the road, to determine the size of the W.
Next, I printed it in black and white on a piece of white cardstock and cut it out with scissors.

I rolled some black fondant out in a thin layer.
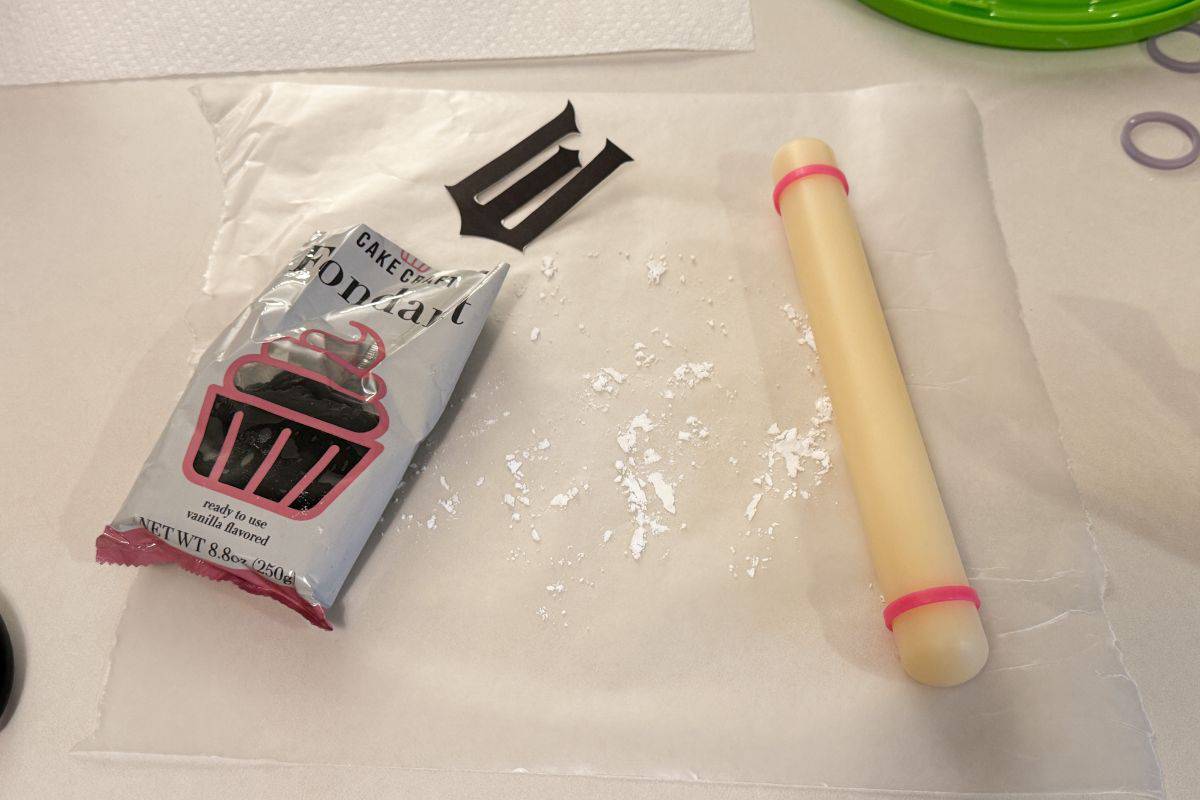
Using the W as a stencil, I placed it on top of the fondant and used a sharp paring knife to cut around the W

To adhere the W to the yellow brick road, I used some black royal icing that I had already from making some Wicked Cookies. You can use any kind of icing or even buttercream, although you have to make sure you can get it to stick.
Decorate the Cake
Divide the remaining buttercream into each of two bowls. Tint one with green food coloring gel and the other with pink.
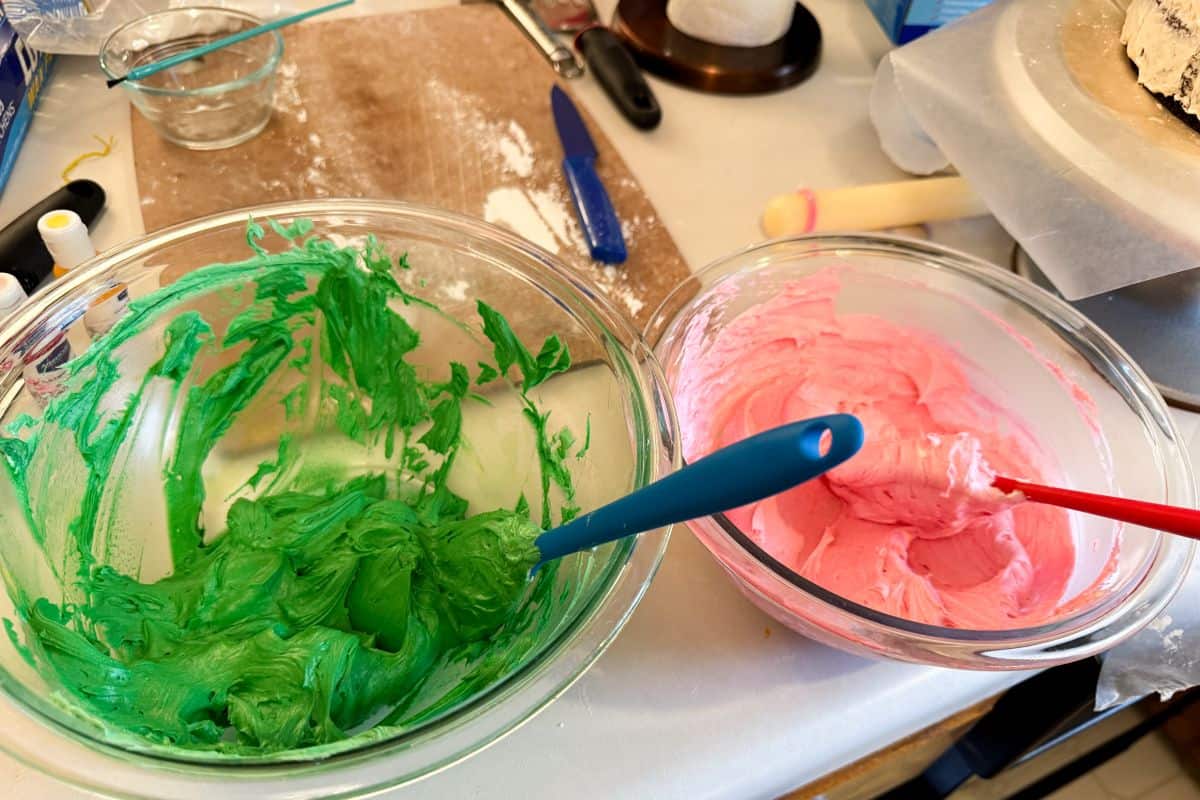
Transfer the colored buttercream to disposable piping bags fitted with large star tips. I used a #6B for the green buttercream and a #2D for the pink.
Pipe on the green buttercream on the left side of the cake and the pink on the right. I have seen the Wicked logo with the colors reversed, so it's up to you which color goes on which side. I wanted mine to mirror the decorations and banner for the dessert table.
Sprinkle the green side with edible green glitter and the pink side with edible pink glitter. This gives the cake a lot of sparkles and makes it so pretty in person.
Place the Emerald City cardstock cut out toward the back of the yellow brick road, facing the front of the cake.

Insert rock candy behind the Emerald city.
I had plastic silver wands leftover from the Princess Cake Pops at this Princess Birthday Party. I found those years ago at Walmart, but they look identical to these. I also used them to make the Wicked Cake Pops.
Press a wand into the pink buttercream at the front of the cake.
Press the broomstick into the green buttercream on the opposite side. I piped more green buttercream on top of the broom to make sure it didn't fall off.

Place the silver crown on the top of the cake, in the pink buttercream. You may overlap it onto the yellow brick road if you want.

The crown came with a variety of witch hats, but I had already made the black fondant hat, so I used that instead. I am saving the witch hats for another project. If you prefer to skip making the witch hat, you can certainly use the largest size from the kit on your cake.
Place the fondant witch hat on top of the green side of the cake.
Press the plastic cake bubbles into the pink buttercream on the sides and top of the cake.

Lastly, if you want to add pink sugar pearls to the pink side, use tweezers to transfer the pearls to the buttercream.

I placed them in the center of the rosettes.

Lastly, use Everclear or a clear alcohol to brush on the fondant and remove any white powdered sugar. This gives a more professional look.

Storage
Store the cake in the refrigerator. Bring to room temperature before serving to soften the buttercream.
Gluten Free Option
Use your favorite homemade or boxed gluten free cake. This Chocolate Layer Cake is excellent made with measure for measure gluten free flour blend, like Bob's Red Mill.
📖 Recipe
Wicked Birthday Cake
Equipment
- 3 8-inch round cake pans
- 3 Even Bake Cake Strips
- Wooden skewers for cake supports
- disposable piping bags
- #2D piping tip
- 6B piping tip
- round gold cake board
- small fondant rolling pin
- Plastic silver wand
- Plastic bubbles
- Metal silver crown
- Emerald City cardstock cake topper
Ingredients
For the Hat and Broom:
- black rolled fondant
- powdered sugar
For the Cake:
- 3 ounces fine-quality semisweet chocolate (such as Callebaut or Ghirardelli)
- 1½ cups hot brewed coffee
- 3 cups sugar
- 2½ cups all purpose flour (see note)
- 1½ cups unsweetened cocoa powder (not Dutch process)
- 2 teaspoons baking soda
- ¾ teaspoon baking powder
- 1¼ teaspoons salt
- 3 large eggs
- ¾ cup vegetable oil
- 1½ cups well-shaken buttermilk (see note)
- ¾ teaspoon vanilla extract
For the Buttercream:
- 50 tablespoons unsalted butter (softened, see note)
- 25 ounces powdered sugar (see note)
- 5 pinches table salt
- 2½ tablespoons vanilla extract
- 5 tablespoon heavy cream
For the Stabilized Whipped Cream:
- 4 teaspoons cold water
- 1 teaspoon unflavored gelatin
- 1 cup heavy cream
- ¼ cup powdered sugar
- ½ teaspoon vanilla extract
For Cake Assembly and Decor:
- 35.2 ounces Amarena cherries in syrup
- white rolled fondant
- powdered sugar
- yellow (pink and green food coloring gel)
- green rock candy sticks
- pink sugar pearls
- edible silver stars
- edible pink glitter
- edible green glitter
Instructions
Make the Hat and Broom:
- For the hat, roll a piece of parchment paper into a cone shape and secure it with masking tape.
- Roll out some black fondant on a powdered sugar dusted cutting mat with a small fondant rolling pin to an even thickness.
- Roll the fondant around the parchment cone and use a sharp paring knife to trim the excess, pressing together the fondant at the seam.

- Use a large biscuit cutter to cut out a circle for the brim of the hat and press the cone on top to secure.
- Roll out some black fondant into a thin rope and wrap it around the fondant cone to create the layered look of Elphaba's hat.
- For the broom, wrap thinly rolled black fondant around a white drinking straw and cut the straw to fit the desired length of the broom.
- Cut strings of fondant to make the broom bristles and gather them into a bunch, pushing the ends up into the straw and pressing the fondant at the end of the straw around the strings to secure.

- Brush the surface of the hat and broom with a clear alcohol, such as Everclear, to dissolve the sugar and give them a finished appearance.
- Allow the fondant to dry for at least a day before assembling the cake. If you use gum paste instead of fondant, you may not have to wait as long.
Make Cake Layers:
- Preheat oven to 300°F. Spray pans with non-stick baking spray containing flour, such as Pam for Baking, or grease and flour the pans. To ensure the cakes do not stick to the pans, line the bottoms with rounds of parchment paper and grease paper.
- Finely chop chocolate and combine with hot coffee in a bowl. Let the mixture stand, stirring occasionally, until chocolate is melted and mixture is smooth.3 ounces fine-quality semisweet chocolate, 1½ cups hot brewed coffee
- In a large bowl, sift together sugar, flour, cocoa powder, baking soda, baking powder, and salt.3 cups sugar, 2½ cups all purpose flour, 1½ cups unsweetened cocoa powder, 2 teaspoons baking soda, ¾ teaspoon baking powder, 1¼ teaspoons salt
- In the bowl of a stand mixer, beat the eggs until thickened slightly and lemon colored (about 3 minutes with a standing mixer or 5 minutes with a hand-held mixer).3 large eggs
- Add the oil, buttermilk, vanilla, and melted chocolate coffee mixture to eggs and whisk by hand until combined well. If you use a mixer for this step, go slow or the batter will spray out of the bowl.¾ cup vegetable oil, 1½ cups well-shaken buttermilk, ¾ teaspoon vanilla extract
- Fold in the sugar mixture until just combined well. Batter will be very thin.
- Divide batter among the pans and bake in middle of oven until a tester inserted in the center comes out clean, 1 hour to 1 hour and 10 minutes.
- Remove the pans from the oven to a cooling rack. Cool for 15 minutes.
- Run a thin knife around edges of pan and invert layers onto racks. Carefully remove paper, if using, and cool the layers completely. The cake layers may be made 1 day ahead and kept, wrapped well in plastic wrap and then in a resealable gallon bag, at room temperature.
Make the Buttercream:
- In standing mixer fitted with the whisk attachment, beat butter at medium-high speed until smooth, about 20 seconds. NOTE: if using a hand-held mixer, increase mixing times by at least 50%.50 tablespoons unsalted butter
- Add powdered sugar and salt, and beat at medium-low speed until most of the sugar is moistened, about 45 seconds.25 ounces powdered sugar, 5 pinches table salt
- Scrape down bowl and beat at medium speed until mixture is fully combined, about 15 seconds; scrape bowl, add vanilla extract and heavy cream, and beat at medium speed until incorporated, about 10 seconds.2½ tablespoons vanilla extract, 5 tablespoon heavy cream
- Increase speed to medium-high and beat until light and fluffy, about 4 minutes, scraping down bowl once or twice.
- Use immediately or store in refrigerator. If refrigerated, allow frosting to come to room temperature before use.
Make the Whipped Cream:
- Add the water to a microwave safe bowl and sprinkle the gelatin on top. Allow to sit for 3 to 4 minutes.4 teaspoons cold water, 1 teaspoon unflavored gelatin
- Microwave the gelatin for just a few seconds until fully dissolved. Stir the mixture then strain through a fine mesh strainer into a clean bowl and set aside to cool slightly.
- Combine the cream, powdered sugar and vanilla in the bowl of a stand mixer fitted with the whisk attachment. Beat the mixture until soft peaks form, then turn the mixer to low speed.1 cup heavy cream, ¼ cup powdered sugar, ½ teaspoon vanilla extract
- Pour the gelatin mixture into the mixer slowly. Increase speed to medium and beat until stiff peaks form.
Assemble the Cake:
- Fill a piping bag with the tip cut off with vanilla buttercream.
- Place a round cake board on top of a spinning cake stand. Place pieces of waxed paper round the bottom edges of the board. Smear some buttercream in the center and place the first cake layer on top.
- Pipe a border of buttercream around the top perimeter of the cake. This will serve as a barrier to prevent the whipped cream filling from spilling out the sides under the weight of the next 2 cake layers.

- Add the whipped cream inside the border in an even layer.
- Place the chopped cherries on top of the whipped cream with some of the syrup.35.2 ounces Amarena cherries in syrup
- Stack the second cake layer on top.

- Repeat the process with the buttercream border and filling.

- Place the final cake layer on top. Insert 3 wooden skewers into the cake so the layers do not slide. Make sure the skewers are about 1 inch shorter than the cake because will settle and compress, becoming shorter.
- Add a crumb coat of buttercream using an offset spatula and a metal cake scraper while spinning the cake stand. A thicker layer is preferred here.
- Set the cake aside, at room temperature, to make the yellow brick road.
Make the Yellow Brick Road:
- Wearing food safe nitrile gloves, tint some white fondant with yellow food coloring gel by working the gel into the fondant with your hands.
- Roll the fondant out using a small fondant rolling pin with guides to achieve an even thickness. Measure the height and diameter of your assembled cake with a ruler to know how long and wide to make the road. You will overlap the sides of the road with piped buttercream, but you want to make sure it's wide enough for the full effect.

- Use a pastry wheel or sharp paring knife to make parallel horizontal lines down the entire length of the road.
- Use a sharp paring knife to make the offset vertical lines to create an offset brick pattern.

- Drape the fondant over the top and front side of the cake, pressing down gently to adhere it to the buttercream.

Make the W:
- Print out a W in black and white from the Wicked: For Good logo on a piece of white cardstock. Make sure to measure how wide your yellow brick road is before deciding on a size of the W, taking into account that you will be piping buttercream onto the sides of the road. Cut out the W with scissors.

- Roll some black fondant out in a thin layer.
- Place the black W stencil on top and use a sharp paring knife to cut around the stencil.

- To adhere the W to the yellow brick road, use royal icing or buttercream and press the W while holding to ensure it will stick.

Decorate the Cake:
- Divide the remaining buttercream into each of two bowls. Tint one with green food coloring gel and the other with pink. Transfer the colored buttercream to disposable piping bags fitted with large star tips. I used a #6B for the green buttercream and a #2D for the pink.

- Pipe on the green buttercream on the left side of the cake and the pink on the right. The Wicked logo sometimes has the colors reversed, so it's up to you which color goes on which side.
- Sprinkle the green side with edible green glitter and the pink side with edible pink glitter, if desired.
- Place the Emerald City cardstock cut out toward the back of the yellow brick road, facing the front of the cake.

- Insert rock candy behind the Emerald city.

- Press the broomstick into the green buttercream on the opposite side. I piped more green buttercream on top of the broom to make sure it didn't fall off.

- Place the fondant witch hat on top of the green side of the cake.

- Press a silver wand into the pink buttercream at the front of the cake.

- Place the silver crown on the top of the cake, in the pink buttercream. You may overlap it onto the yellow brick road if you want.
- Press the plastic cake bubbles into the pink buttercream on the sides and top of the cake.

- If you want to add pink sugar pearls to the pink side, use tweezers to transfer the pearls to the buttercream.

- To finish the cake, use Everclear or a clear alcohol to brush on the fondant yellow brick road and W to remove any white powdered sugar. This gives a more professional look.

Susan G says
As one who was luckily enough to eat this cake, I can tell you it is delicious. Just reading how to make this cake give me great admiration to the baker. She loves her girls so much to do this for them on their birthdays.
Meghan says
Aw thank you!!