
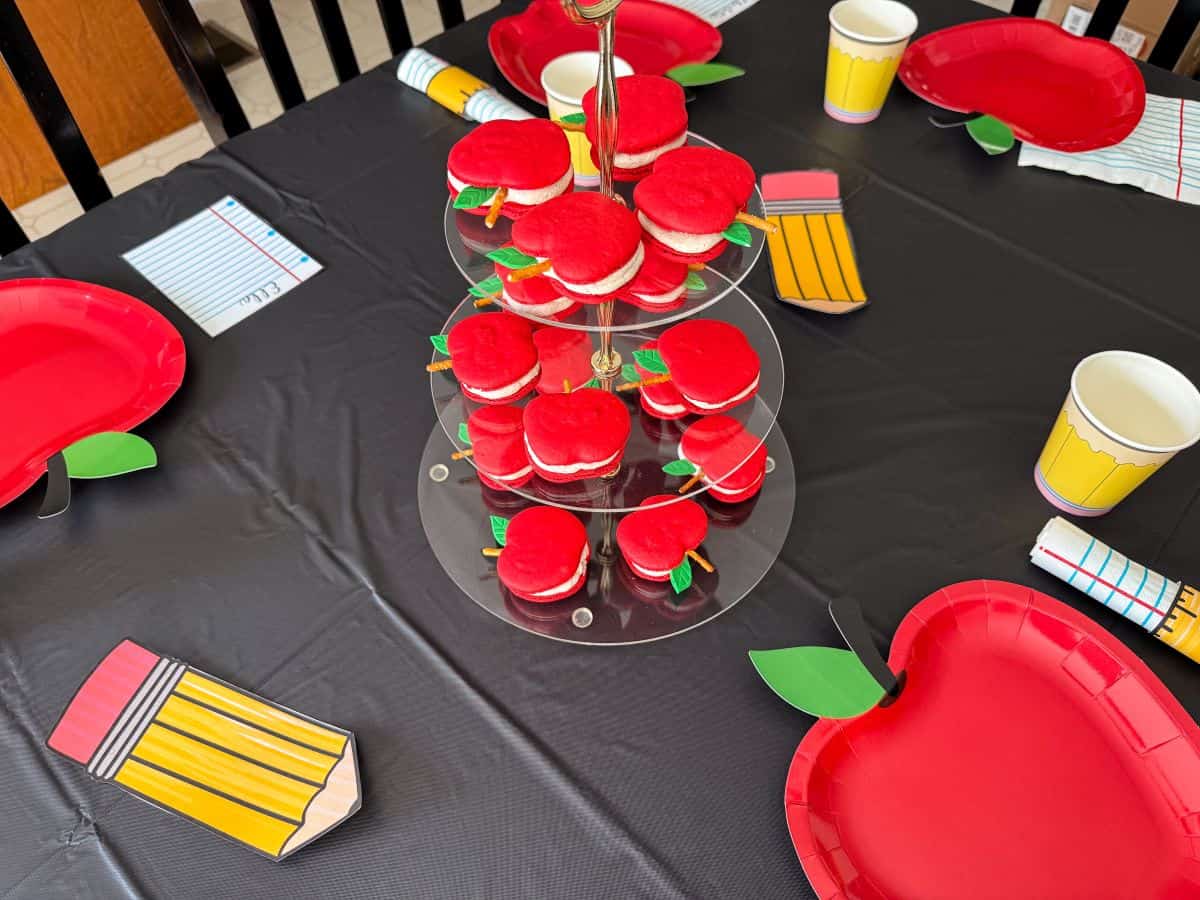
These allergy friendly Gluten Free and Nut Free Caramel Apple Cider Macarons are the perfect way to celebrate a new school year. They also make the best teacher gift.

Each year on the first day of school, I make a special Back to School treat for my girls as an after school snack. It started with an annual School Bus Cake and has now evolved into a new treat each year.
Previous years have included Apple Shaped Cupcakes, 3D Apple Shaped Cake, Chalkboard Brownies, Pencil and Ruler Wafer Cupcakes, and a Pencil Cake.
Since I have been making Nut Free French Macarons for just about every event in the last year, from Grinch Macarons to Gold Macarons with Rainbow Filling, I thought an apple shaped macaron would be fitting for this year!
I saw these adorable apple shaped macarons from Pies and Tacos on Pinterest and thought they would be perfect.
She separately colors and pipes the stems and leaves for her macarons. With macaron batter being notoriously finicky, I worried about piping and baking the tiny details.
I saw a photo of an apple macaron from the cookbook Gourmet French Macarons that used a thin pretzel stick for the stem and a green fondant leaf. This is the same concept from the Apple Cake Pops, so I went with that method for decorating.
Of course, due to my nut allergy, I started with a nut free macaron shell. I use certified gluten free oat flour to keep them completely allergy friendly.
I typically use Easy Vanilla Buttercream for the filling in my macarons, but I wanted these to have an apple flavor. I made an apple cider buttercream to use as a dam to contain a caramel apple filling.
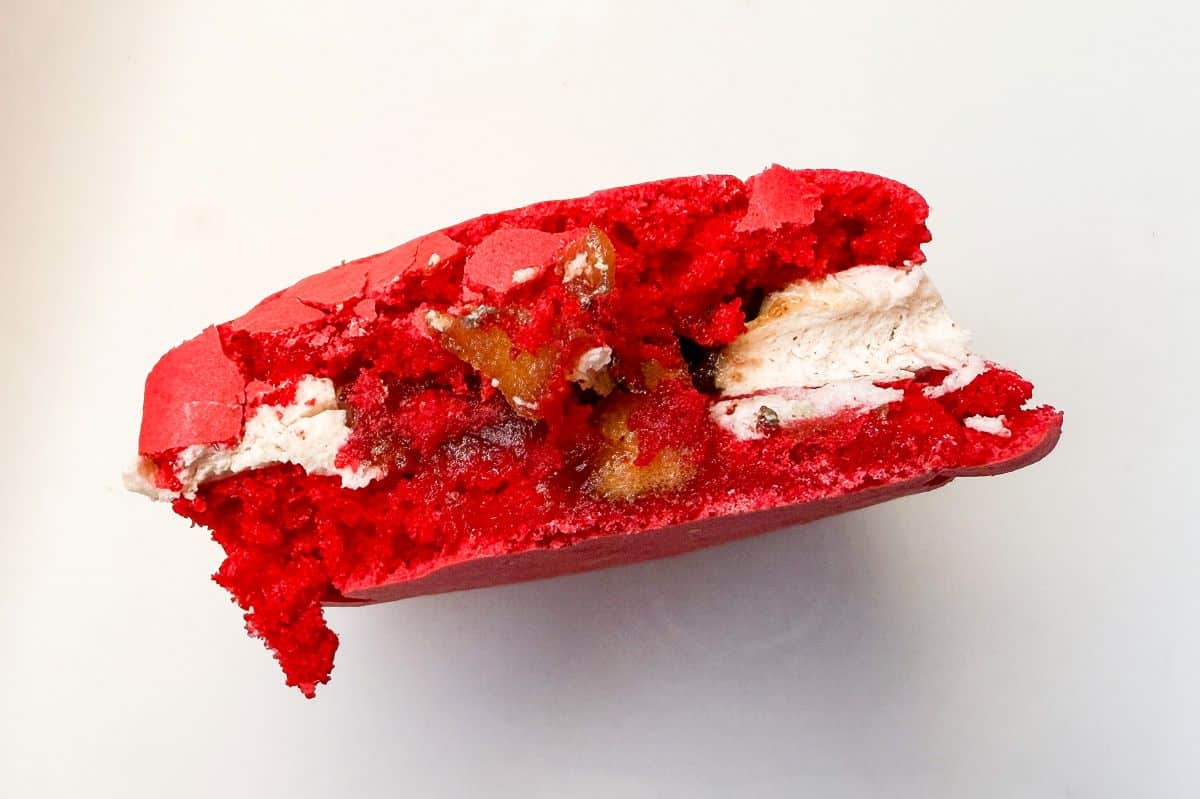
These macarons were bursting with fall flavor! They tasted just like a delicious caramel apple pie!
Jump to:
Supplies
Other than the ingredients for the macaron shells, filling and buttercream, you will need:
- white rolled fondant or gum paste
- green food coloring gel, such as AmeriColor
- small fondant rolling pin
- paring knife
- 4 macarons mats or parchment paper
- 4 half sheet pans or cookie sheets
- 2 printed apple macaron templates
- medium sized round tip like #12
- plastic tip coupler
- disposable piping bags
- piping bag holders or a tall drinking glass
- red food coloring gel, such as ChefMaster
- thin pretzel sticks
Make the Leaves

Tint the white fondant or gum paste with green food coloring gel. It helps to wear food-safe nitrile gloves and work the coloring into the fondant or gum paste.

Roll the fondant into a thin even layer with a small fondant rolling pin on a cutting mat lightly dusted with powdered sugar to prevent sticking.

Use a sharp paring knife to cut out small leaf shapes, measuring about ½ to ¾-inch in length. Lightly press the knife into the top of the leaves to make vein patterns.

Allow the leaves to dry at room temperature while you make the macarons. Alternatively, make them in advance and store them in an airtight container at room temperature until ready to use.

Prepare the Mats
In order to evenly pipe the apple shaped macaron shells, I recommend printing two sheets of apple macaron templates from Pies and Tacos.
Place the macaron mats (or parchment paper) on top of upside down half baking sheets. Slide the apple templates underneath the mats. I just printed two templates and moved them to each new tray after piping the shells.

I only have 2 macaron mats, so I assembled 2 trays with the mats and 2 trays with parchment paper, for a total of 4 trays to bake approximately 40 shells.

Bake the Shells
One of my biggest tips for making macaron shells is to be organized and have everything prepped because the process can go fast and is time-sensitive.
Before starting on the batter, place a medium round tip, like a #12, in a disposable piping bag. I always use a plastic tip coupler to keep the tip in place. Fold over the top of the bag and place it in a tall glass or in a piping bag holder so it will be easy to fill with the prepared batter. Twist the bag above the tip and secure with a small binder clip so the batter won't flow out the tip when you fill the bag. I also place at tip cap, like these, on mine so I can re-cap it between trays. Set this aside.
I used Chefmaster super red food coloring gel for my shells. Although I usually stick with red no-taste gel for buttercream and other recipes that use large quantities of red, I did not notice an off taste with these shells. You definitely want to use a gel rather than a liquid, so as not to disrupt the delicate balance that is macaron batter.

Another one of my tips for macaron batter is weighing the ingredients in grams. For this reason, I do not provide cup measurements.
French macarons are notoriously finicky and require precise measurements. Even when ingredients are measured, many people struggle to make macaron shells. I find that practice is the key, as you will gain an understanding of how long the steps take in your kitchen with your equipment and you will be able to tell visually what the batter looks and feels like when it's ready to pipe.
Many factors are at play, including the temperature and humidity of your work space. I even find that my shells take longer to dry in the summer months than in the winter. That being said, allow extra time and have extra ingredients on hand if this is your first time making macarons.
To begin, sift together the oat flour and the powdered sugar in a medium-sized bowl, then whisk to combine them completely. Set this bowl aside.

I recommend using cracked whole eggs, not store bought egg whites. You need 100 grams of egg whites for this recipe, which is the equivalent to the whites of approximately 3⅓ large eggs, meaning you will likely need to crack and separate 4 eggs.
Place the egg whites in the bowl of a stand mixer fitted with the whisk attachment.

Beat the whites on medium-high speed until frothy. Add the cream of tartar, then slowly add the granulated sugar, one spoonful at a time, with the mixer still running.
Add the vanilla extract and the red food coloring gel until a deep, bright red color is achieved.

Continue to beat the mixture until the meringue forms stiff peaks. The color will deepen slightly when the oat flour mixture is added due to the natural color of oats.

Remove the bowl from the mixer.
The process of folding the dry ingredients into the meringue is called macaronage. For oat flour macarons, you want to undermix the batter compared to traditional almond flour macarons.
With traditional macarons, you want the batter to flow like a ribbon off the spatula, but with oat flour macarons the batter will fall in clumps. If you overmix, the batter will be too thin, and the shells won't have the proper structure. It is better to slightly undermix the batter than to overmix.
Using a large rubber spatula, carefully fold ⅓ of the flour/powdered sugar mixture into the meringue.

Then, add the remaining ⅔ of the flour mixture. Continue folding until the ingredients are fully incorporated and the batter falls off the spatula in clumps, just before you reach the figure 8 stage. See my Nut Free French Macarons recipe for more details.
Once the batter is the proper consistency, immediately transfer it to the prepared piping bag.

I like to seal off the tip with a tip cap and keep the bag closed using a small binder clip.

Pipe the batter into apple shapes on the first tray using a V-shaped motion. I highly recommend watching Pies and Tacos video on how she pipes these apple shaped macaron shells. Although she uses traditional almond flour macaron batter, the piping technique is the same.
Once the batter has been piped on a full tray, slam the tray down hard on the counter or a table several times to force any air bubbles to the surface. If desired, take a toothpick and pop large bubbles then smooth out the hole left after the bubble pops. You can recap your tip between trays to prevent the batter from spilling out.

Remove the macaron templates from underneath the mat of the first tray and slide them under the mat of the second tray. Repeat the piping and slamming process and then do the same with the remaining 2 trays.

Allow the batter to dry at room temperature for 40 minutes. Meanwhile, preheat the oven to 300°F.
The shells are ready to bake when the batter is no longer wet and sticky. You can carefully touch a shell with your index finger to see if it sticks or if there is a nice film on the surface. As I mentioned before, the dry time is affected by your kitchen's temperature and humidity, so go by how they look and feel rather than the time.

Bake the shells, one sheet at a time, for about 12-14 minutes, rotating the pan half way through.

If your batter was properly mixed and dried, the shells should puff up nicely and have the classic macaron "feet."

Allow the shells to cool completely on the mats before removing them.
To remove them more easily, push up on the mat from underneath to help them pop off. If you have trouble with them sticking, that may mean they are underbaked.
Some of the shells in the center of the tray may have a little bit of sticking depend on how evenly your oven heats. Very carefully use a stiff metal spatula to pry them off the mat, taking care not to rip the shells.
Make the Caramel Apple Filling
To make the filling, you will need to chop your apples very small. They do shrink down some during cooking, but consider the small space of a single macaron shell, which is made smaller with a buttercream border.

Sprinkle the tiny apple pieces with lemon juice. Prepare the dry ingredients in a separate bowl.

Add the dry ingredients to the apples, toss, then add the vanilla and cream. Set the apple mixture aside.

Melt the butter in a skillet.

Add the apple mixture and cook approximately 8-10 minutes, until the apples are soft and the liquid has turned golden.

Combine the cornstarch and water in a small bowl. Add to the apple mixture and stir, continuing to cook until thickened.

Allow filling to cool to room temperature or chill to cool.

Make the Apple Cider Buttercream
I once saw a contestant on Holiday Baking Championship use apple cider drink mix in buttercream and thought it was such a great idea. It sounded like a way to get concentrated cider flavor quickly, without the time consuming process of reducing a large quantity of liquid cider.

Rather than dissolving a packet of cider drink mix in the recommended 8 ounces of boiling water, I used just 1 tablespoon. This gave a very strong cider almost like a reduction.
Because the drink mix contains sugar, I scaled pack on the powdered sugar in my buttercream recipe. I eliminated the vanilla to avoid adding too much liquid, and I added extra cinnamon to bump up the apple cider flavor.

I followed the exact same method as my favorite American buttercream recipe, which produces a light and fluffy whipped frosting.

Fill and Decorate
As with all macaron recipes, I recommend pairing up your macarons by size before starting to fill so you can most closely match the top and bottom of the sandwich cookie together.
Filling these macarons is a 2 step process: piping a buttercream dam and spooning in the apple filling.
I piped the buttercream dam on the flat side of the bottom shell using a disposable piping bag fitted with a medium-sized round #12 tip.

I carefully spooned some caramel apple mixture in the center of the macaron shell.

I repeated this process with several macarons at a time.

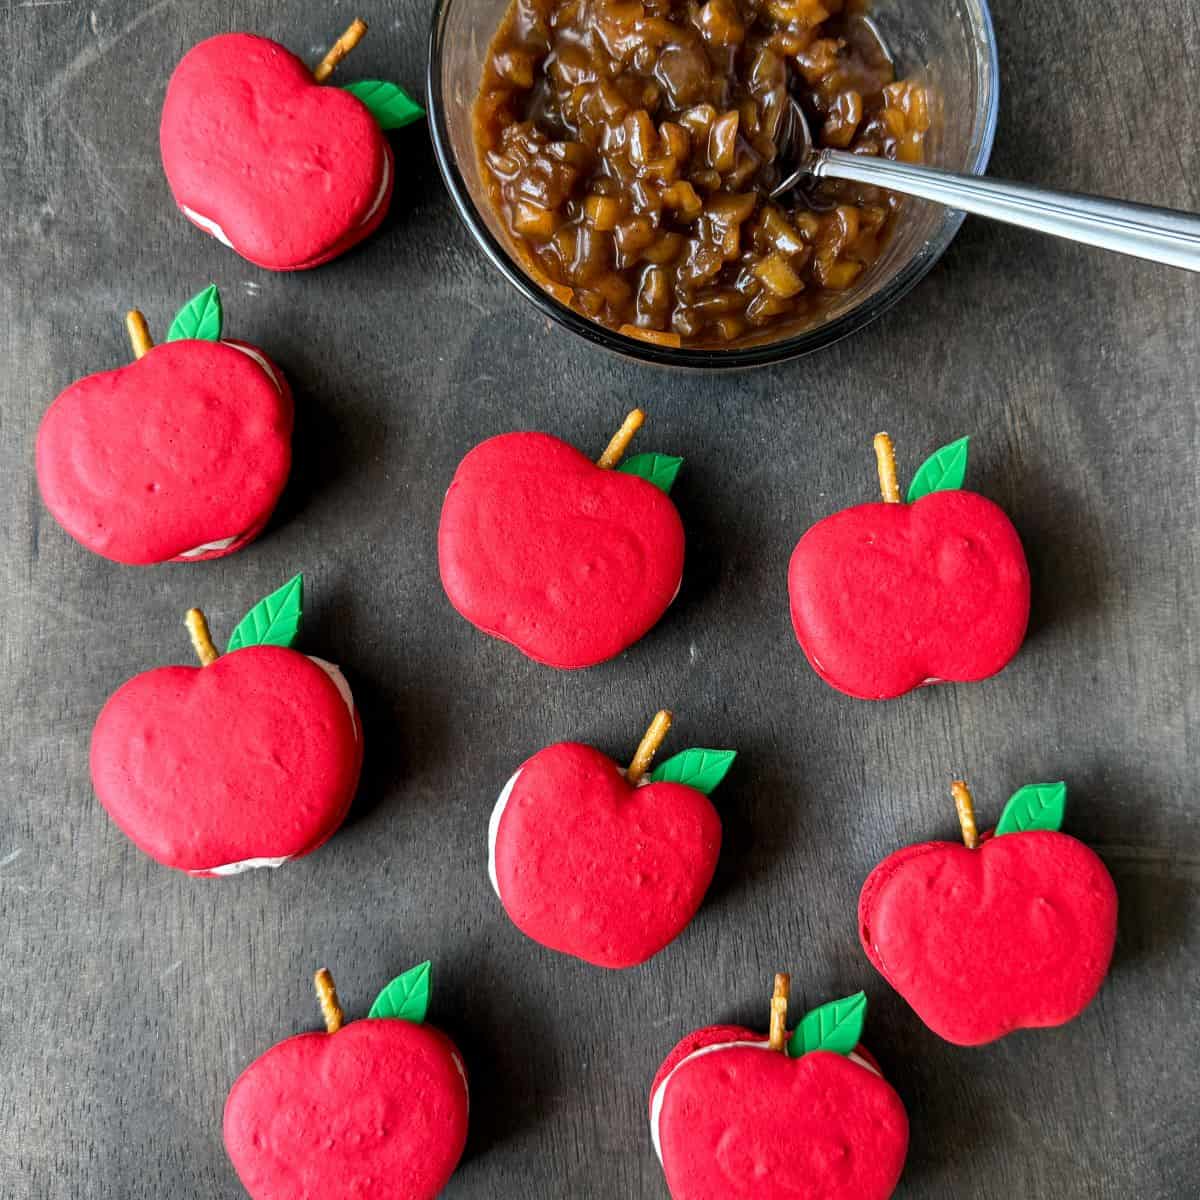
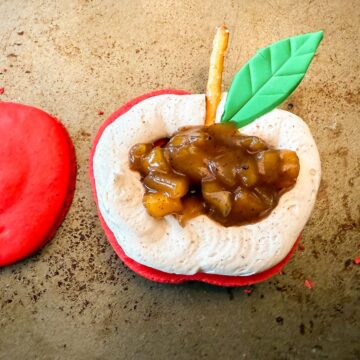
Then, I added a little pretzel stick stem and fondant leaf into the buttercream at the top of the shell.

You will have buttercream and filling leftover. The filling is great warmed up and spooned over ice cream, pancakes or waffles. You can even add it to yogurt or oatmeal.
Storage
Store the assembled cookies in an airtight container in the refrigerator for several days. Allow the cookies to come to room temperature before serving to soften the buttercream.
Assembled macarons can be stored in the freezer for a longer period of time.
Gluten Free Option
Use gluten free pretzel sticks and certified gluten free oat flour to make these entirely gluten free. Check the packaging on your ingredients for possible gluten contaminates.
📖 Recipe

Nut Free Caramel Apple Cider Macarons
Equipment
- 4 half baking sheets or cookie sheets
- 4 macaron mats or parchment paper
- 2 apple macaron templates see note
- 1 small fondant rolling pin
- 1 medium round tip such as #12
- disposable piping bags
Ingredients
For the Fondant Leaves:
- white rolled fondant or gum paste
- green food coloring gel
For the Macaron Shells:
- 126 grams oat flour
- 126 grams powdered sugar
- 100 grams egg whites (see note)
- ¼ teaspoon cream of tartar
- 90 grams granulated sugar
- 1 teaspoon vanilla extract
- red food gel
For the Apple Filling:
- 4 small apples (chopped small into about 2 cups)
- ½ tablespoon lemon juice
- ½ cup dark brown sugar
- 1 teaspoon cinnamon
- ⅛ teaspoon nutmeg
- ¼ teaspoon sea salt
- ½ teaspoon vanilla
- 2 tablespoons heavy cream
- 2 tablespoons butter
- 1 teaspoon cornstarch
- 4 teaspoons water
For the Buttercream:
- 1 packet instant apple cider mix (0.74 ounce packet)
- 1 tablespoon boiling water
- 10 tablespoons butter (softened to room temperature)
- ½ - 1 teaspoon cinnamon
- ⅛ teaspoon salt
- 4 ounces powdered sugar
- ½ tablespoon heavy cream
For Decorating:
- 20 thin pretzel sticks (broken into ¾-inch pieces)
Instructions
Make the Fondant Leaves:
- Wearing food grade disposable gloves, work green food coloring gel into white rolled fondant or gum paste until desired color is achieved.

- Roll the fondant into a thin even layer with a small fondant rolling pin on a cutting mat lightly dusted with powdered sugar to prevent sticking.

- Use a sharp paring knife to cut out small leaf shapes, measuring about ½ to ¾-inch in length. Lightly press the knife into the top of the leaves to make vein patterns.

- Allow the leaves to dry at room temperature while you make the macarons.

Make the Macaron Shells:
- Place the macaron mats or parchment paper on top of upside down half baking sheets. Slide the apple templates underneath the mats.

- Place a large round tip, like a #12, in a disposable piping bag. Fold over the top of the bag and place it in a tall glass or in a piping bag holder so it will be easy to fill with the batter. Set this aside.
- Sift together the oat flour and the powdered sugar in a medium-sized bowl, then whisk to combine them completely. Set this bowl aside.126 grams oat flour, 126 grams powdered sugar
- Place the egg whites in the bowl of a stand mixer fitted with the whisk attachment and beat on medium-high until frothy. Add the cream of tartar, then slowly add the granulated sugar, one spoonful at a time, with the mixer still running.100 grams egg whites, ¼ teaspoon cream of tartar, 90 grams granulated sugar

- Add the vanilla extract and the red food coloring gel until a deep, bright red color is achieved. Continue to beat the mixture until the meringue forms stiff peaks. Remove the bowl from the mixer.1 teaspoon vanilla extract

- Using a rubber spatula, carefully fold ⅓ of the flour/powdered sugar mixture into the meringue. Then add the remaining ⅔ of the flour mixture and continue folding until the ingredients are fully incorporated and the batter falls off the spatula in clumps, just before you reach the figure 8 stage. See note about macaronage.

- Once the batter is the proper consistency, transfer it to the prepared piping bag.

- Pipe the batter into apple shapes on the first tray using a V-shaped motion. See note. Once the batter has been piped on a full tray, slam the tray down hard on the counter or a table several times to force any air bubbles to the surface. If desired, take a toothpick and pop large bubbles then smooth out the hole left after the bubble pops.

- Remove the macaron templates from underneath the mat of the first tray and slide them under the mat of the second tray. Repeat the piping and slamming process and then do the same with the remaining 2 trays. Make sure to remove the templates from the final tray!

- Allow the batter to dry at room temperature for 40 minutes. Meanwhile, preheat the oven to 300°F.

- Bake the shells, one sheet at a time, for about 12-14 minutes, rotating the pan half way through.

- Allow the shells to cool completely on the mats before removing them. To remove more easily, push up on the mat from underneath to help them pop off. If you have trouble with them sticking, that may mean they are underbaked. Some of the shells in the center of the tray may have a little bit of sticking. Very carefully use a stiff metal spatula to pry them off the mat, taking care not to rip the shell.

- The cooled shells can be stored in a single layer in an airtight container in the refrigerator or freezer, or you can fill them immediately. If you must stack them to store, separate them with layers of parchment paper so they don't stick together.
Make the Filling:
- Sprinkle the apples with lemon juice.½ tablespoon lemon juice, 4 small apples
- Combine dry ingredients in large bowl.½ cup dark brown sugar, 1 teaspoon cinnamon, ⅛ teaspoon nutmeg, ¼ teaspoon sea salt
- Add the apples to the dry ingredients and toss to mix. Add the vanilla and cream and mix thoroughly. Set aside.½ teaspoon vanilla, 2 tablespoons heavy cream

- Melt the butter in a skillet.2 tablespoons butter

- Add the apple mixture and cook approximately 8-10 minutes, until the apples are soft and the liquid has turned golden.

- Combine the cornstarch and water in a small bowl. Add to the apple mixture, stir and continue to cook for a few minutes until thickened.1 teaspoon cornstarch, 4 teaspoons water
- Cool the filling, either at room temperature or in the refrigerator, and use immediately or store in the fridge for up to a week.
Make the Buttercream:
- Dissolve the apple cider drink mix in the boiling water. Allow to cool.1 packet instant apple cider mix, 1 tablespoon boiling water
- In a stand mixer fitted with the whisk attachment, beat butter, cinnamon and salt at medium-high speed until smooth, about 20 seconds. NOTE: If using a hand-held mixer, increase mixing times by at least 50%.10 tablespoons butter, ½ - 1 teaspoon cinnamon, ⅛ teaspoon salt
- Add the powdered sugar and beat at medium-low speed until most of the sugar is moistened, about 45 seconds.4 ounces powdered sugar
- Scrape down bowl and beat at medium speed until mixture is fully combined, about 15 seconds; scrape bowl, add the heavy cream, and beat at medium speed until incorporated, about 10 seconds.½ tablespoon heavy cream
- Increase speed to medium-high and beat until light and fluffy, about 4 minutes, scraping down bowl once or twice. This step is important to create a smooth and whipped buttercream.

Assemble the Macarons:
- Add the buttercream to a disposable piping bag fitted with a medium-sized round tip, such as #12.

- Pair up the macaron shells by size so the top and bottom of each sandwich will match.
- Pipe a dam of buttercream around the edge of the flat side of each bottom shell. Spoon a small amount of apple filling inside the buttercream dam. You will have buttercream and filling leftover.

- Place a single pretzel stick into the buttercream at the top of the macaron to represent the apple stem. Place a fondant leaf into the buttercream next to the pretzel stick.
- Place the top shells on top and press down slightly by holding onto the outer edges of the shells. Take care not to crush the shells.

- Refrigerate the assembled macarons until ready to serve. For best texture and flavor, allow the macarons to come to room temperature before enjoying. Macarons can be frozen in an airtight container.


Leave a Reply