
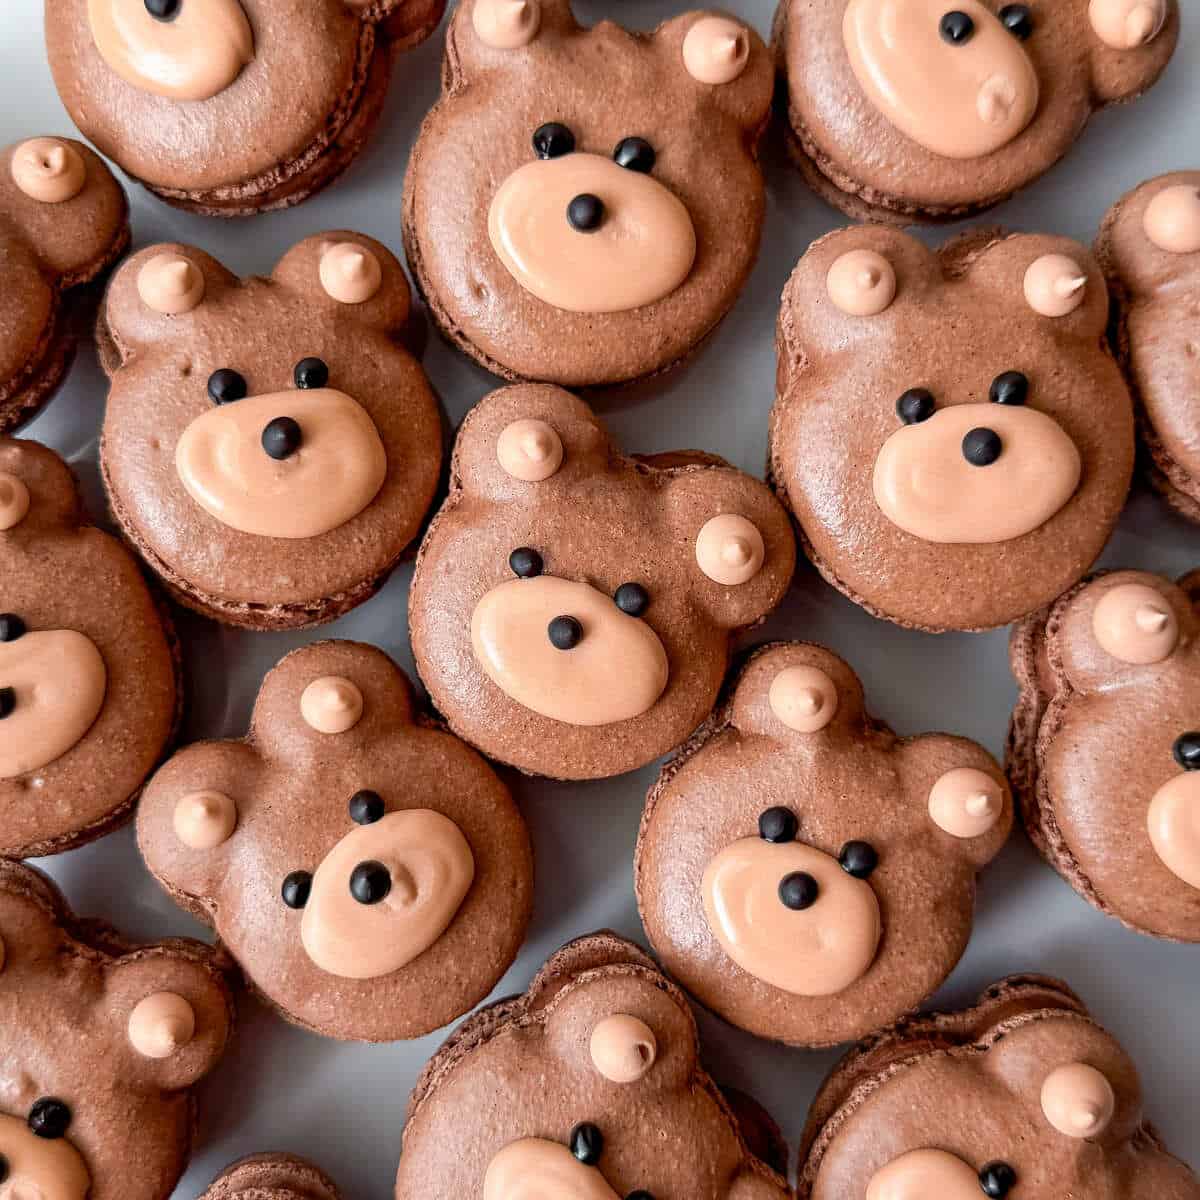
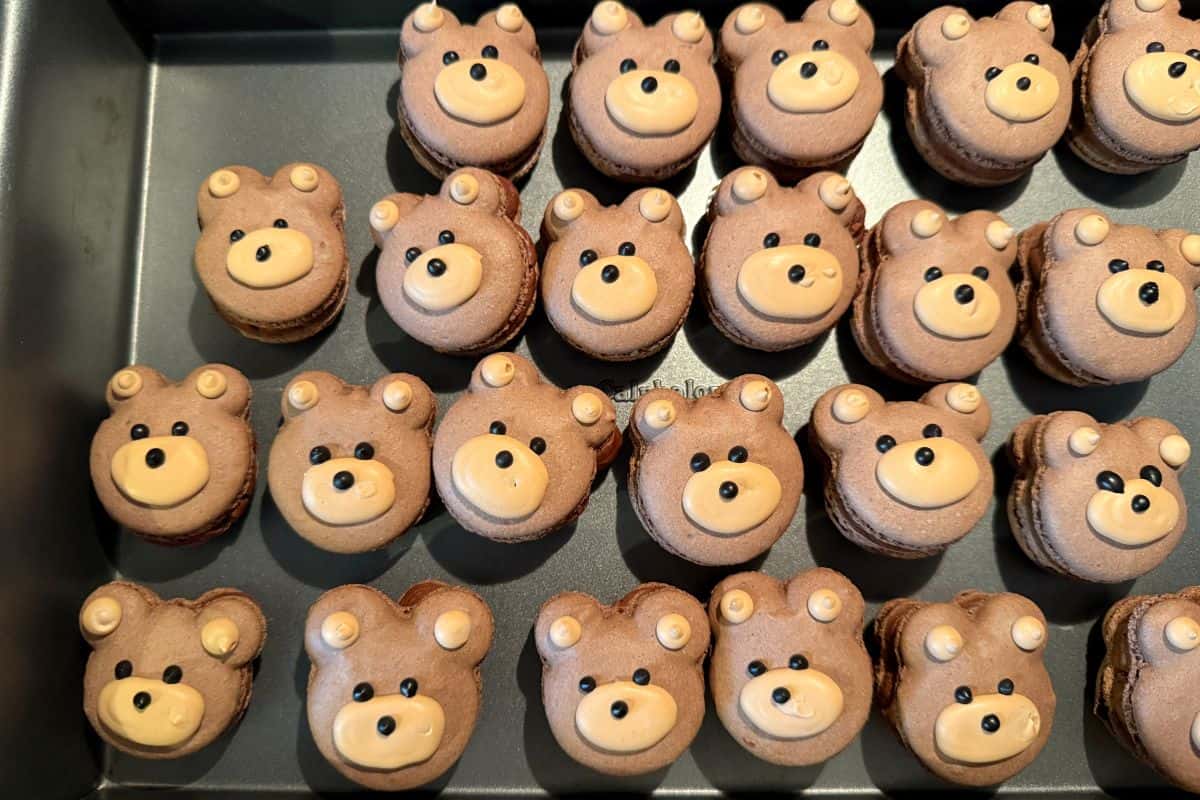
These adorable Nut Free Chocolate Teddy Bear Macarons are French chocolate macarons filled with chocolate ganache. Both nut free and gluten free, they are allergy friendly being made with oat flour instead of almond flour. They can be displayed on a dessert table at a Teddy Bear birthday or baby shower or used as a cupcake topper or party favor.
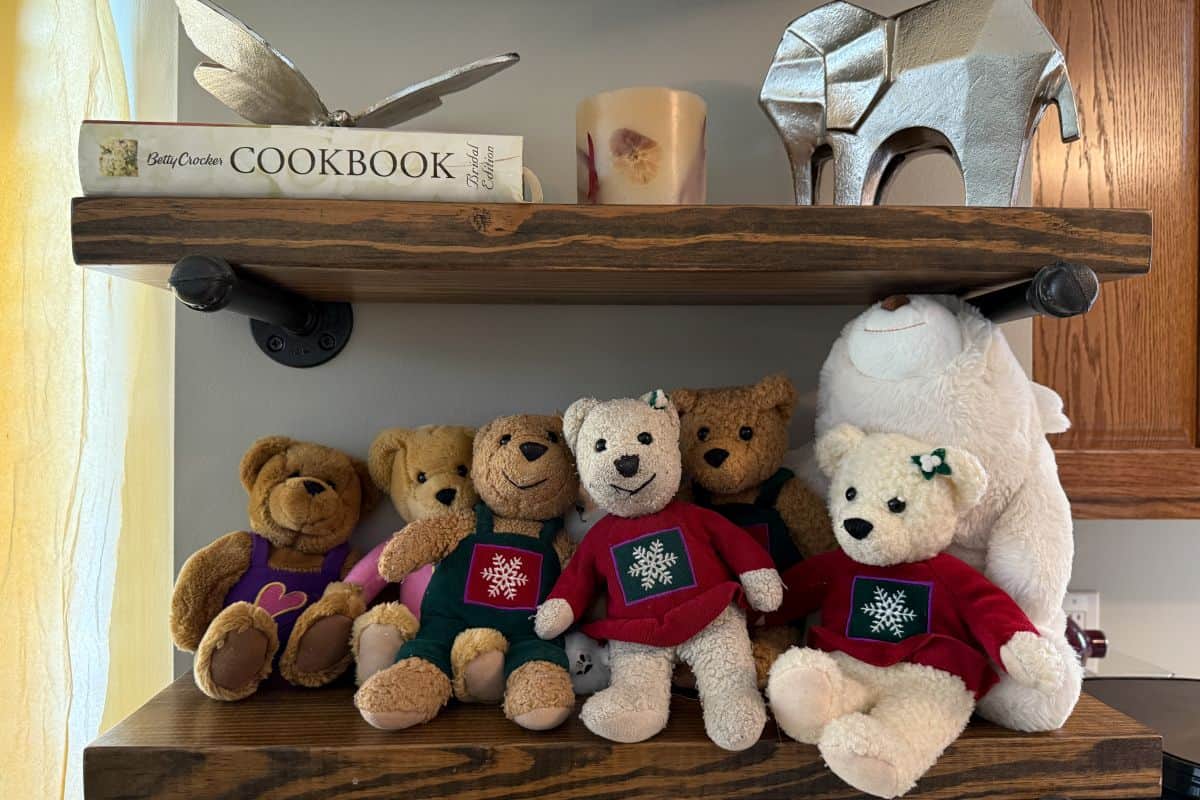
My daughter has a set of Hallmark Kiss Kiss Bears that my good friend gifted to me in college. She started carrying around the white bear, the girl she calls "Huggie," when she was 18 months old and has never looked back. The brown bear is a boy she calls "Brown Hug."
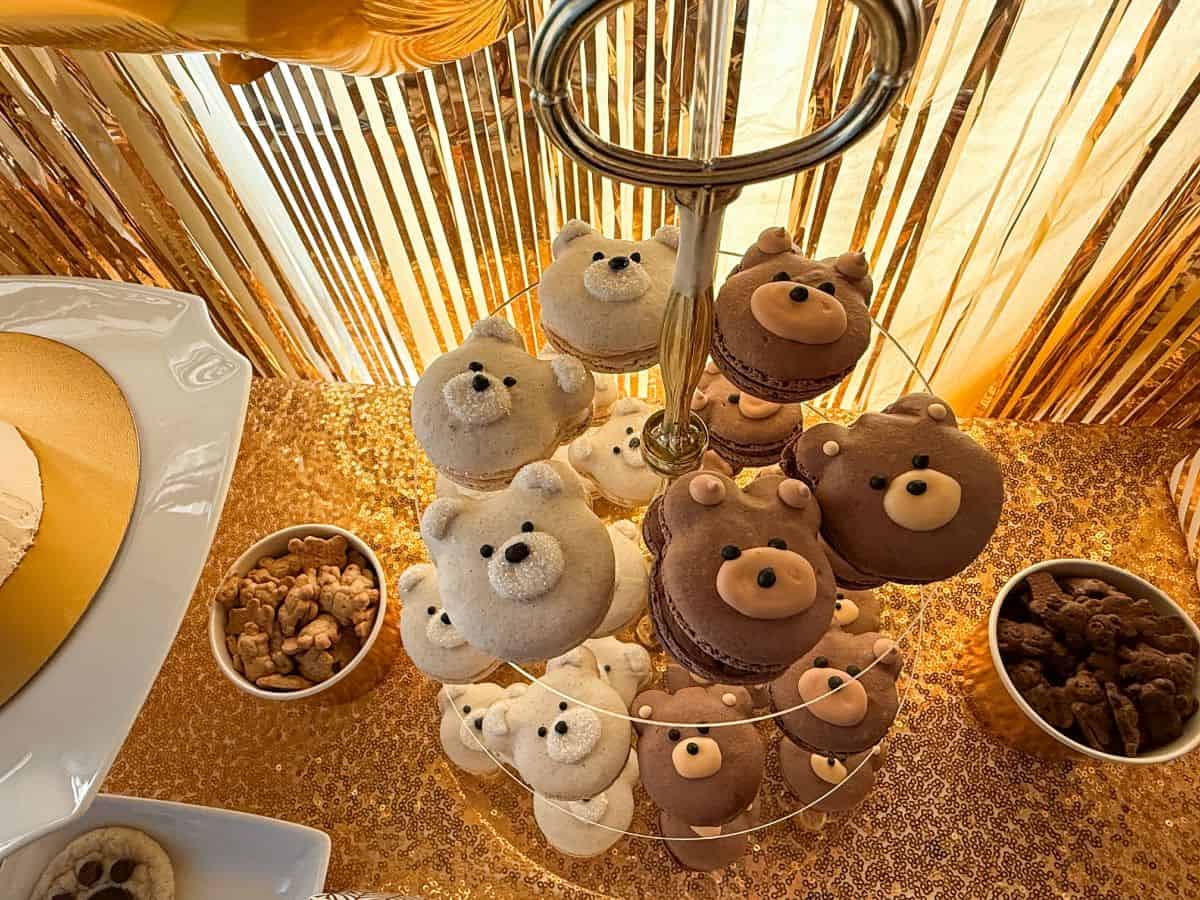
Her 9th birthday was also her Golden Birthday, and she wanted a teddy bear theme.
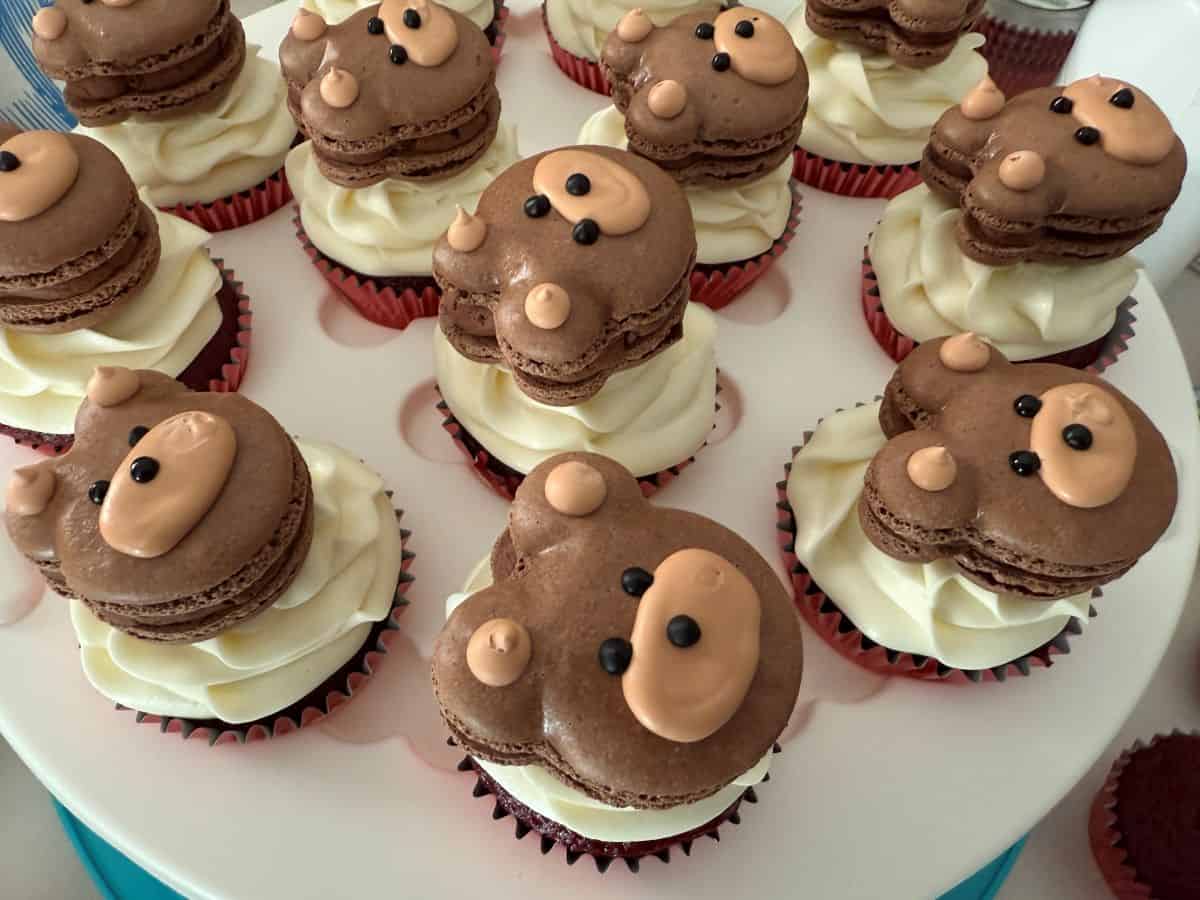
For her friend party, she wanted red velvet cupcakes with Easy Cream Cheese Frosting. I decided to make chocolate Teddy Bear Macarons to use as a cupcake topper.

For her family party, I did a dessert table in honor of her two stuffed bears, with one side of the table featuring polar bear treats and the other teddy bear confections.
These included a Polar Bear Cake, Polar Bear Cookies, Polar Bear Paw Cookies, Polar Bear Cake Pops, Golden Teddy Bear Chocolate Covered Oreos, Chocolate Bear Paw Cookies, Teddy Bear Cookies, Teddy Bear Cake Pops and a Teddy Bear Cake.
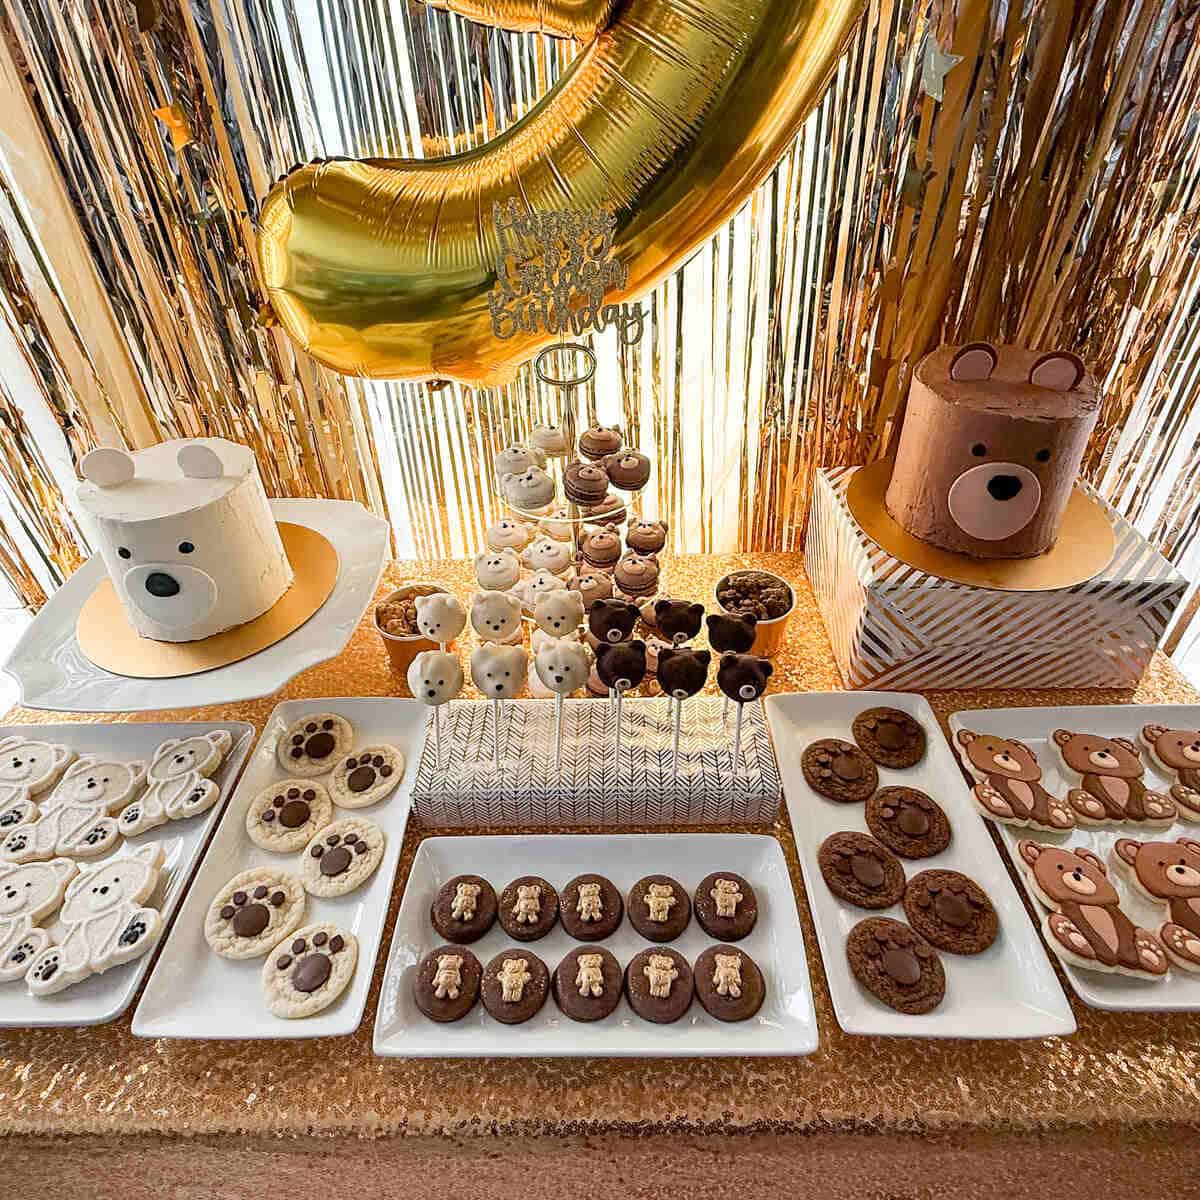
I displayed these Chocolate Teddy Bear Macarons next to the vanilla flavored Polar Bear Macarons on a 3-tiered server in the center of the dessert table.

The Teddy Bear Macarons are made with chocolate shells and filled with chocolate ganache. You could use any flavor of filling that you prefer.

These were cute and delicious!
Jump to:
Supplies
Other than the ingredients for the shells and ganache, you will need:
- digital kitchen scale
- 2 macaron mats or parchment paper
- 2 half sheet pans
- disposable piping bags
- medium round tip, like #12
- plastic tip coupler
- 1 batch Easy Royal Icing
- tan or brown food coloring gel
- small round tip like Wilton #5
- black royal icing powder or gel
Make the Chocolate Macaron Shells
In order to make these shells chocolate, I did some research into how to add cocoa powder to macaron batter without affecting the delicate balance that is required for perfect shells.
As nut free oat flour macarons are already more finicky than traditional almond flour macarons, adding cocoa to the mix makes this batter even harder to work with. Some of my shells, but not all, ended up with cracks.
The batter was a little sticky, which made it harder to pipe. This could be because I used 10 grams more sugar than with Nut Free French Macarons, so it might be best to go back to the original amount. I have reflected that in the recipe card.
The result can be affected by the season, temperature and humidity. Even though I'm obviously making the shells indoors year-round, I find that they are different in the winter than in the summer.
My recommendation is to make more shells than you need so you can choose the best ones to decorate. You may even want to make a small batch of shells as a test and then another one if that works, rather than waste ingredients on a large batch that does not turn out.
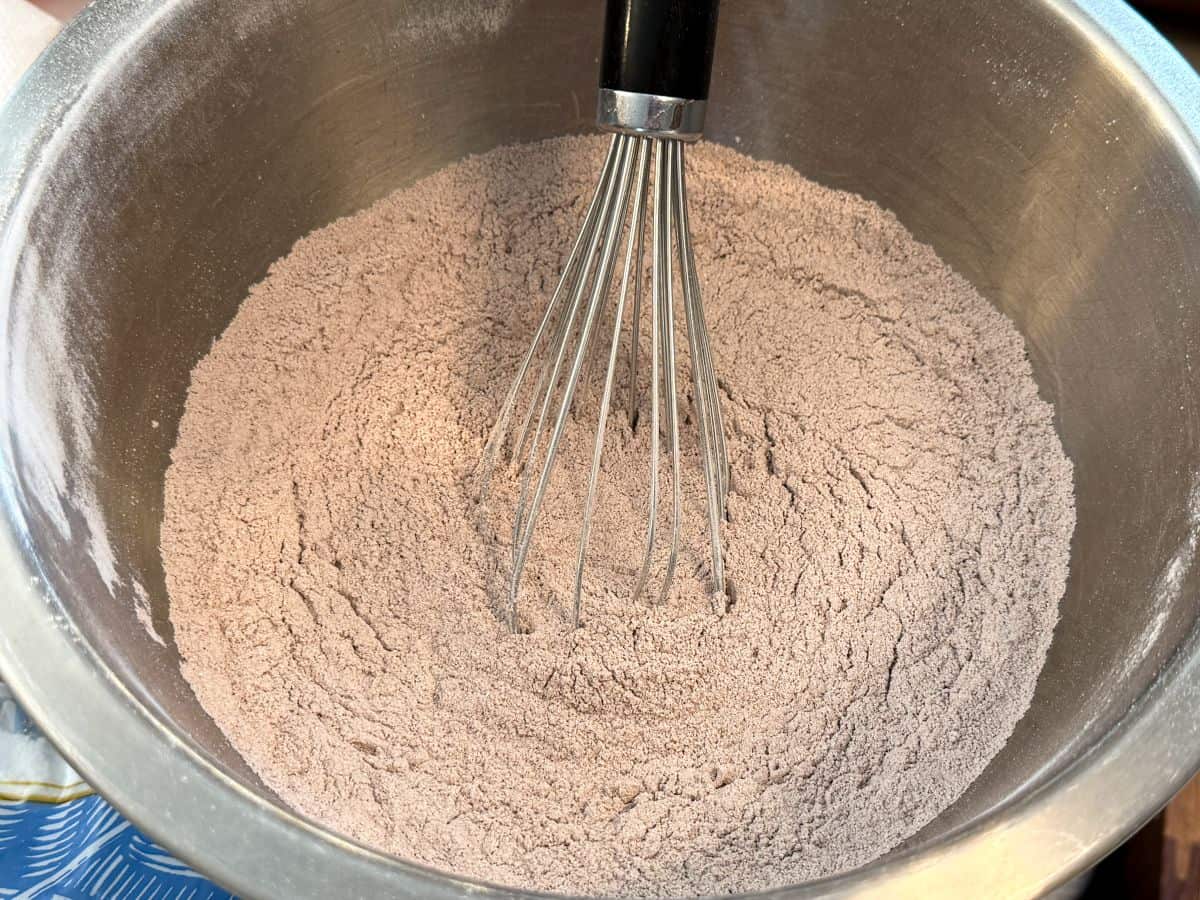
As with traditional macarons, the dry ingredients are sifted together.

In this case, the oat flour, powdered sugar and cocoa powder are sifted together.
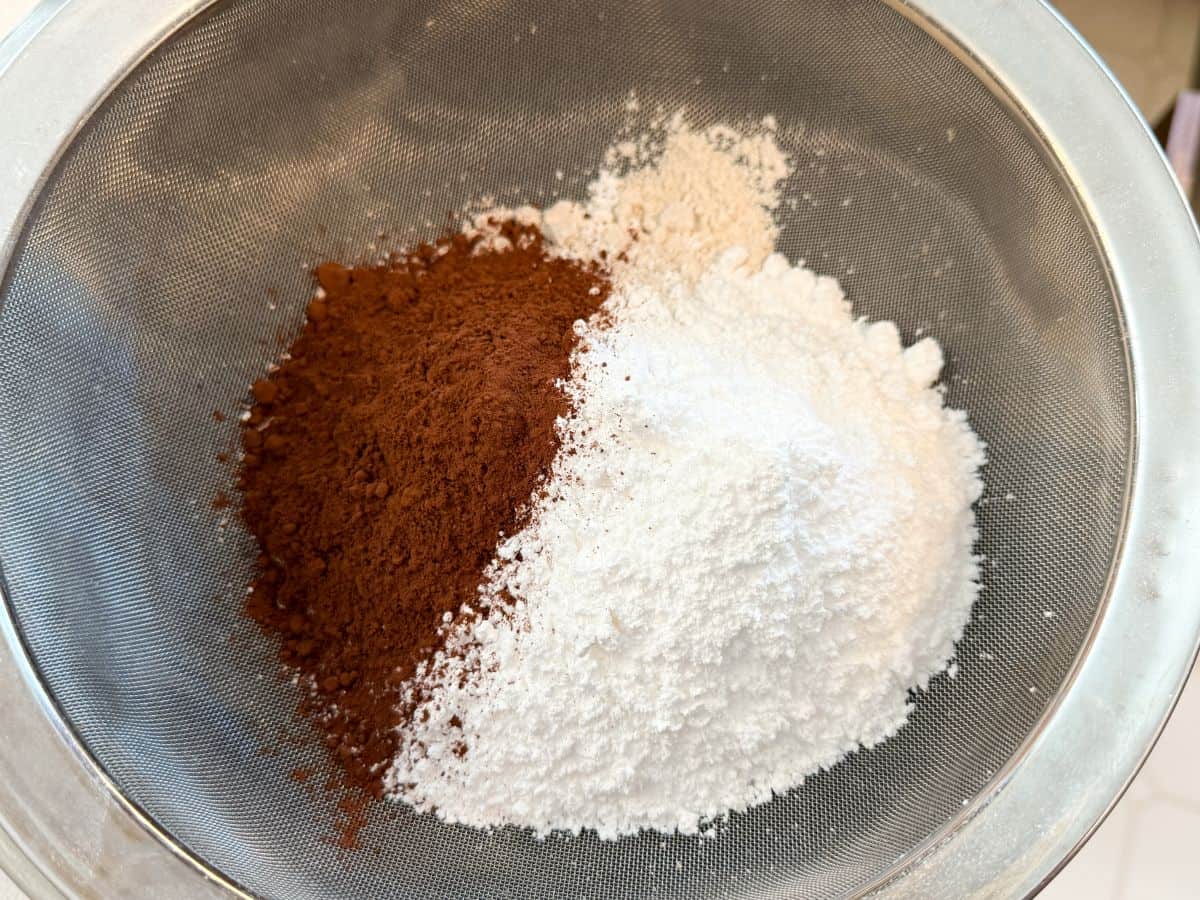
The dry ingredients are then whisked to combine completely and evenly.
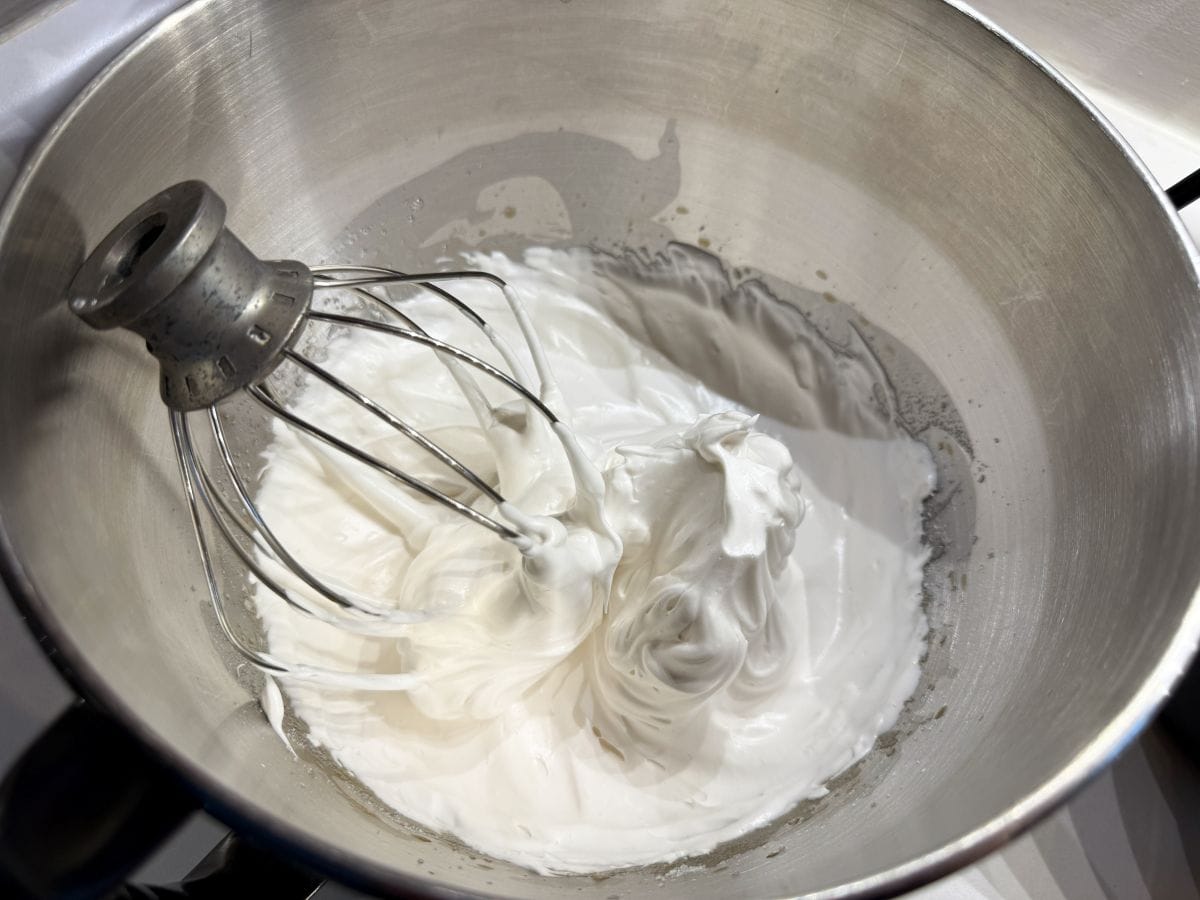
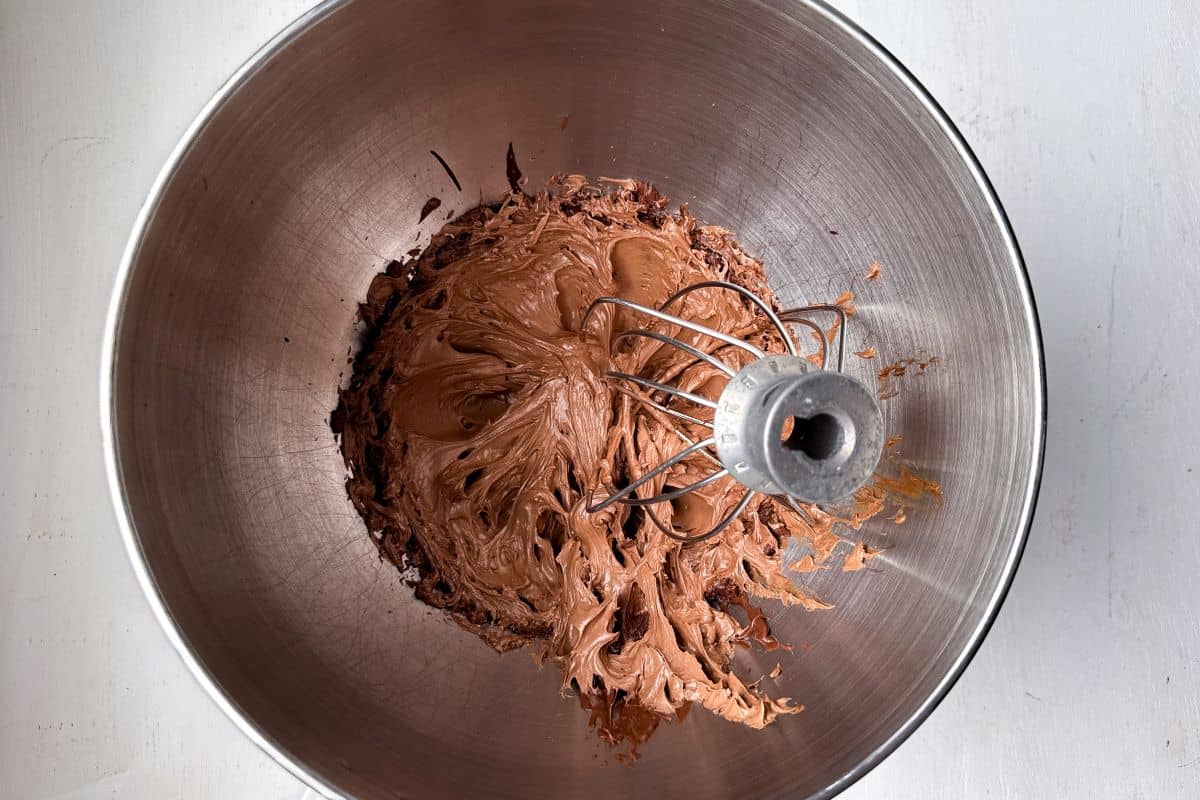
Next, the egg whites are whipped in a stand mixer with the whisk attachment. Once frothy, the cream of tartar is added along with the granulated sugar slowly by the spoonful.
Once stiff peaks have formed, it's time for macaronage.
With traditional almond flour macarons, you fold the dry ingredients into the meringue until the batter reaches the figure 8 stage.
For oat flour macarons, you actually want to stop just before you reach the figure 8 stage. If you over-fold, the batter will become too thin, too runny to pipe properly, and result in shells that bake with wrinkly tops.
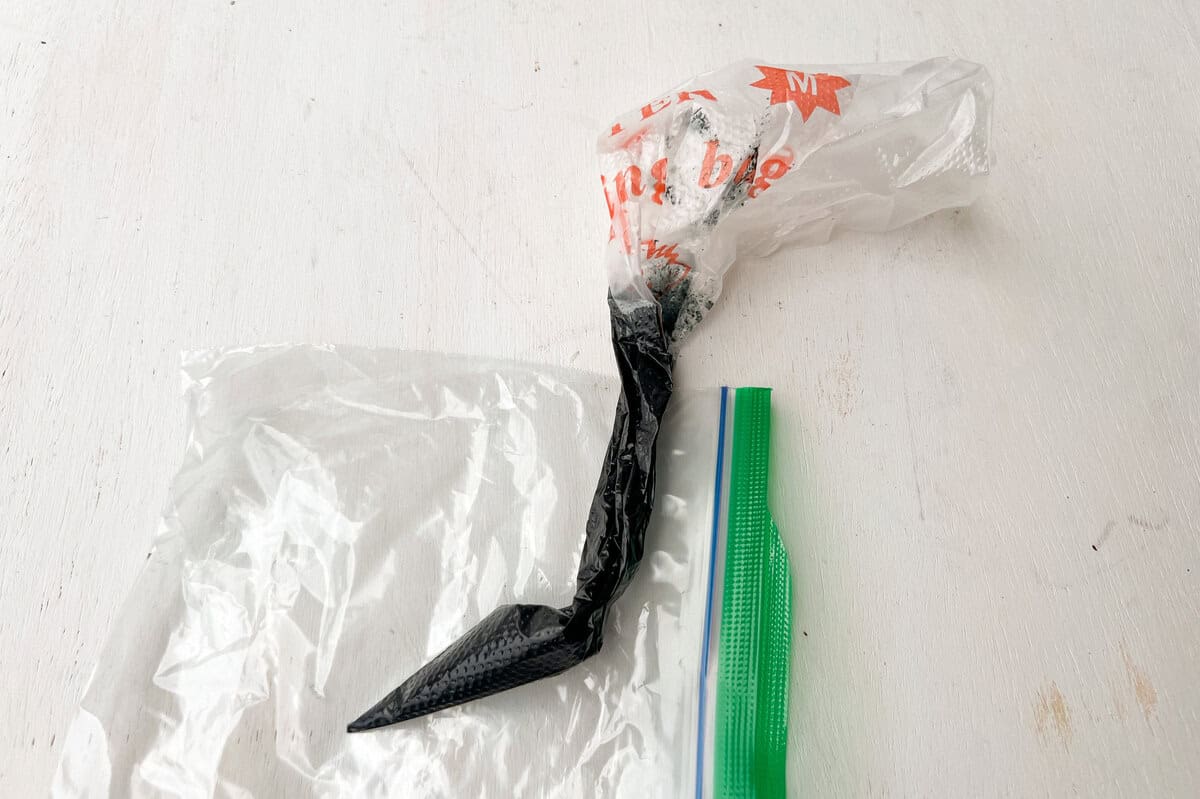
Once the batter is the proper consistency, transfer it to a disposable piping bag fitted with a medium round piping tip, like a #12. I like to use a plastic tip coupler to keep the tip secure and in place. I also use a small binder clip to keep the batter from flowing out of the tip before I'm ready to pipe.
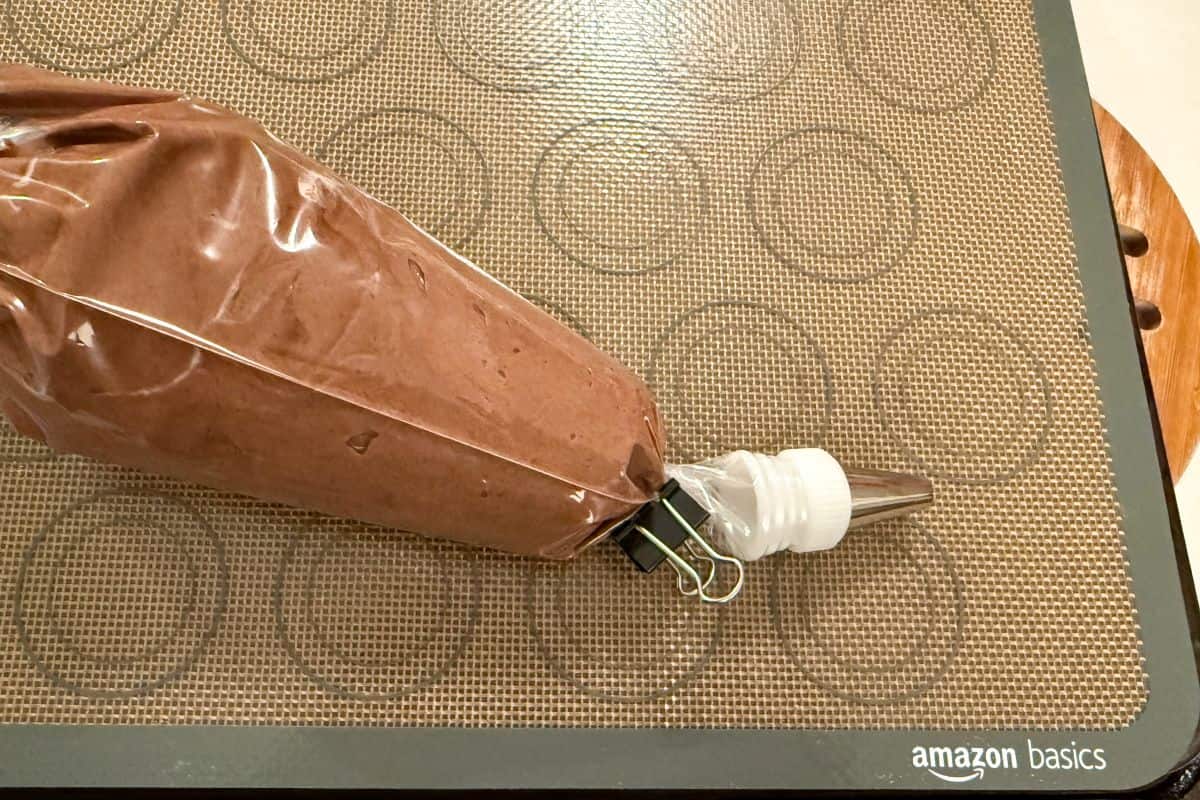
Once the bag is ready, remove the clip and allow the batter to flow into the tip.
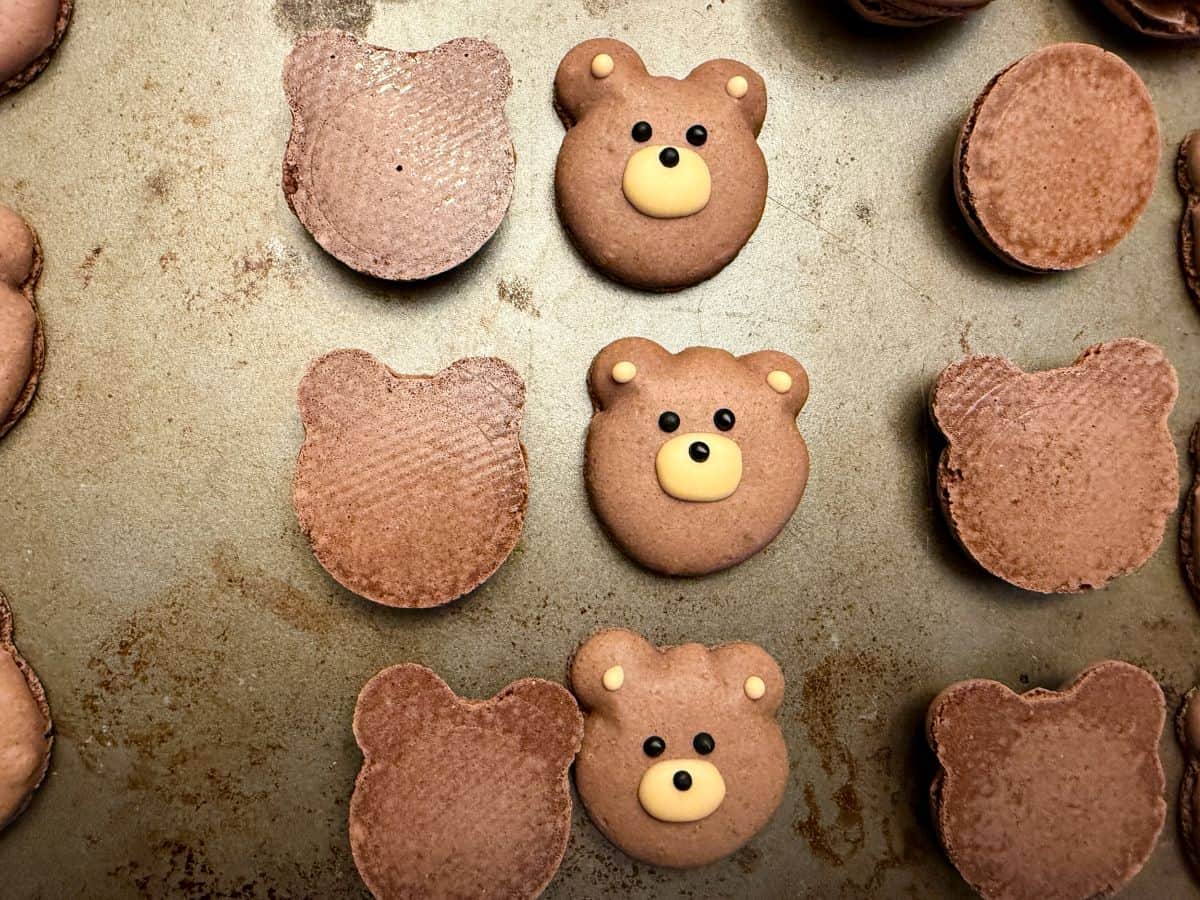
Pipe 1-inch circles on the first macaron mat, then pipe two ears on the top of each shell.

Slam the tray down to force bubbles to the surface and pop them with a toothpick or scribe tool.
You don't need to worry as much about smoothing the little point in the center of the shell, as you will cover that with the bear's snout when decorating.
Repeat the process with the second tray. Allow the shells to dry at room temperature, about 40 minutes.
While the shells dry, make the ganache.
Prepare the Filling
This is a super simple ganache recipe based on the ganache from Almost Fudge Gateau. I've removed the corn syrup because that just gives it some shine, which is not necessary when it is used as a filling.
First, the chocolate is melted. Then, just boiling cream is poured over the chocolate, and the mixture is stirred until smooth.
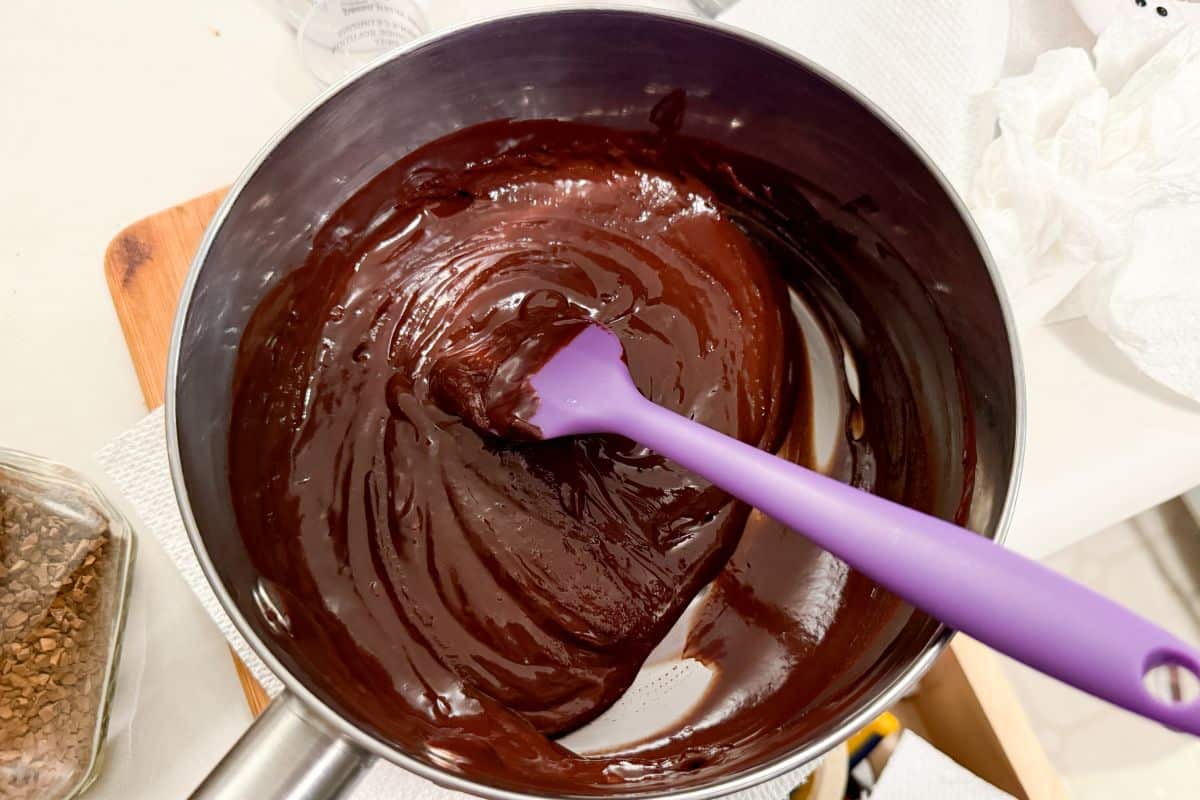
The ganache needs to cool at room temperature to thicken enough for piping. You can stir it occasionally to distribute the heat and ensure even cooling.
You can use the ganache as is, or whip it to a frosting consistency. I have done both. I think I prefer the look of the unwhipped ganache, and it saves a step.
That being said, whipping the ganache increases the volume so stretches it further to fill more cookies.
Bake the Shells
Bake the shells one tray at a time, rotating the tray half way through baking.

Allow the shells to cool on the mat before attempting to remove.
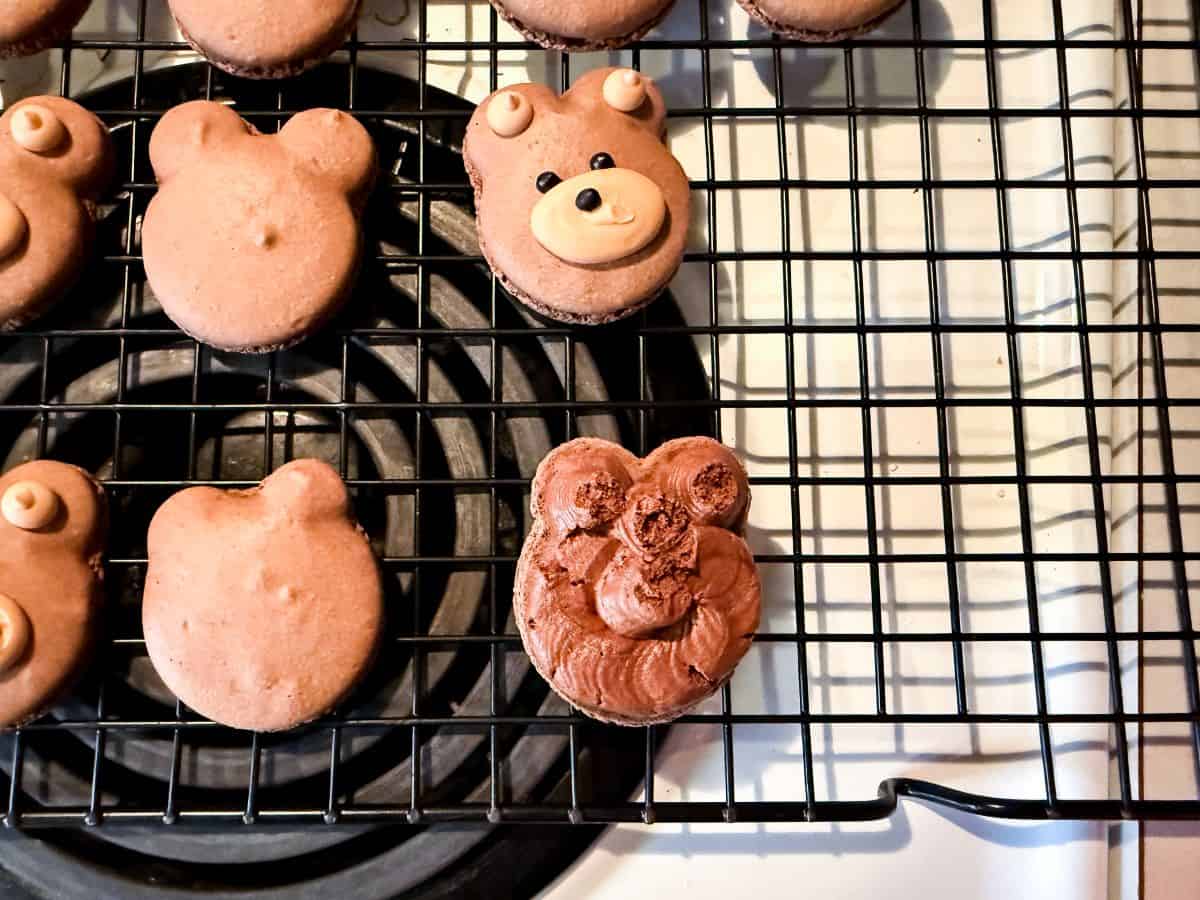
Add the Teddy Bear Faces
Because these are sandwich cookies, pair up the shells by size. Having ears complicates this process a bit since the position of the ears will affect how well the shells match.
Make some medium consistency royal icing tinted light brown. You want the icing to keep its shape but be thin enough so that the oval face will be smooth once it dries.
Transfer the icing to a piping bag fitted with a small round tip, like a #5. I use a tip coupler to ensure the tip is secure and stays in place.
Pipe an oval in the center of each the top shell to make the bear's snout. Pipe circles on top of each ear to make the inner ear.

Allow the tan icing to dry for at least one hour. Then, prepare outline consistency black royal icing. Transfer the icing to a piping bag with the tip snipped off.
Pipe two eyes and a nose on each top shell.
Allow the icing to set before filling.
Fill the Macarons
Add the cooled ganache to a disposable piping bag. Cut off the tip of the bag. Pipe the ganache on each bottom shell.

Follow the same steps if you use whipped ganache. It pipes more like a buttercream.
Pick up the top macaron with the face by the edges and carefully place on top, pressing down gently to adhere.
Place the assembled macarons in the refrigerator in an airtight container to mature.
Storage
Assembled macarons can be stored in an airtight container in the refrigerator for up to several days for maximum freshness. Bring them to room temperature before serving.
Serving Suggestions
You can serve the macaron as stand-alone cookies or use them as a cupcake topper, like I did with these red velvet cupcakes with Easy Cream Cheese Frosting.
I recommend putting the cookies on just before serving so they do not get soggy.
I served the cookies by displaying them on a dessert table next to Polar Bear Macarons.
You could package these macarons into treat bags like these Teddy Bear Cookies.
Gluten Free Option
Use certified gluten free oat flour to make these entirely gluten free. Check the packaging on your ingredients for possible gluten contaminates.
📖 Recipe

Nut Free Chocolate Teddy Bear Macarons
Equipment
- digital kitchen scale
- 2 half sheet pans
- 2 macaron mats
- disposable piping bags
- Piping bag holder optional
- Plastic tip coupler
- medium round piping tip such as #12
- Small round piping tip such as #5
Ingredients
For the Macaron Shells:
- 118 grams oat flour
- 118 grams powdered sugar
- 16 grams cocoa powder
- 100 grams egg whites
- ¼ teaspoon cream of tartar
- 90 grams granulated sugar
- 1 teaspoon vanilla extract
For the Ganache Filling:
- 4 ounces bittersweet chocolate (chopped, see note)
- ½ cup heavy cream
For Decorating:
- Easy Royal Icing (see note)
- brown or tan food coloring gel
- black royal icing powder
Instructions
Prepare the Macaron Batter:
- Place a macaron mat on each of 2 baking sheets. You can also use parchment paper with 1-inch circles drawn on underneath. Set these aside.
- Place a medium round tip, like a #12, in a disposable piping bag with a plastic tip coupler to keep it in place. Twist the bag just above the tip and secure with a small binder clip. Fold over the top of the bag and place it in a tall glass or in a piping bag holder so it will be easy to fill with the batter. Set this aside.
- Sift together the oat flour, powdered sugar and cocoa powder in a medium-sized bowl, then whisk to combine them completely. Set this bowl aside.118 grams oat flour, 118 grams powdered sugar, 16 grams cocoa powder

- Place the egg whites in the bowl of a stand mixer fitted with the whisk attachment and beat on medium-high until frothy. Add the cream of tartar, then slowly add the granulated sugar, one spoonful at a time, with the mixer still running.100 grams egg whites, ¼ teaspoon cream of tartar, 90 grams granulated sugar

- Once soft peaks form, add the vanilla extract and continue to beat the mixture until the meringue forms stiff peaks. Remove the bowl from the mixer.1 teaspoon vanilla extract
- Using a silicone spatula, carefully fold ⅓ of the flour/powdered sugar mixture into the meringue. Then, add the remaining ⅔ of the flour mixture and continue folding until just before reaching the figure 8 stage. See note.
- Once the batter is the proper consistency, transfer it to the prepared piping bag.

- Remove the small clip to allow the batter to flow into the piping tip. Pipe 1-inch circles of batter onto the first macaron mat, then pipe two small ears at the top of each circle.

- Slam the tray down hard on the counter or a table several times to force any air bubbles to the surface. If desired, take a toothpick or scribe tool and pop large bubbles then smooth out the hole left after the bubble pops.
- Pipe the batter onto the second macaron mat into circles with ears on top. You will not fill the entire mat.
- Allow the batter to dry at room temperature for 40 minutes. Meanwhile, preheat the oven to 300°F and make the ganache.
Make the Ganache:
- Place the chocolate in the top of a double boiler and melt above simmering water (or use microwave to melt, being careful to heat on 50% power and for short amounts of time, stirring often). The chocolate should be just melted and only warm, not hot.4 ounces bittersweet chocolate
- Bring the cream just to a boil in a small saucepan. As soon as it boils, remove from heat and pour the hot cream over the chocolate.½ cup heavy cream
- Stir very gently with a rubber spatula until the mixture is smooth and shiny.

- Allow the ganache to cool at room temperature, stirring occasionally, until it is a pipable consistency.
- OPTIONAL: for whipped ganache, beat the ganache with a wire whisk in the bowl of a stand mixer until it fluffs up and looks like chocolate frosting.

Bake the Macaron Shells:
- Bake the macaron shells for 12-15 minutes, rotating the pan once about 7 minutes into the bake. Only bake one pan at at time.
- Allow the shells to cool completely on the mats before removing them. To remove more easily, push up on the mat from underneath to help them pop off. If you have trouble with them sticking, that may mean they are underbaked. Some of the shells in the center of the tray may have a little bit of sticking. Very carefully use a stiff metal spatula to pry them off the mat, taking care not to rip the shell.

- The cooled shells can be stored in an airtight container in the refrigerator or freezer, or you can fill them immediately.
Pipe the Teddy Faces:
- Because the macarons will be sandwiched, pair up the shells by size. You want the top and bottom of the sandwich cookie to match as closely as possible.
- Mix up tan medium consistency royal icing. Transfer to a disposable piping bag fitted with a small round tip. Pipe an oval in the center of each top shell to make the snout of the bear. Pipe dots in the center of each ear to create the inner ear.

- Prepare outline consistency black royal icing and transfer to a disposable piping bag with a small opening cut from the tip.

- Pipe two eyes and a nose on each top shell.

Assemble the Macarons:
- Add the room temperature ganache to a piping bag with the tip cut off.
- Pipe the ganache on the bottom shell.

- Pick up the top shell by the edges and carefully place on top, pressing down very gently to adhere. Repeat with all macarons.


Leave a Reply