
These Royal Icing Playing Card Cookies are decorated with edible food markers to make the Ace of hearts, diamonds, spades and clubs. They are perfect for an Alice in Wonderland or Mad Hatter's Tea Party themed party.

I made these adorable Playing Card Cookies for my daughter's Alice in Wonderland themed birthday party. They were actually so easy to do despite looking more complicated. In fact, my dad didn't believe that I drew the designs!

I made them at the same time as these Clock Cookies. Both sets of cookies really added to the Alice in Wonderland theme.
In addition to the cookies, I also made Mini Rose French Macarons, Alice in Wonderland Petit Fours and Cake Pops.

These cookies are easy to make, even for royal icing beginners, if you follow the steps I've outlined below.
Jump to:
Materials
- your favorite shortbread or sugar cookies
- Easy Royal Icing
- disposable piping bags
- black and red food coloring pen or marker, such as FooDoodlers
Bake the Cookies
You will need dough for your favorite shortbread or sugar cookies. Cut the dough into rectangles using a ruler and a sharp knife or a pizza rocker cutter. I made my rectangles 2 by 2.5 inches.
I used a single batch of shortbread cookies for these cookies as well as the Clock Cookies and some heart shaped ones that I painted for Valentine's Day following my Painted Watercolor Cookies method.
For that reason, I only ended up making 12 playing card cookies. A full batch of dough would have yielded about 30 card cookies. This will vary depending on the size of your rectangles and the recipe you use for the dough.
Bake the cookies according to your recipe's instructions and allow them to cool to room temperature before adding the royal icing.
Outline the Cookies
Starting with the untinted (white) stock royal icing, add about ¼ cup to a bowl and add very small amounts of warm water to achieve outline consistency icing, carefully stirring with a small silicone spatula to avoid introducing bubbles into the icing.
Transfer the icing to a disposable piping bag and cut off a very small piece of the tip to make a small round opening. Start by just snipping off a tiny amount; you can always cut more if the opening is too small.
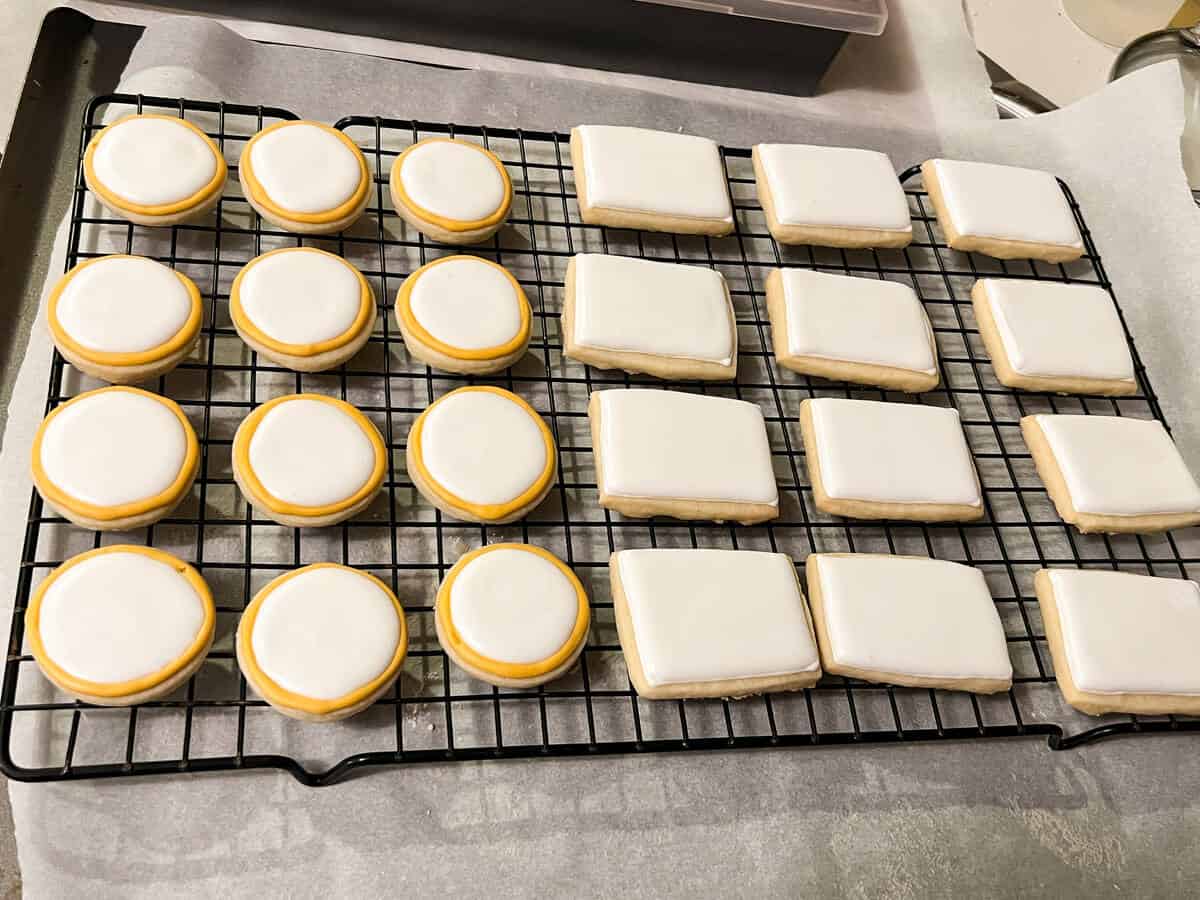
Outline the cookies by piping a rectangular border on the top of each cookie. Allow the outline to dry at least 1 hour before proceeding to the flood step.
Flood with Royal Icing
Prepare flood consistency untinted (white) royal icing by thinning stock royal icing with small amounts of water until desired consistency is achieved.
Transfer the icing to a disposable piping bag, and cut off a small amount of the tip. Fill the center of each cookie with the white icing. Use a toothpick or a scribe tool to swirl the icing on the cookie to pop any bubbles.
If you are also making Clock Cookies, you can fill those at the same time.
Allow the icing to dry completely at room temperature, about 18 to 24 hours, before adding the details.

Draw the Details
Before you draw the card details, make sure the flooded icing has had sufficient time to dry hard, about 18 to 24 hours depending on the temperature and humidity in your work space. Otherwise, the tip of the marker could poke into the icing.
Use black and red food coloring pens or markers, such as a FooDoodlers, to draw the "A"s and suits on the cards.

I got out a deck of playing cards to copy the pattern of the suit as best as I could.

I chose to just do Aces because they require just 1 suit icon on each cookie. With these cookies being small, I didn't think I could comfortably fit more than 1 on each.
Although the Queen of Hearts card would have been the most fitting, that requires an intricate Queen design, so instead I just decorated the tables with actual Queen of Hearts playing cards and kept these cookies simple.
I drew the "A" for the Ace on the top left of the cookie and the suit underneath, red for hearts and diamonds and black for spades and clubs. Then I drew the suit in the center of the cookie. Finally, I turned the cookie 180 degrees and drew the "A" and the suit on the top left of that side.

The food coloring markers I use dry almost instantly, so the cookies are ready to eat or store right away.
Storage
I never recommend stacking royal icing cookies. The grease from the top cookie can transfer to the royal icing of the bottom cookie and ruin the design.
I prefer to store them in a single layer in an airtight container at room temperature. If you must stack them, use aluminum foil between the layers. The grease can still soak through waxed paper or sometimes even parchment paper depending on your cookie base recipe.
Gluten Free Option
Use your favorite gluten free sugar cookie or shortbread cookie recipe. The rest of the ingredients are gluten free. Please check your ingredient packaging for possible gluten contaminants.
📖 Recipe

Playing Card Cookies
Equipment
- disposable piping bags
Ingredients
- 1 batch shortbread or sugar cookies (see note)
- 1 batch Easy Royal Icing (see note)
- black and red food coloring pen or marker (such as FooDoodlers)
Instructions
Bake the Cookies
- Roll the dough into ¼-inch thickness and cut it into rectangles measuring approximately 2 by 2.5 inches using a ruler and a sharp knife or a pizza rocker cutter.
- Bake the cookies according to your recipe's instructions and allow them to cool to room temperature before adding the royal icing.
Outline the Cookies
- Starting with the untinted (white) stock royal icing, add about ¼ cup to a bowl and add very small amounts of warm water to achieve outline consistency icing, carefully stirring with a small silicone spatula to avoid introducing bubbles into the icing.
- Transfer the icing to a disposable piping bag and cut off a very small piece of the tip to make a small round opening. Start by just snipping off a tiny amount; you can always cut more if the opening is too small.
- Outline the cookies by piping a rectangular border on the top of each cookie. Allow the outline to dry at least 1 hour before proceeding to the flood step.
Flood with Royal Icing
- Prepare flood consistency untinted (white) royal icing by thinning stock royal icing with small amounts of water until desired consistency is achieved.
- Transfer the icing to a disposable piping bag, and cut off a small amount of the tip. Fill the center of each cookie with the white icing. Use a toothpick or a scribe tool to swirl the icing on the cookie to pop any bubbles.
- Allow the icing to dry completely at room temperature, about 18 to 24 hours, before adding the details.
Draw the Details
- Before you draw the card details, make sure the flooded icing has had sufficient time to dry hard, about 18 to 24 hours depending on the temperature and humidity in your work space.
- Using food coloring pens or markers, draw an "A" on the top left of the cookie with the suit underneath, red for hearts and diamonds and black for spades and clubs. Then draw the suit in the center of the cookie. Turn the cookie 180 degrees and draw an "A" and the suit on the top left of that side.
- When the food coloring is completely dry, the cookies can be eaten or stored at room temperature.


Leave a Reply