
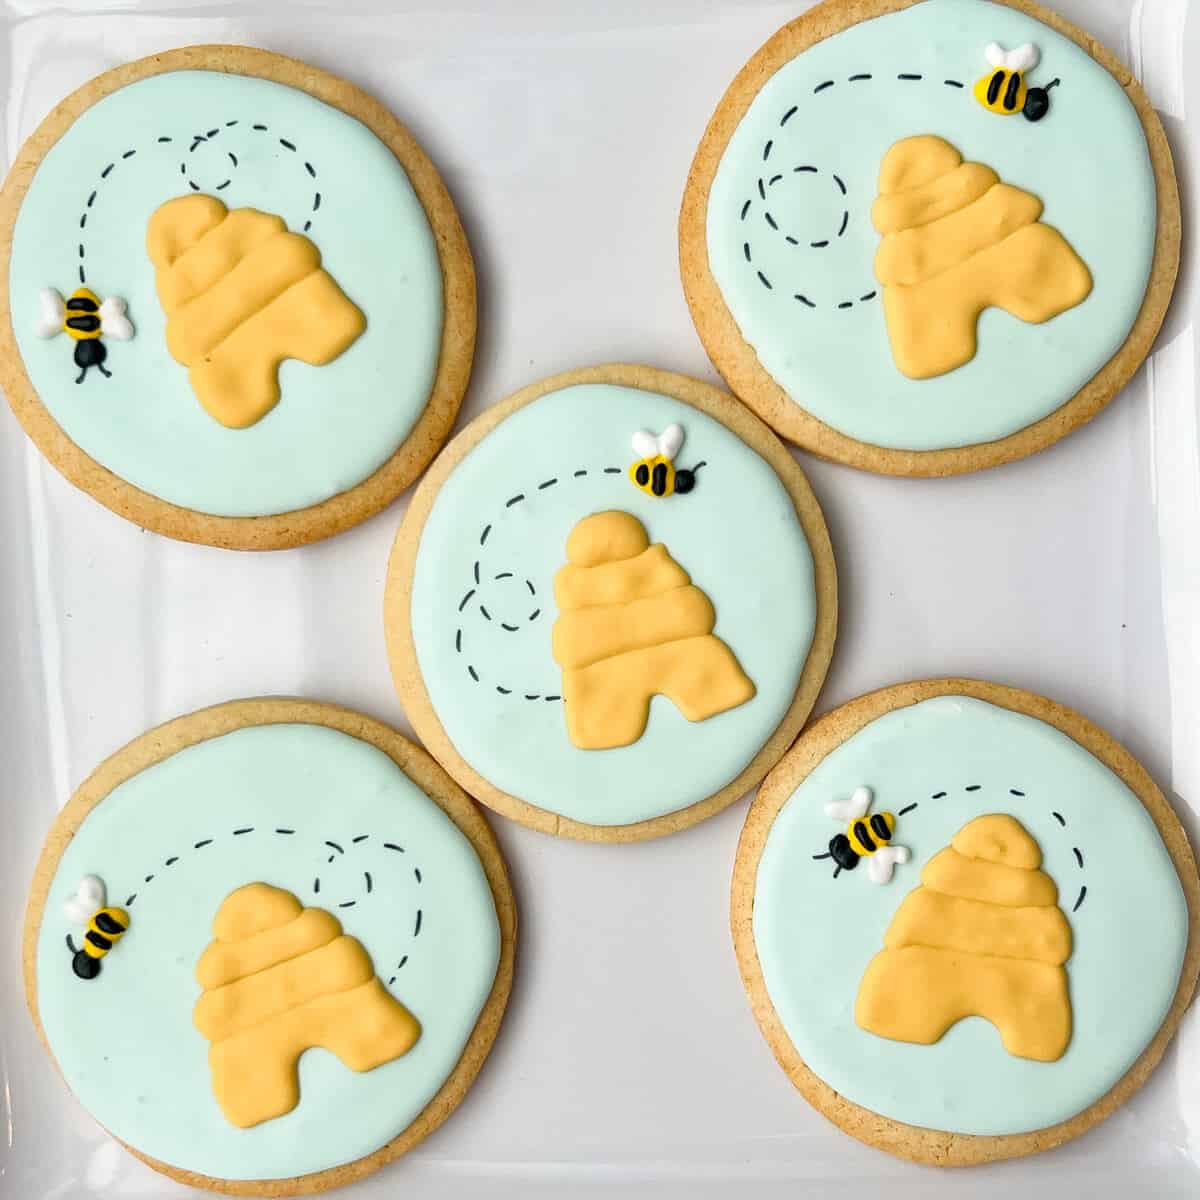
These Beehive Cookies with Royal Icing feature a gold beehive with a bee and bee path showing the bee leaving the hive on a light blue background. They are fitting for a Winnie the Pooh or bee themed birthday party or baby shower.
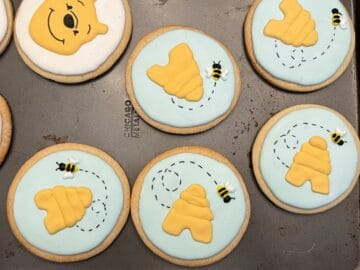
For my daughter's Winnie the Pooh Birthday Party, I made these Beehive Cookies in addition to Piglet Cookies and Winnie the Pooh Cookies. This set of cookies looked so cute when displayed together on the dessert table.
This is actually a simple design with easy steps. I made them alongside the Bumble Bee Oreos, so I piped the bees at the same time.

These cookies would also be cute for a bee birthday party or baby shower!
Jump to:
Supplies
- Cut Out Sugar Cookies or Shortbread Cookies, cut with a large round cutter
- Easy Royal Icing
- blue, yellow and black food coloring gel
- gold food coloring gel
- black royal icing powder or black food coloring gel
- disposable piping bags
- piping bag holders, optional, or tall drinking glasses
- small round piping tips, like #2
- plastic tip couplers, optional
- toothpicks or scribe tool
- black food coloring markers or pens, such as FooDoodlers
Cover the Cookies in Light Blue Icing
The background of these cookies is a light blue to represent the sky.
To make the background, thin the royal icing stock with small amounts of warm water until a slightly thicker flood consistency is achieved. Tint with a tiny amount of blue food coloring gel to make a very light blue color.
Transfer the icing to a disposable piping bag with the tip cut off and pipe a border around the circular cookie, then fill the center with icing. Use a toothpick or scribe tool to guide the icing to the edges and swirl the icing to pop any bubbles.
Repeat this with all of the cookies. Allow the icing to dry completely, about 24 hours at room temperature on a drying rack or in an airtight container in a single layer.
Pipe the Beehive
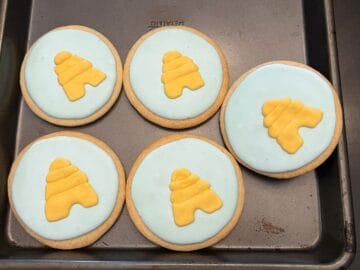
The best way to make the beehive is to do two sections at one time, then do the other two sections.
Tint some slightly thick flood consistency icing with gold food coloring gel. Transfer the icing to a disposable piping bag with the tip cut off.
If you consider the top layer #1 down the bottom as #4, I piped #2 and #4 first, then after about 1 hour dry time, I piped #1 and #3.
Layer #1 is a rounded top of the hive, layers #2 and #3 are rounded rectangle shapes, and layer #4 is a larger rounded rectangle with a half circle opening at the bottom.
Pipe shapes #2 and #4 on each cookie. Allow the icing to set up for at least 1 hour. Then, pipe shapes #1 and #3 on all of the cookies.

Allow the icing to set for about an hour before adding the bees.
Add the Bee and Bee Path
For these cookies, I made two kinds of bees: bees that you see from the side with just one set of wings and one antenna and bees that you see from above with two sets of wings and two antennae.
For step by step photos of making the bees, see my Bumble Bee Oreos post.
To make the bees, you will need to prepare some outline consistency black royal icing by using either black royal icing powder or by tinting royal icing stock with black food coloring gel. You will also need outline consistency white royal icing and yellow royal icing.
Transfer each icing color to a disposable piping bag with the tip snipped off or fitted with a small round tip such as a #2.
To begin, use a black food coloring marker to make either one antenna (for a side view bee) or two antennae (for an above view bee) where you want the bee's head to be.

Pipe a black circle bee head attached to the antenna(e). Then, pipe a yellow oval next to the head to make the body of the bee.
Next, pipe on two white wings on top of the yellow body for the side view bees and two white wings on each side of the body for the top view bees.

If you're careful, you can add the bee path immediately after piping the bee. If you're afraid you might smudge the bee, you can wait until the icing has set before adding the bee path. The royal icing will take about 18 to 24 hours at room temperature to fully dry, depending on the humidity in your work space.
Use a black food coloring marker to make a dashed line bee path from the hive to the back of the bee. You can make this path curved or with loops.
Once the yellow body has dried, you can add the black stripes. Pipe on two thin, vertical black stripes of outline consistency black icing on the yellow body.
Allow the icing to dry completely, about 18-24 hours at room temperature, by keeping the cookies on a drying rack or in a single layer in an airtight container.
Storage
Store the cookies by placing in a single layer in an airtight container. I highly recommend not stacking royal icing cookies, as the grease from the top cookie can bleed onto the royal icing design of the bottom cookie.
If you need to stack them, I recommend using aluminum foil between the layers to prevent the grease from transferring. Even waxed paper will allow grease transfer.
Gluten Free Option
Use your favorite gluten free sugar cookie recipe. The other ingredients are gluten free, but please check your packaging for possible gluten contaminants.
📖 Recipe

Beehive Cookies with Royal Icing
Equipment
- disposable piping bags
- piping bag holders or tall drinking glasses optional
- small round piping tips, like #2 optional
- plastic tip couplers optional
- toothpicks or scribe tool
Ingredients
- Cut Out Sugar Cookies or Shortbread Cookies (cut with a large round cutter, see note)
- Easy Royal Icing (see note)
- blue, yellow, gold and black food coloring gel or black royal icing powder
- black food coloring markers or pens (such as FooDoodlers)
Instructions
Cover the Cookies in Light Blue Icing
- Thin the royal icing stock with small amounts of warm water until a slightly thicker flood consistency is achieved. Tint with a tiny amount of blue food coloring gel to make a very light blue color.
- Transfer the icing to a disposable piping bag with the tip cut off and pipe a border around the circular cookie, then fill the center with icing. Use a toothpick or scribe tool to guide the icing to the edges and swirl the icing to pop any bubbles.
- Repeat this with all of the cookies. Allow the icing to dry completely, about 24 hours at room temperature on a drying rack or in an airtight container in a single layer.
Pipe the Beehive
- Tint some slightly thick flood consistency icing with gold food coloring gel. Transfer the icing to a disposable piping bag with the tip cut off.
- The beehive is made of 4 sections, #1 being the top and #4 being the bottom. Layer #1 is a rounded top of the hive, layers #2 and #3 are rounded rectangle shapes, and layer #4 is a larger rounded rectangle with a half circle opening at the bottom. Pipe layers #2 and #4 on each cookie. Allow the icing to dry for about 1 hour, then pipe layers #1 and #3 on all of the cookies.
- Allow the beehive icing to set for about an hour before adding the bees.
Add the Bee and Bee Path
- Prepare outline consistency black royal icing by using either black royal icing powder or by tinting royal icing stock with black food coloring gel. Make outline consistency white royal icing and yellow royal icing. Transfer each icing color to a disposable piping bag with the tip snipped off or fitted with a small round tip such as a #2.
- You can do two kinds of bees: bees that you see from the side with just one set of wings and one antenna and bees that you see from above with two sets of wings and two antennae. Use a black food coloring marker to make either one antenna (for a side view bee) or two antennae (for an above view bee) where you want the bee's head to be.
- Pipe a black circle bee head attached to the antenna(e).
- Pipe a yellow oval next to the head to make the body of the bee.
- Pipe on two white wings on top of the yellow body for the side view bees and two white wings on each side of the body for the top view bees.
- Allow the bees to dry for about 18 to 24 hours at room temperature on a drying rack or in an airtight container in a single layer.
- Use a black food coloring marker to make a dashed line bee path from the hive to the back of the bee. You can make this path curved or with loops.
- Pipe on two thin, vertical black stripes of outline consistency black icing on the yellow bee body.
- Allow the icing to dry completely, about 18-24 hours at room temperature, by keeping the cookies on a drying rack or in a single layer in an airtight container.
Storage
- Store the cookies by placing in a single layer in an airtight container. I highly recommend not stacking royal icing cookies, as the grease from the top cookie can bleed onto the royal icing design of the bottom cookie.
- If you need to stack them, I recommend using aluminum foil between the layers to prevent the grease from transferring. Even waxed paper will allow grease transfer.
Leave a Reply