
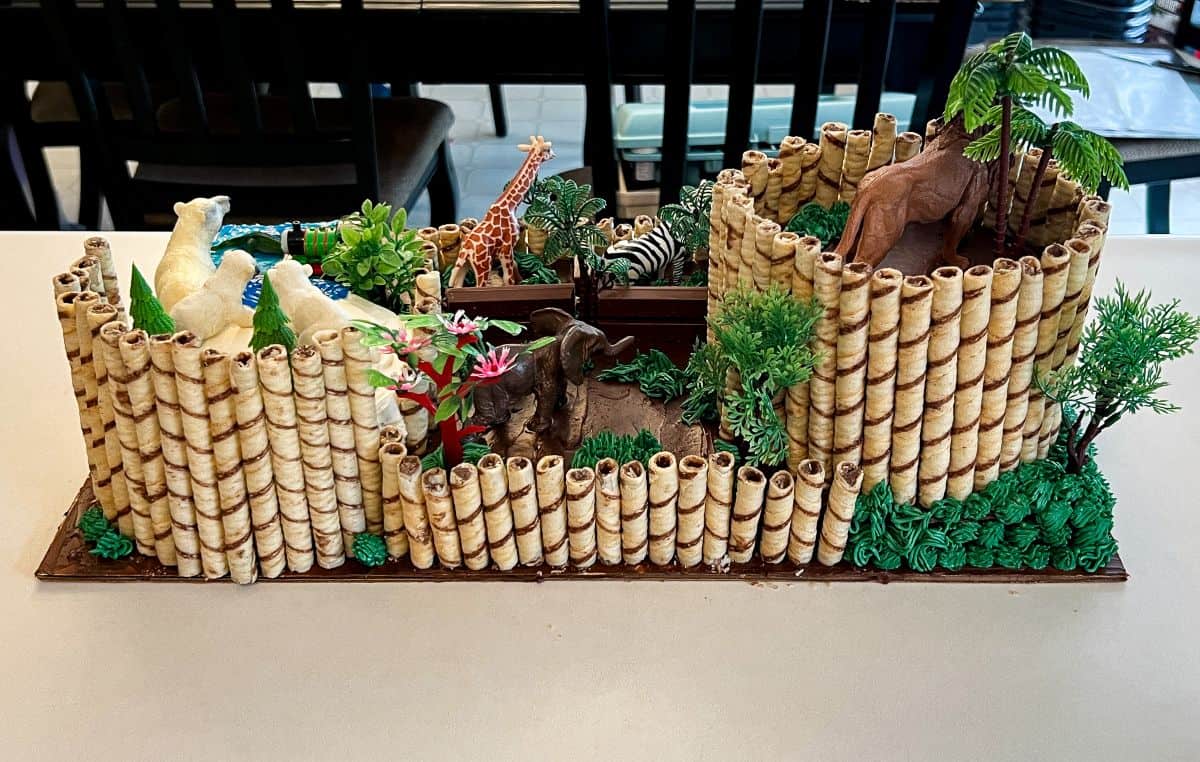
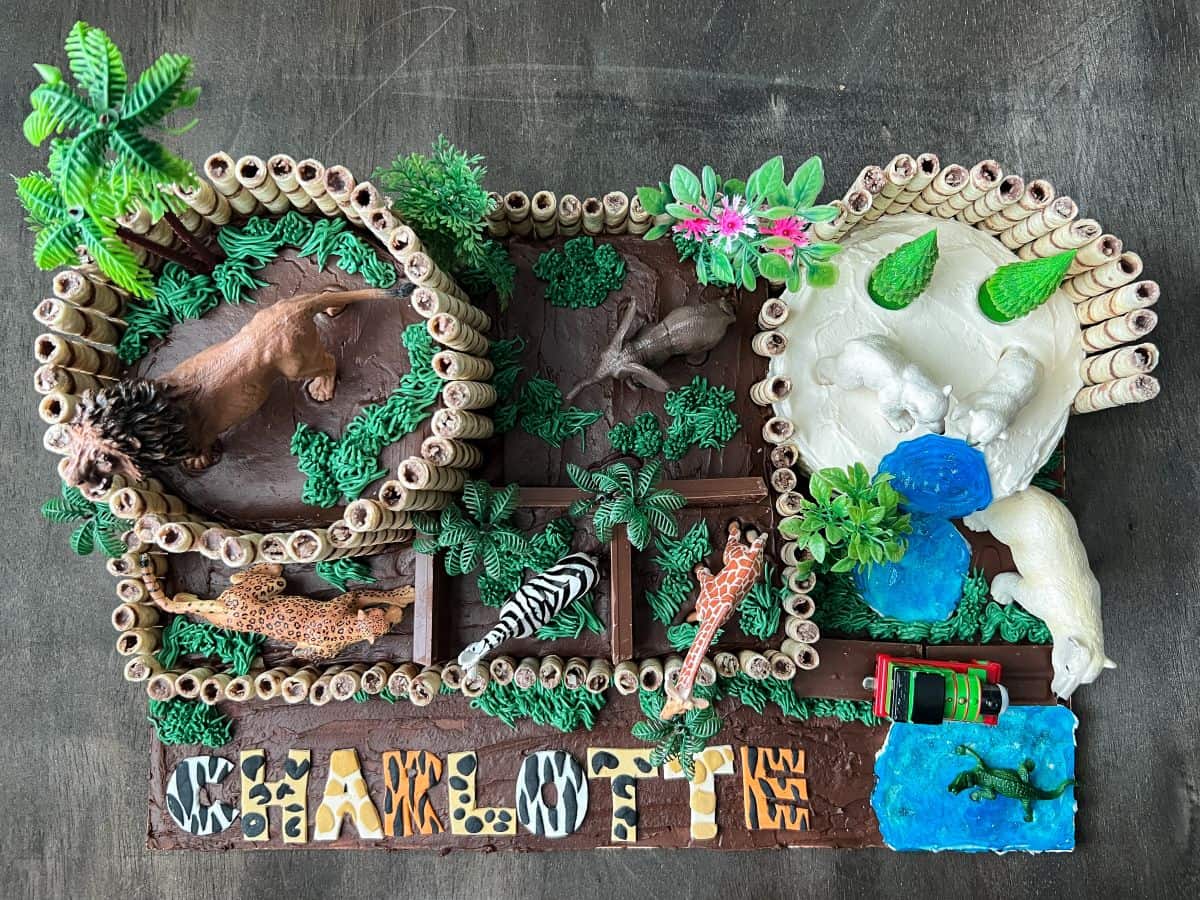
This Zoo Animal Birthday Cake has different zoo exhibits for the animals. The inside of the cakes are tiger stripe, zebra stripe, and rainbow leopard print.
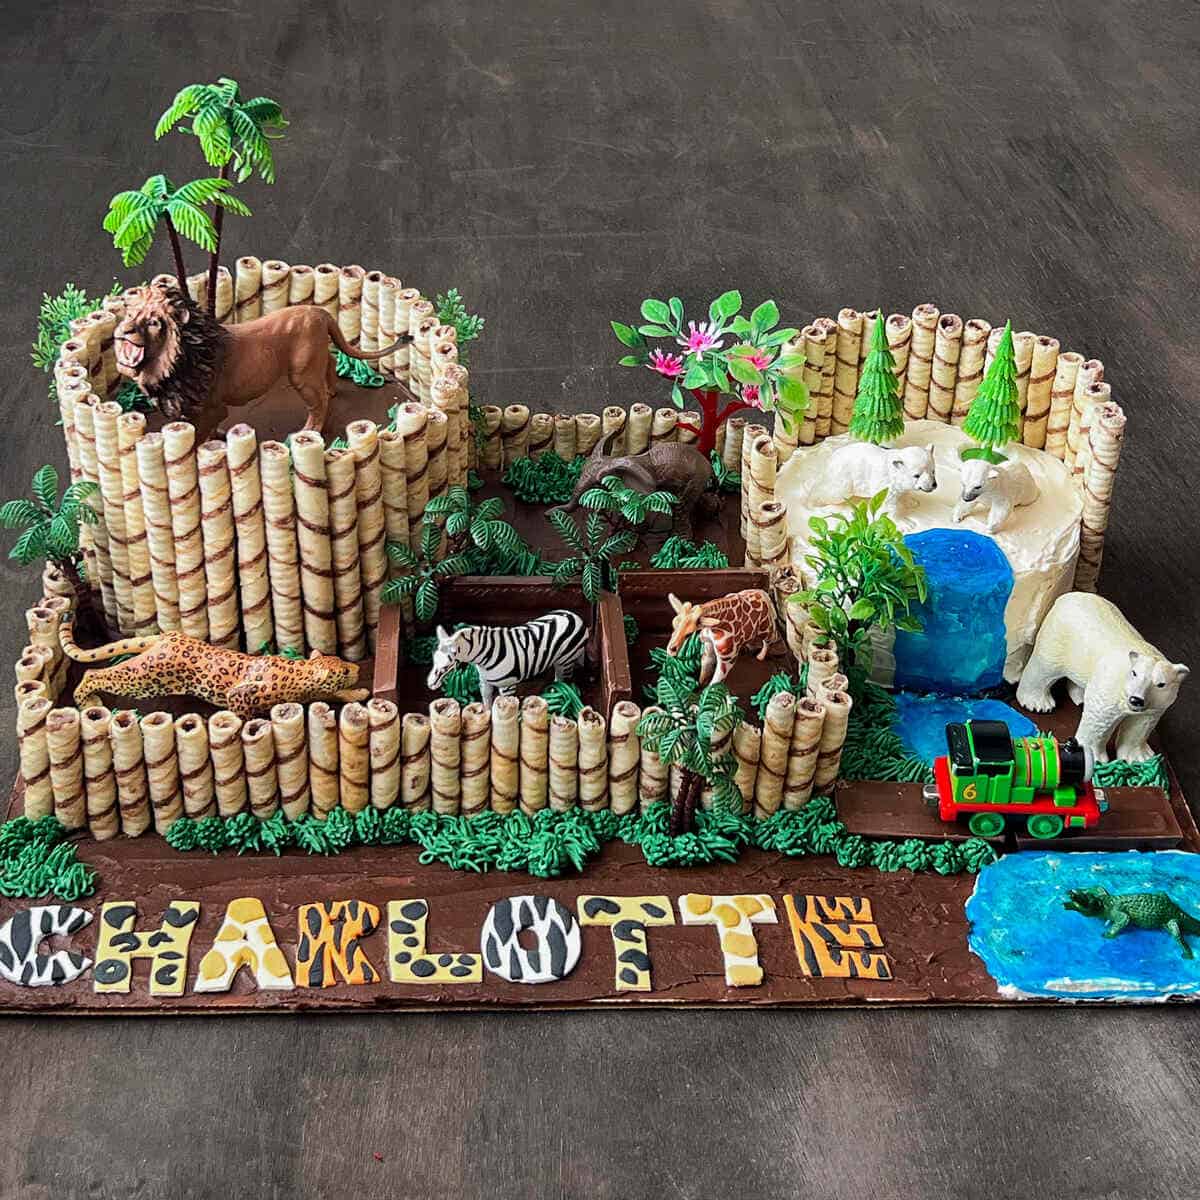
I made this Zoo Cake for my daughter's 7th birthday to go along with her Zoo themed party. I decided to make a sprawling cake with multiple animal exhibits and include three animal prints of cake inside: tiger, zebra, and rainbow leopard.
This cake turned out so well, and it may be most involved cake to date based on the level of components. The cake itself is quite simple: just a single flavor of cake and only one type of homemade buttercream since I used store bought canned chocolate frosting.
I will take you through all of the steps to make the cake as well as the supplies needed. You can really get creative with this cake and make it your own!

Jump to:
Supplies
- white and black rolled fondant
- disposable nitrile gloves, optional
- small fondant rolling pin with guides
- paring knife
- powdered sugar, for dusting the fondant
- Everclear or vodka, optional
- 2 or 3 batches white or vanilla cake
- one 13x9-inch pan, two round 8-inch pans, two round 6-inch pans
- cake baking strips
- large 19x13-inch rectangular cake board
- gel food coloring in gold, black, brown, orange, pink, teal, purple, and green
- Easy Vanilla Buttercream
- 2 cans chocolate frosting
- Kit Kat bars
- Pirouline Cookies
- blue decorating gel
- royal blue disco cake dust, optional
- animal figurines, such as lions, elephants, polar bears
- small train
- plastic trees and plants
- disposable piping bags
- small grass tip, like Wilton #233
- plastic tip coupler, optional
Make the Safari Print Fondant Letters
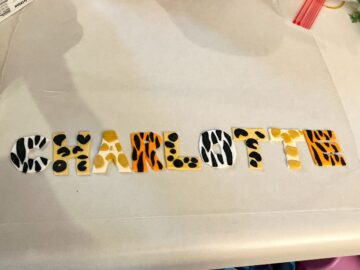
I chose to do 5 different animal prints for the letters: zebra, leopard, giraffe, tiger, and cheetah. Because my daughter has a long name, all but cheetah were repeated.
To make the letters, I tinted the white fondant using small amounts of food coloring gel. I do this by wearing disposable nitrile gloves and working the color into the fondant in my hands.
For the leopard and cheetah, I used a small amount of brown. I used gold for the giraffe and orange for the tiger.
To make the zebra letters, I rolled out white fondant and black fondant using a small fondant rolling pin with a small amount of powdered sugar to prevent sticking.
I used a sharp knife to cut out the white letters and the black zebra stripes, then adhered the stripes onto the white background using a small amount of water. You can also use alcohol, like Everclear or vodka.
I repeated this process for all of the animal patterns.
After the letters are assembled, I brushed them with a thin layer of Everclear to remove or dissolve any powdered sugar remnants. This gives the letters a more vibrant appearance.

I allowed the letters to dry at room temperature for a couple days. They do not need to be dried to add them to the cake; this timing just worked better for me.
Bake the Cakes
Because I was making 3 different patterns of cake, I made a double batch of Sugar Spun Run's Vanilla Cake. This cake is a thicker batter than some vanilla cake recipes, which is exactly what we need in order to properly make the patterns.
I go through detailed steps of how to make the Rainbow Leopard Print Cake in a separate post. I made those cakes in two 6-inch pans, which did not use even half of my double batch of batter, so the rest I was able to dedicate to the tiger and zebra striped cakes.
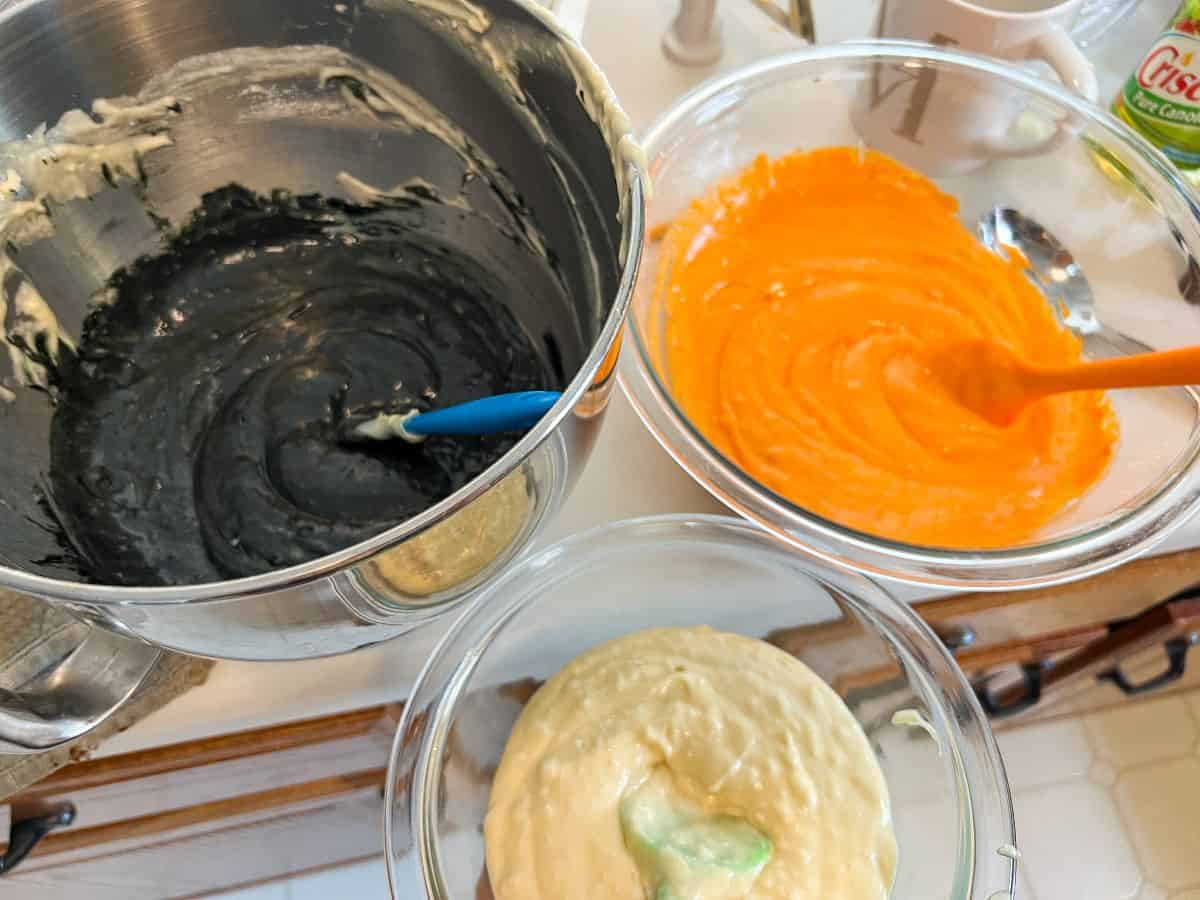
I divided the batter into 3 portions, leaving one plain and tinting one black and one orange.
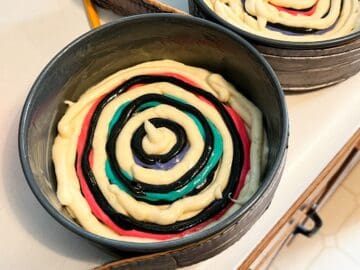
For the Zebra Striped Cake, I loosely followed this video tutorial but without the pink. Briefly, spoon some of the untinted batter in the center of two greased 8-inch cake pans. I like using Pam for Baking and place cake baking strips around the outsides of the pans for even baking.
Spoon black cake batter on top of the untinted batter, directly in the center so it pushes out the untinted batter. Repeat the process until the batter reaches the sides of the pan.

Bake the cakes according to your recipe's instructions until baked through. Do not overbake.
Meanwhile, grease or spray a 13x9-inch pan and add cake baking strips around the outside of the pan.
I loosely followed this video tutorial for a Tiger Striped Cake. In brief, spoon 2 rows and 3 columns of orange cake batter so there are 6 circles. Top each circle with a large spoonful of black cake batter and then a smaller amount of untinted batter.
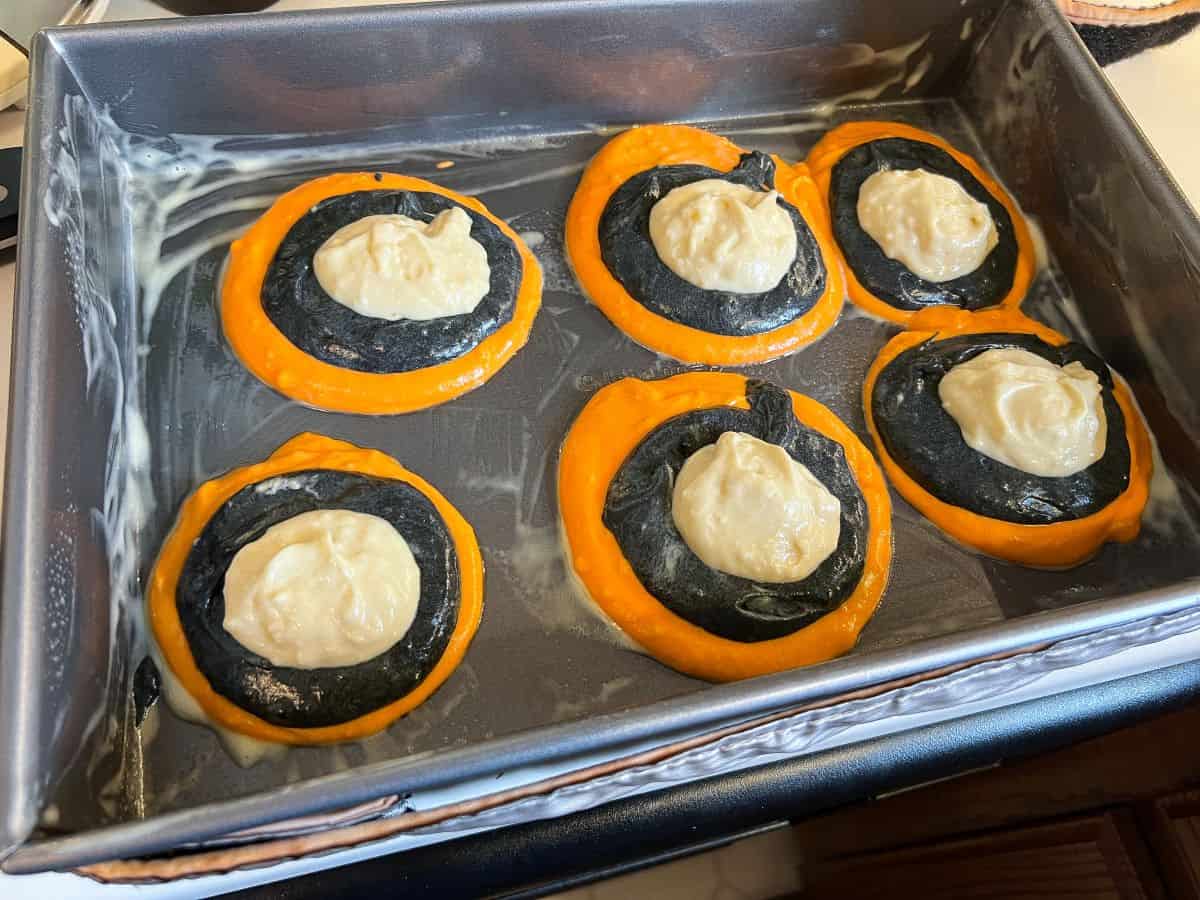
Repeat this process until all of the batter has been added and the 6 circles all touch as if one layer of cake batter.

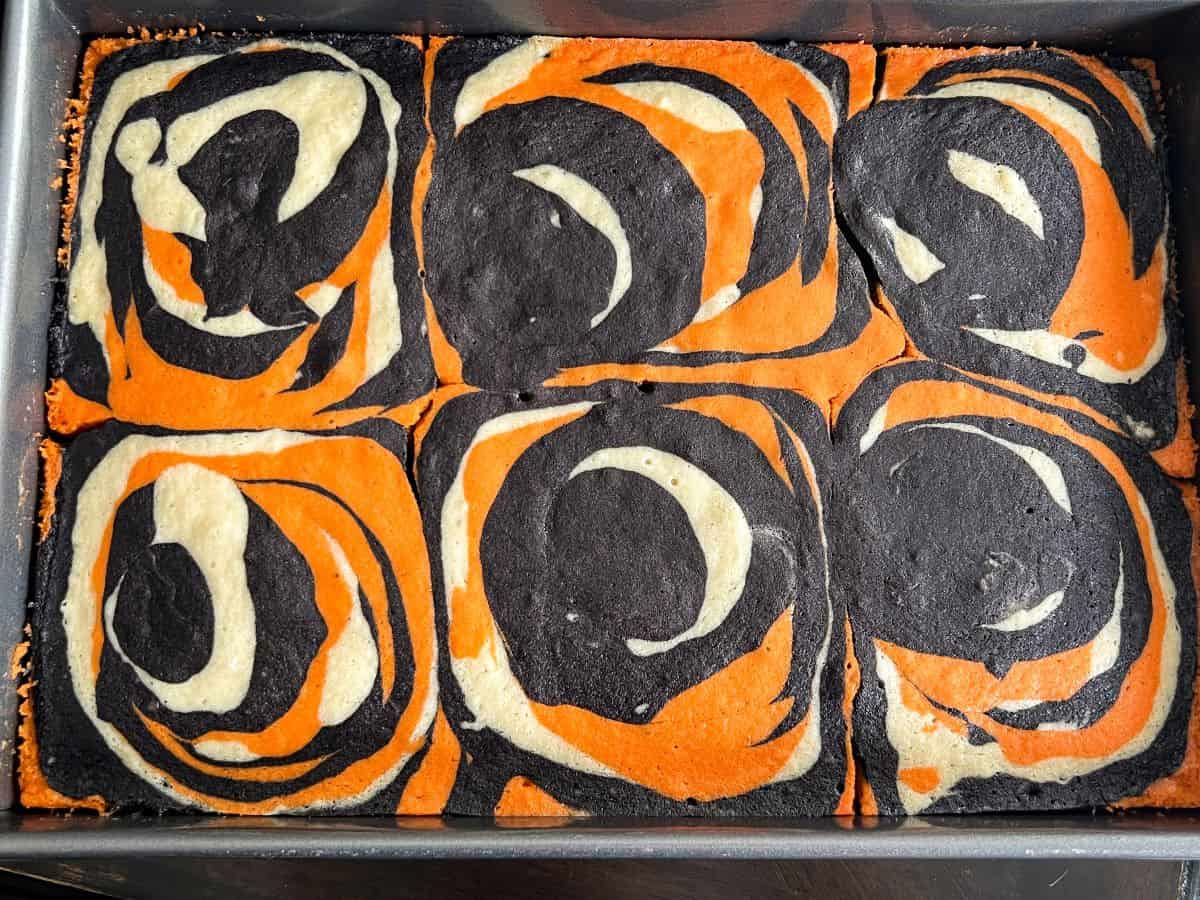
Bake the cake according to your recipe's instructions.
Allow the cakes to cool for 10 minutes in the pans and then unmold the cakes on cooling racks to cool completely. Wrap the cakes tightly in plastic wrap and store at room temperature until you're ready to assemble the cake.
Assemble the Cake
The first step of cake assembly is to lay out the cakes on a large 19x13-inch rectangular cake board. You can do this in any way that you prefer.
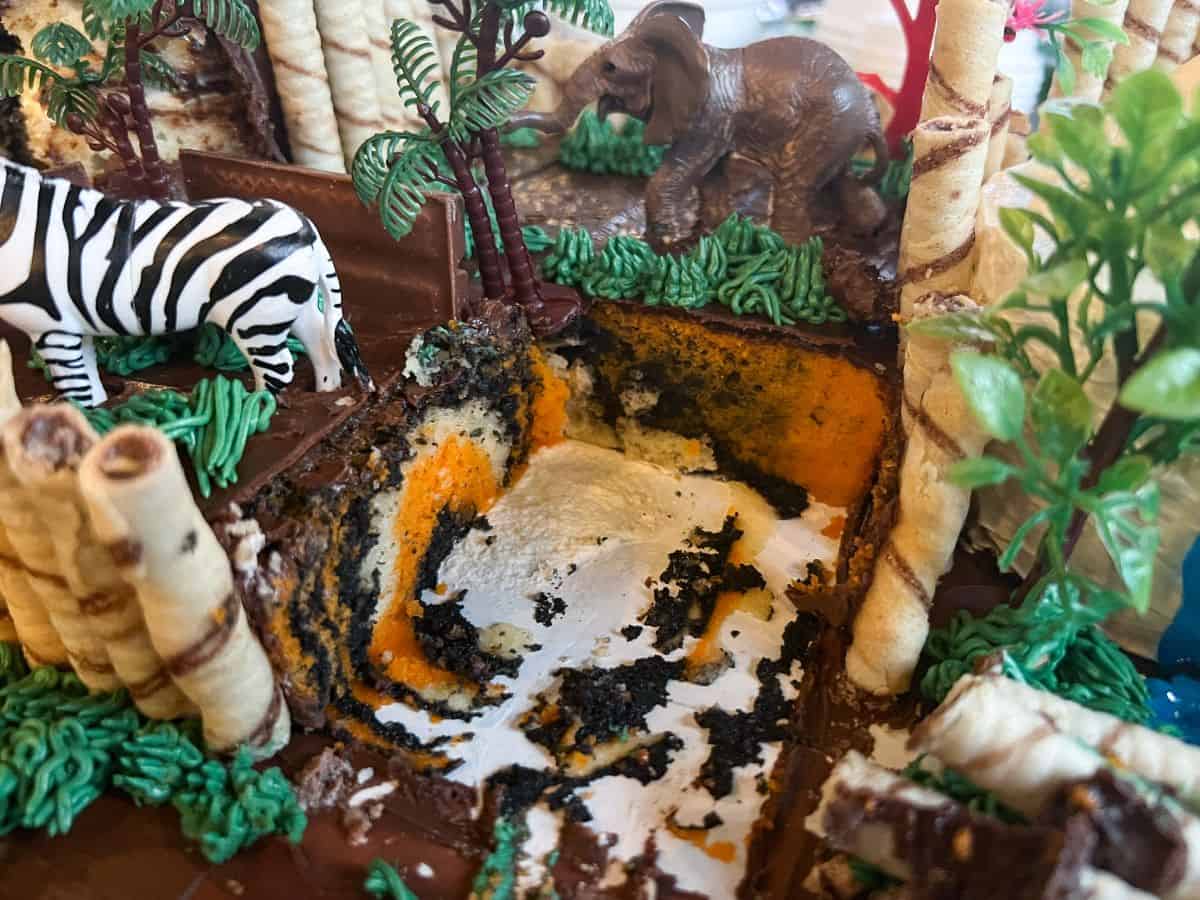
I decided to place the tiger striped 13x9 cake in the upper left corner of my cake board, then stack the two 8-inch zebra striped cakes on top in the upper left corner of the 13x9-inch cake to make the lion exhibit.

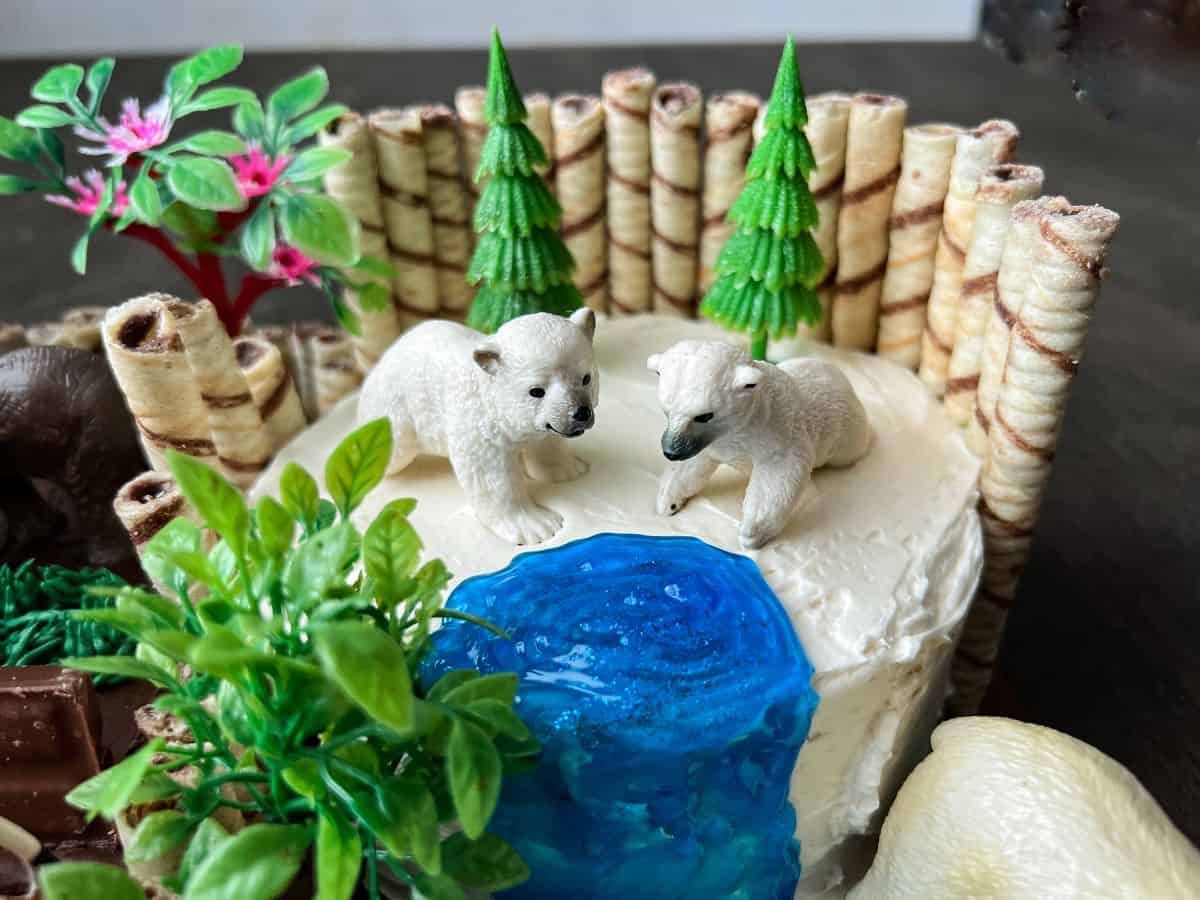
In the upper right of the cake board, I placed the two 6-inch Rainbow Leopard Print Cakes to make the polar bear exhibit.
I left space for train tracks and a train in front of the polar bear exhibit, with an alligator pond in the lower right of the board.
Finally, the fondant letters for my daughter's name would be placed in the lower left corner along the bottom edge of the board.
For the frosting, I used Easy Vanilla Buttercream and store bought canned Chocolate Fudge Frosting. This saved me time, and I knew it would be the color I wanted.

I smeared some buttercream in the upper left corner of the board to adhere the tiger striped cake. I then smeared buttercream in the upper left corner of the tiger cake to adhere the zebra striped cake layers.
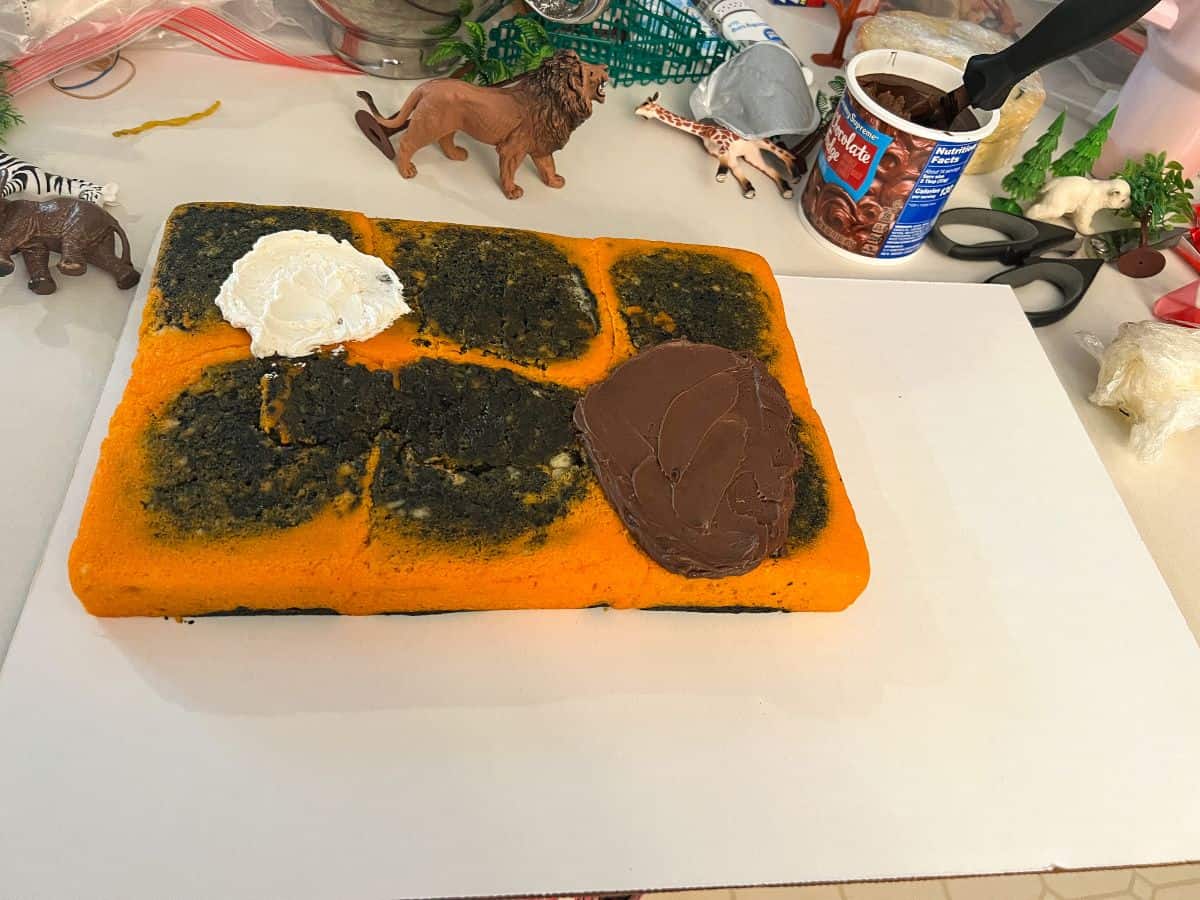
I stacked both cake layers with vanilla buttercream in between. Then, I spread a thin layer of the chocolate frosting all over the tiger striped cake, over the top and sides of the zebra cake, and all over the cake board to represent dirt or ground.

I then layered the Rainbow Leopard Print Cakes on the upper right corner of the board using vanilla buttercream to represent ice.
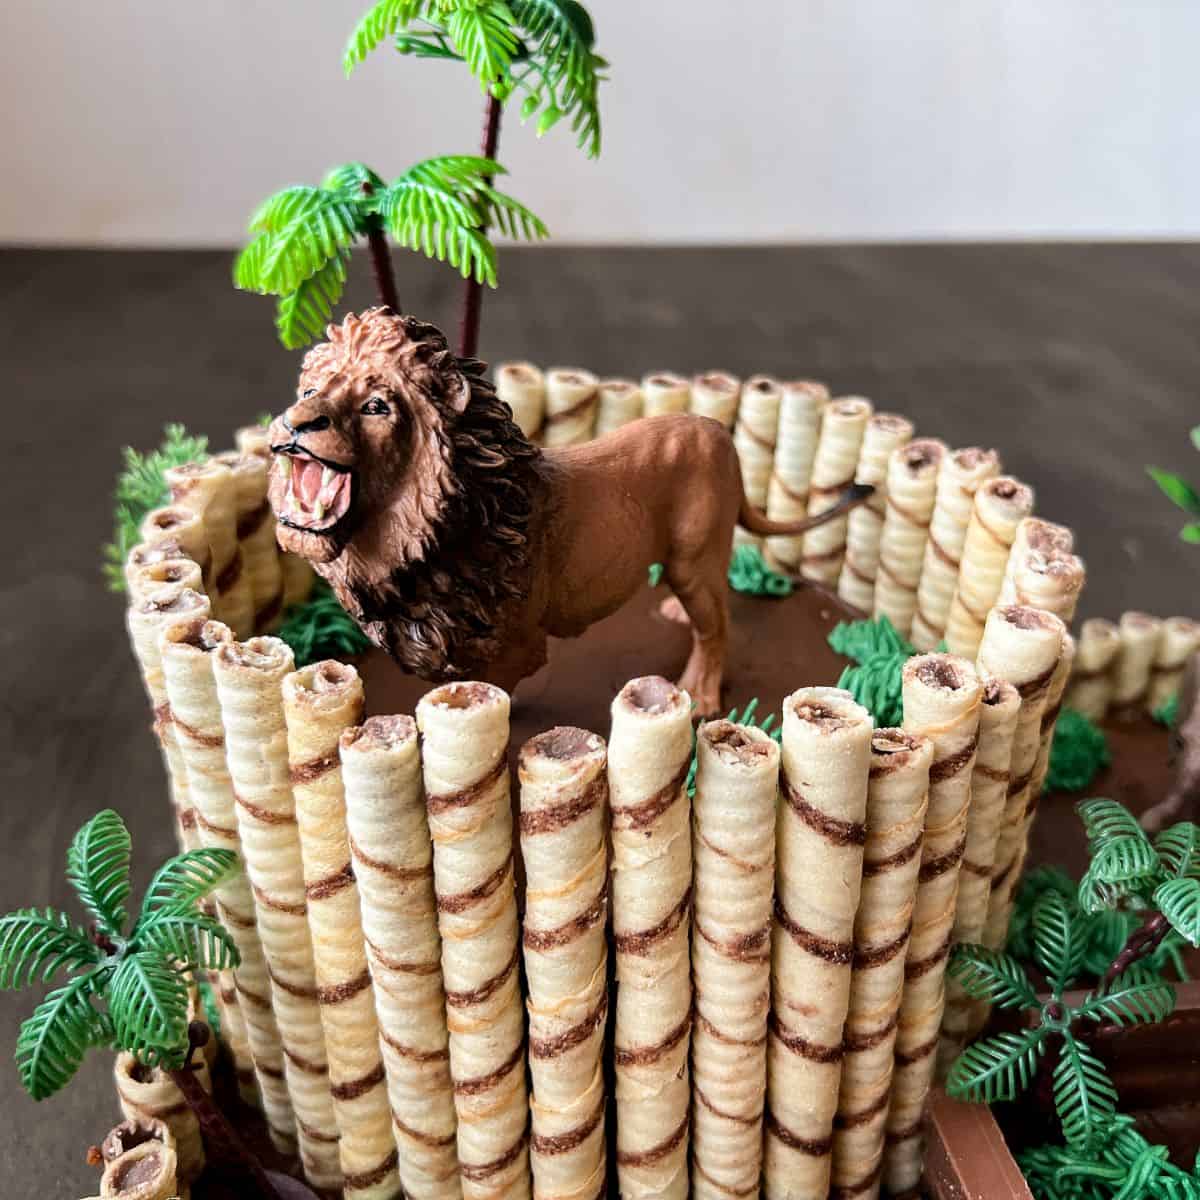
At this point, I pressed full size Pirouline Cookies into the sides of the zebra striped cake to make an enclosure for the lion. I did the same with the polar bear exhibit, but I left the front open.
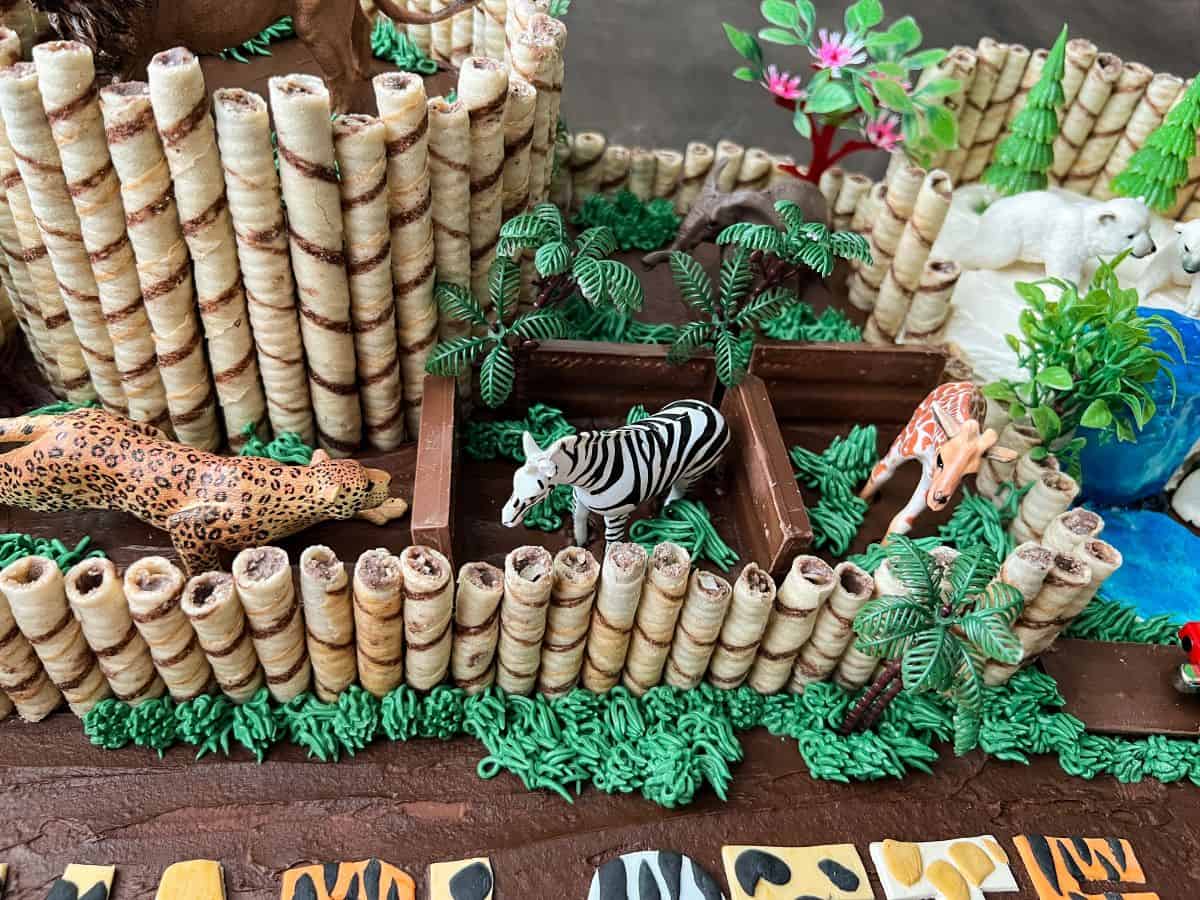
Then, I carefully cut the Pirouline Cookies in half to make enclosures for the other animals: a leopard, a zebra, a giraffe, and an elephant.
I used Kit Kat bars to represent walls to separate these animals from each other. The placement was based on which animal I wanted where and the size of the animal.
For me, it worked to put the cheetah in the front left, the zebra in the middle, the giraffe on the right, and the elephant in the back.
For the polar bear exhibit, I first made a circle of vanilla buttercream on the cake board in front of the stacked Rainbow Leopard Print Cakes.
Then, I spread a thin layer of blue food gel on the top and down the front side of the cake and on top of the vanilla buttercream circle on the board. I sprinkled the gel with a little blue disco dust. This represented a little water feature and waterfall for the polar bears.
I placed two Kit Kat bars in front of the polar bear exhibit to represent train tracks.
Then, I spread a small rectangle of buttercream in the lower right corner of the board and covered it in a thin layer of blue decorating gel to represent water for the alligator. I also sprinkled this gel with some royal blue disco cake dust for a little sparkle.

Next, I placed the fondant letters in the lower left corner of the board.

The last step was to place the animals and the trees and pipe grass. I added evergreen trees to the polar bear exhibit and tropical trees to the animals that live in warm environments.
I tinted vanilla buttercream a deep green color. You can add small amounts of black or brown gel to your green to achieve this color.
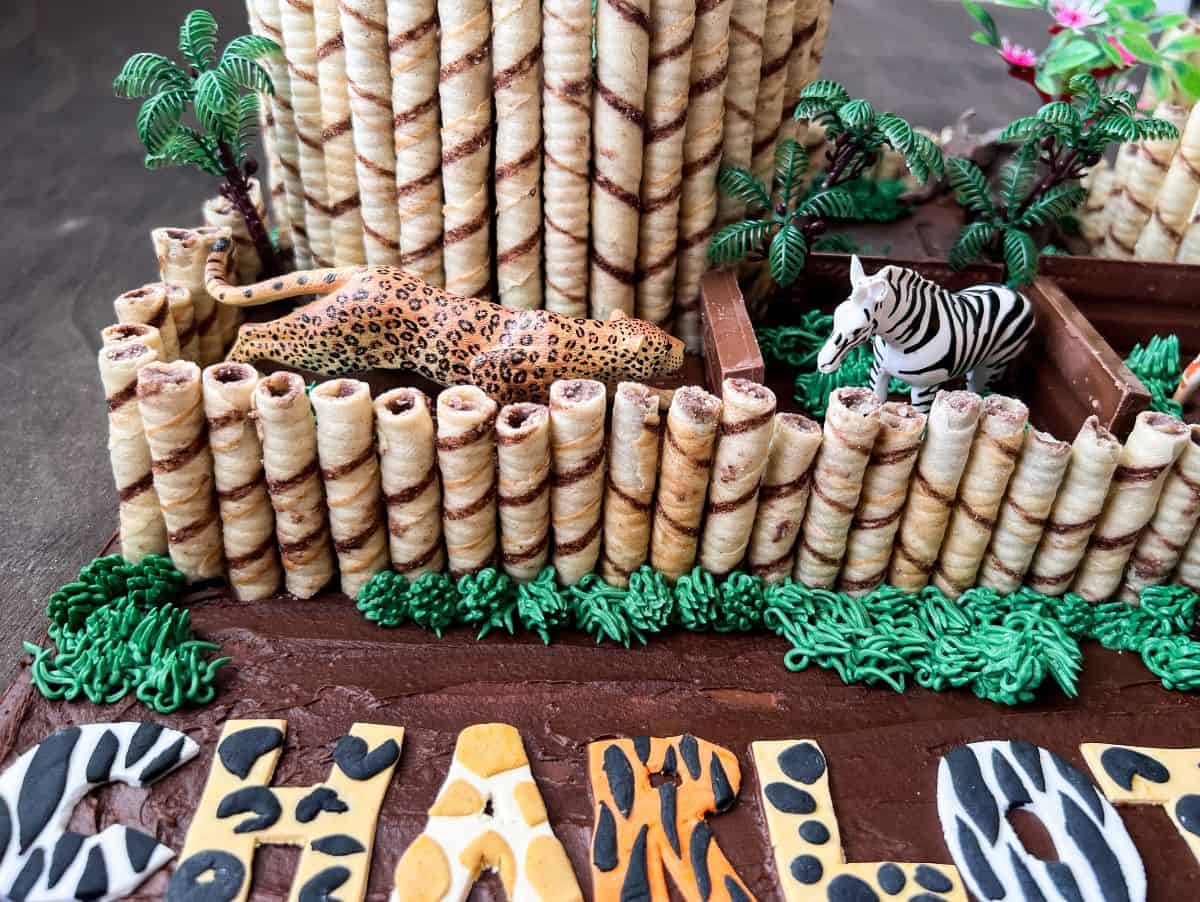
I transferred the green buttercream to a disposable piping bag with a grass tip and just started adding grass wherever it made sense.
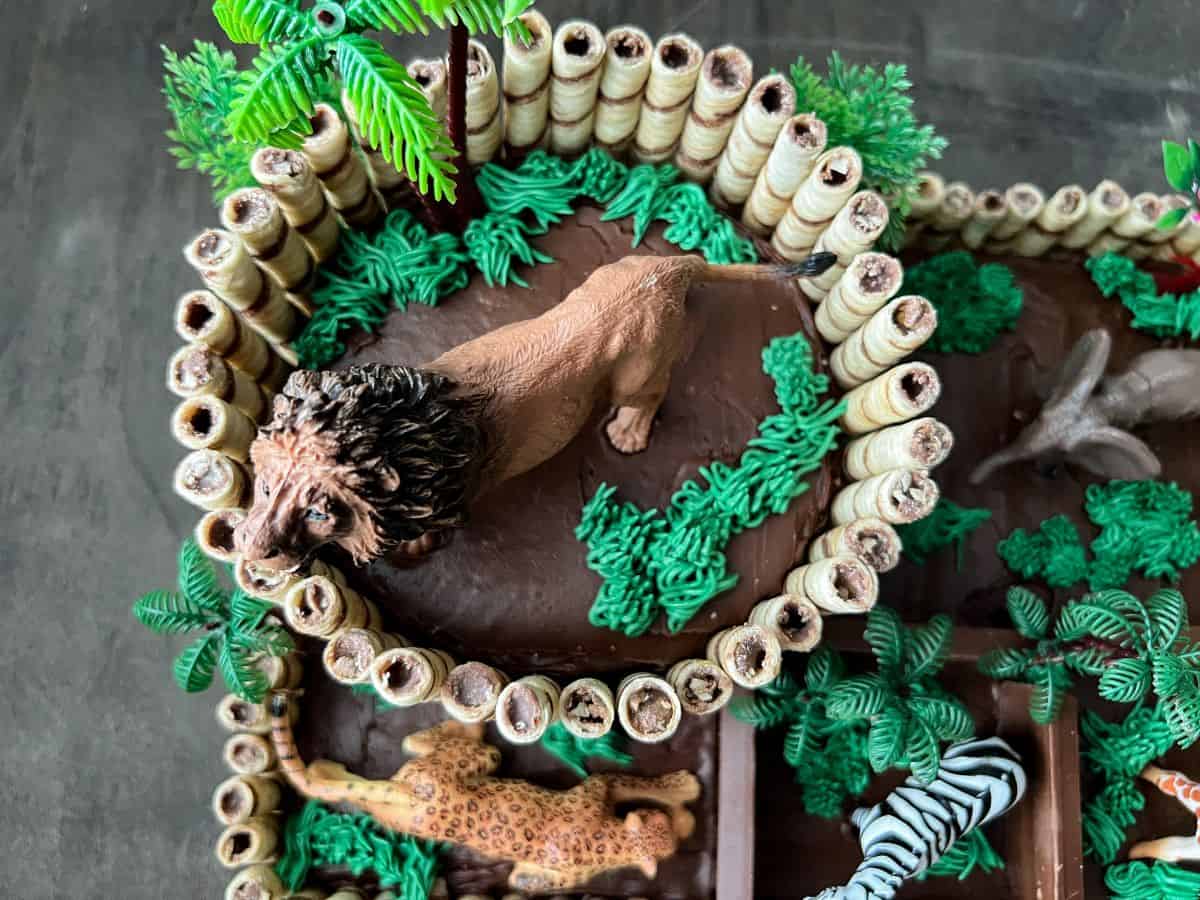
I put some in all of the animal exhibits, except for the polar bears', and even around the back of the zoo.

The grass is an easy way to hide any imperfections or gaps in the cake too.

Storage
This is a massive cake, so I was not able to refrigerate it. I made it the day before the party and kept it at room temperature. Since it was just cake and buttercream, it should be fine to store it that way for a day.
If you do refrigerate the cake, make sure to allow it to come to room temperature before serving.
Serving Suggestions
Because there are 3 cake patterns all made of the same flavor of cake, I decided to allow the kids to choose which pattern(s) they wanted. I believe most asked for all 3!
I started by removing some of the piroutte cookies and then slicing into the cakes with a cake serving knife. A sharp serrated knife will also work well to get nice, clean slices.

This was the first time I was able to know whether the patterns worked. We were all pleasantly surprised!
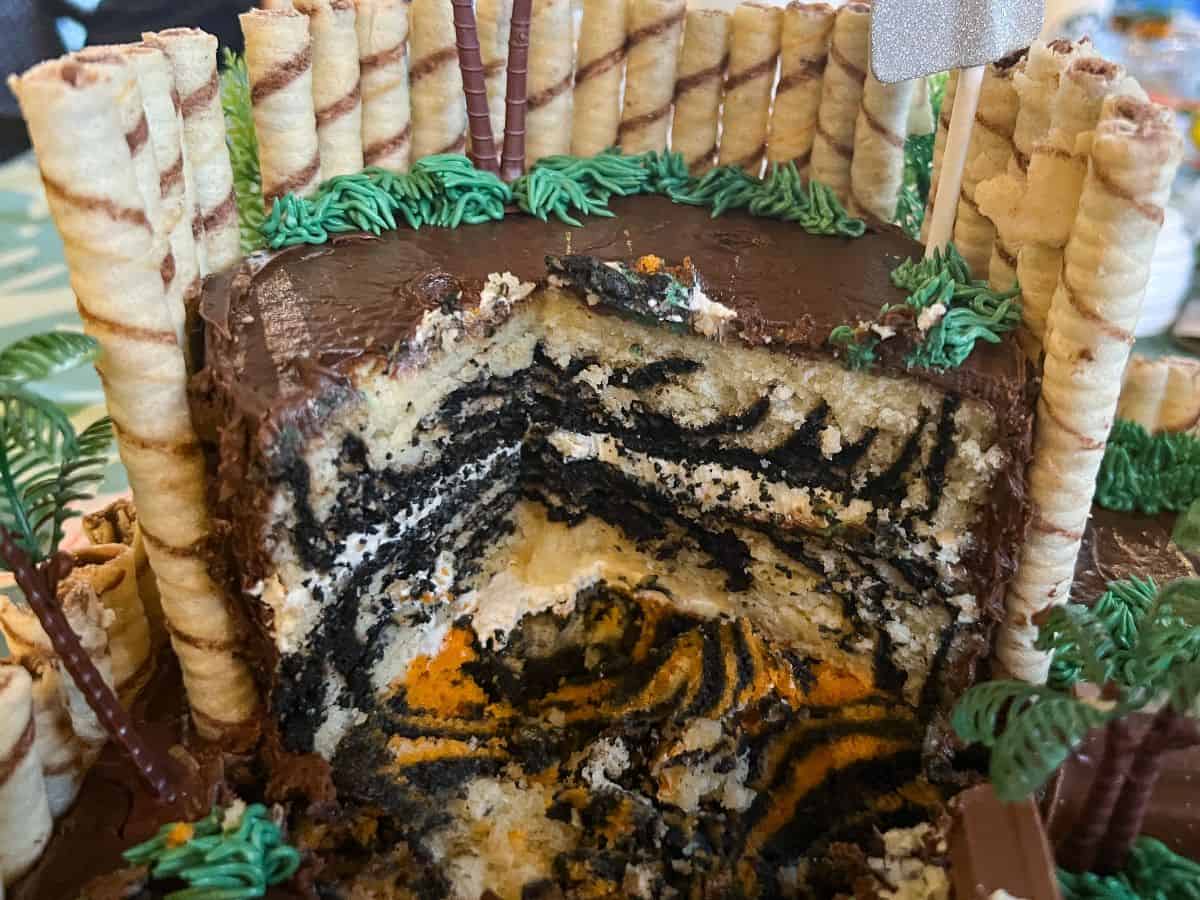
The cake was a success!

Gluten Free Option
Use a measure for measure gluten free flour blend, like Bob's Red Mill, in place of all purpose flour in your favorite vanilla cake recipe.
📖 Recipe

Zoo Animal Birthday Cake
Equipment
- disposable nitrile gloves, optional
- small fondant rolling pin with guides
- paring knife
- one 13x9-inch pan, two round 8-inch pans, two round 6-inch pans
- cake baking strips
- large 19x13-inch rectangular cake board
- animal figurines, such as lions, elephants, polar bears
- small train
- plastic trees and plants
- disposable piping bags
- small grass tip, like Wilton #233
- Plastic tip coupler, optional
Ingredients
- white and black rolled fondant
- powdered sugar (for dusting the fondant)
- Everclear or vodka (optional)
- 2 or 3 batches white or vanilla cake (see note)
- gel food coloring in gold, black, brown, orange, pink, teal, purple, and green
- Easy Vanilla Buttercream (see note)
- 2 cans chocolate frosting
- Kit Kat bars
- Pirouline Cookies
- blue decorating gel
- royal blue disco cake dust (optional)
Instructions
Make the Safari Print Fondant Letters:
- To make safari letters in zebra, leopard, giraffe, tiger and cheetah prints, put on disposable nitrile gloves to protect your hands when tinting the fondant.
- For the leopard and cheetah, use a small amount of brown gel and work it into the white fondant to make a light brown color. Use gold gel to tint some white fondant for the giraffe print and orange for the tiger.
- To make the zebra letters, roll out white and black fondant on a cutting board or mat using a small fondant rolling pin with a small amount of powdered sugar to prevent sticking. Use a sharp knife to cut out the white letters and the black zebra stripes, then adhered the stripes onto the white background using a small amount of water. You can also use alcohol, like Everclear or vodka.
- Repeat this process for all of the animal patterns.
- After the letters are assembled, brush them with a thin layer of Everclear to remove or dissolve any powdered sugar remnants. This gives the letters a more vibrant appearance.
- Use the letters immediately or allow the letters to dry at room temperature for a couple days.
Bake the Cakes:
- Prepare two 6-inch cakes according to the method outlined in the Rainbow Leopard Print Cake recipe.
- To make the Zebra and Tiger Stripe Cakes, spray two 8-inch cake pans and one 13x9-inch pan with baking spray. Add moist baking strips around the cake pans.
- Divide the batter into 3 portions. Leave one plain and tint the others black and orange.
- To make the Zebra Stripe Cakes, place about four tablespoons of untinted batter into the center of each 8-inch round pan. Then, directly into the middle of the untinted batter, place two tablespoons of black batter. Directly into the center of the black batter, place two tablespoons of untinted batter. Alternate black and untinted batter until the pans are ⅔ full.

- Bake the cakes according to your recipe's instructions until baked through. Do not overbake.
- For the Tiger Stripe Cake, spoon 2 rows and 3 columns of orange cake batter so there are 6 circles of about ¼ cup each. Top each circle with a large spoonful of black cake batter and then a smaller amount of untinted batter.

- Repeat this process until all of the batter has been added and the 6 circles all touch as if one layer of cake batter.

- Bake the cake according to your recipe's instructions.

- Allow the cakes to cool for 10 minutes in the pans and then unmold the cakes onto cooling racks to cool completely. Wrap the cakes tightly in plastic wrap and store at room temperature until you're ready to assemble the cake.
Assemble the Cake:
- Smear some vanilla buttercream in the upper left corner of a large 19x13-inch rectangular cake board. Place the tiger striped 13x9 cake in the upper left corner of the cake board. Spread a circle of vanilla buttercream on the upper left corner of the 13x9 cake and a circle of chocolate frosting on the bottom right corner.

- Stack the two 8-inch zebra striped cakes on top in the upper left corner of the 13x9-inch cake to make the lion exhibit, using vanilla buttercream between the layers.

- In the upper right of the cake board, place the two 6-inch Rainbow Leopard Print Cakes with vanilla buttercream in between the cake layers to make the polar bear exhibit. Leave space for train tracks and a train in front of the polar bear exhibit, with an alligator pond in the lower right of the board.
- Spread chocolate frosting to cover the remaining exposed surfaces of the 13x9-inch cake and over the entire cake board to represent dirt or ground.
- Cover the layered Rainbow Leopard Print Cakes with vanilla buttercream to represent ice.
- Press full size Pirouline Cookies into the sides of the zebra striped cake to make an enclosure for the lion.

- Press full size Pirouline Cookies into the sides of the Rainbow Leopard Print Cake to to make an enclosure for the polar bears, leaving the front open.

- Carefully cut the Pirouline Cookies in half to make enclosures for the other animals: a leopard, a zebra, a giraffe, and an elephant.
- Use Kit Kat bars to represent walls to separate these animals from each other. The placement is based on which animal goes where and the size of the animal. One possible arrangement is to put the cheetah in the front left, the zebra in the middle, the giraffe on the right, and the elephant in the back.

- For the polar bear exhibit, make a circle of vanilla buttercream on the cake board in front of the stacked Rainbow Leopard Print Cakes.
- Spread a thin layer of blue food gel on the top and down the front side of the cake and on top of the vanilla buttercream circle on the board to represent a water feature and waterfall for the polar bears. Sprinkle the gel with a little blue disco dust.

- Place two Kit Kat bars in front of the polar bear exhibit to represent train tracks.
- Spread a small rectangle of buttercream in the lower right corner of the board and cover it in a thin layer of blue decorating gel to represent water for the alligator. Sprinkle the gel with some royal blue disco cake dust for a little sparkle.

- Place the fondant letters in the lower left corner of the board.
- Place the animals and the trees on the cake, using evergreen trees for the polar bear exhibit and tropical trees for the animals that live in warm environments.

- Tint vanilla buttercream a deep green color by using small amounts of black or brown gel with green to achieve this color.
- Transfer the green buttercream to a disposable piping bag with a grass tip and pipe grass in all of the animal exhibits, except for the polar bears', and even around the back of the zoo. The grass is an easy way to hide any imperfections or gaps in the cake.


Leave a Reply