
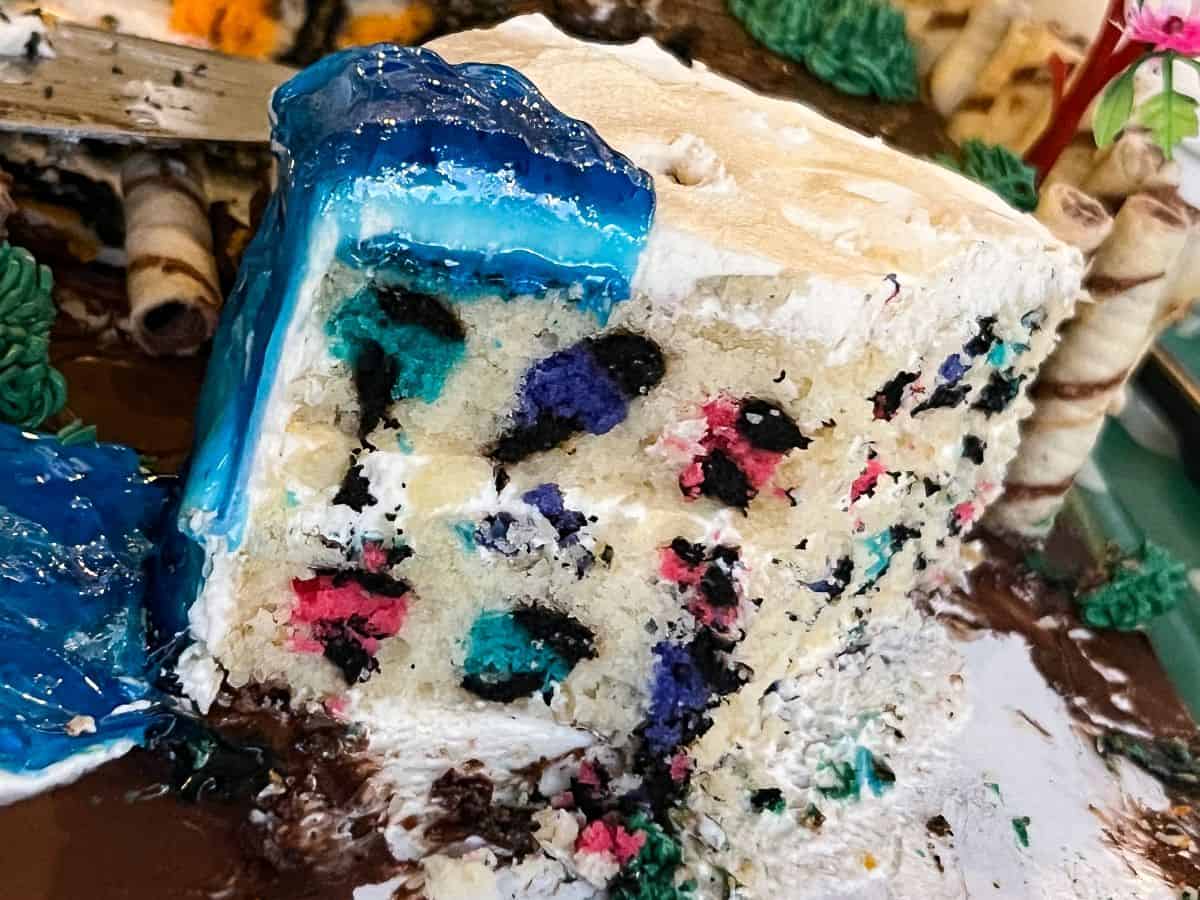
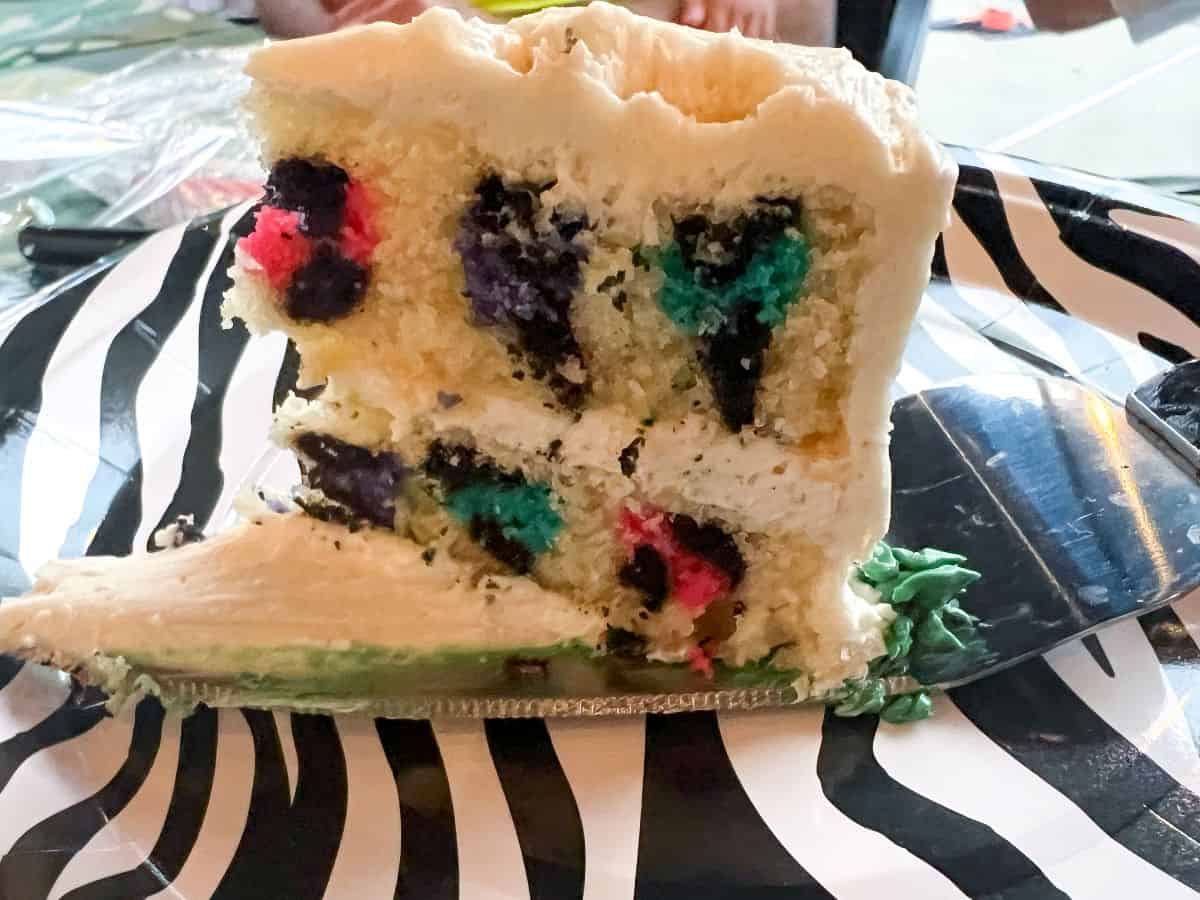
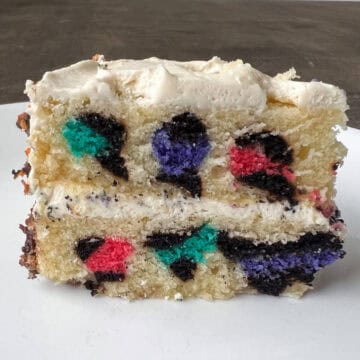
This Rainbow Leopard Print Cake has a pattern that is revealed when the cake is cut. This is perfect for a Zoo or Safari themed birthday party.

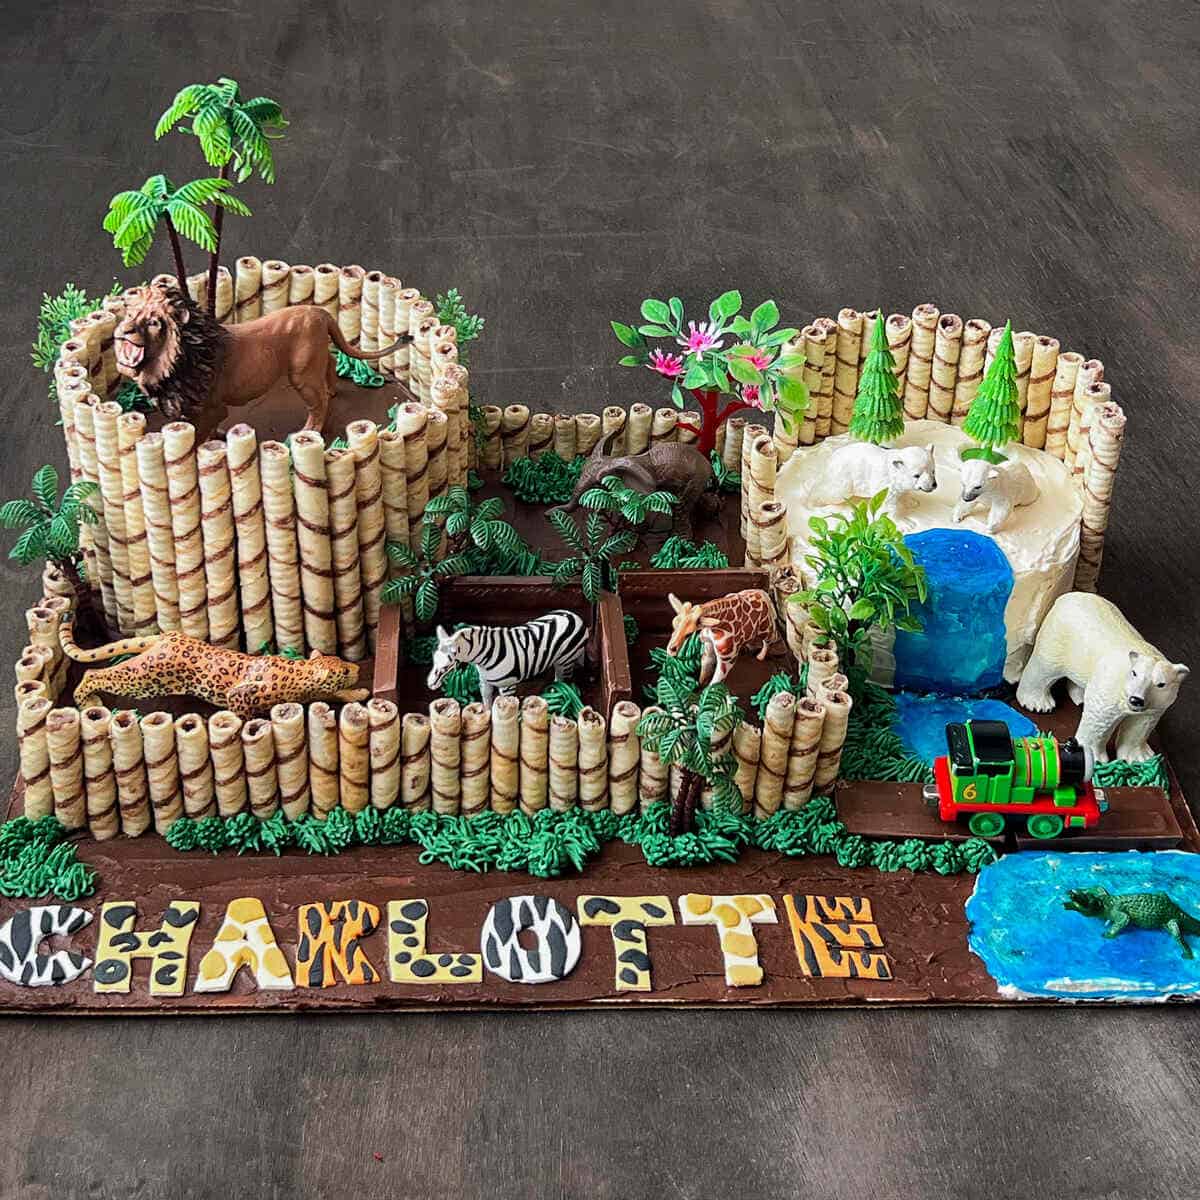
For my daughter's Zoo Birthday Party, I made a massive Zoo Animal Cake with different animal exhibits. To add to the theme, I made the cake with 3 different animal print patterns inside: tiger stripes, zebra stripes, and this rainbow leopard print.
Many years before, I found this amazing YouTube video from Cookies Cupcakes and Cardio for how to make a Rainbow Leopard Cake. I was waiting for the perfect opportunity to try it out. Unfortunately, the corresponding blog post no longer exists, so I wanted to document a step by step printable recipe for this beautiful cake technique.
I made the rainbow leopard print as two small round cakes that ended up being the polar bear exhibit.
I wasn't sure if it would really work and didn't know how it turned out until we cut into the cake at her party. I was pleasantly surprised, and my daughters were amazed at the reveal!
Because I made these in 6-inch cake pans, I only had space for 3 colors. If you use 8- or 9-inch pans, you can use up to 5 colors.
I would love to make this cake again on its own, so hopefully one of my girls asks for it!
Jump to:
Supplies
Other than the cake batter ingredients, you will need:
- teal, pink, purple and black food coloring gels (yellow and orange if making cake in 8-inch pans)
- disposable piping bags
- rubber bands or piping bag clips
- two or three 6-inch or 8-inch cake pans
- small metal offset spatula
- Easy Vanilla Buttercream, optional for frosting cake
Make the Cake Batter
Because this batter needs to be colored and piped, it's important to use a cake recipe that makes a thicker batter, rather than a homemade or boxed cake mix that has a thin batter.
It's also important to use a white cake or vanilla cake, rather than a yellow cake, so that they colors are nice and bright. You can tint the cake batter with white food coloring gel if your recipe turns out light yellow.
I used this vanilla cake recipe from Sugar Spun Run. The cake was the perfect texture for making the leopard pattern. As with most homemade cakes, it is not quite as soft and moist as a boxed cake, but everyone enjoyed it. I have since made it again and had my kids do a blind taste test to compare this cake to the King Arthur Classic Birthday Cake. After a lot of back and forth, they picked this cake recipe.
You will need about 6 cups of batter to make three 8-inch layers. I needed less here since I was just making two 6-inch layers. I used the extra batter to make the tiger striped and zebra striped cakes.
To make this batter, sift together the dry ingredients in a medium sized bowl. Set aside. Beat the butter, sugar and oil together in the bowl of an electric mixer until well combined. Add the eggs one at a time. Once fully mixed, stir in the vanilla extract. By hand, carefully add ⅓ of the dry ingredients, using a spatula to incorporate. Then add ½ of the buttermilk and stir, then ⅓ of the dry ingredients and stir, then the other ½ buttermilk and the final ⅓ dry ingredients. Do not overmix this batter!
Once the batter is made, it's time to color it.
Mix the Colors
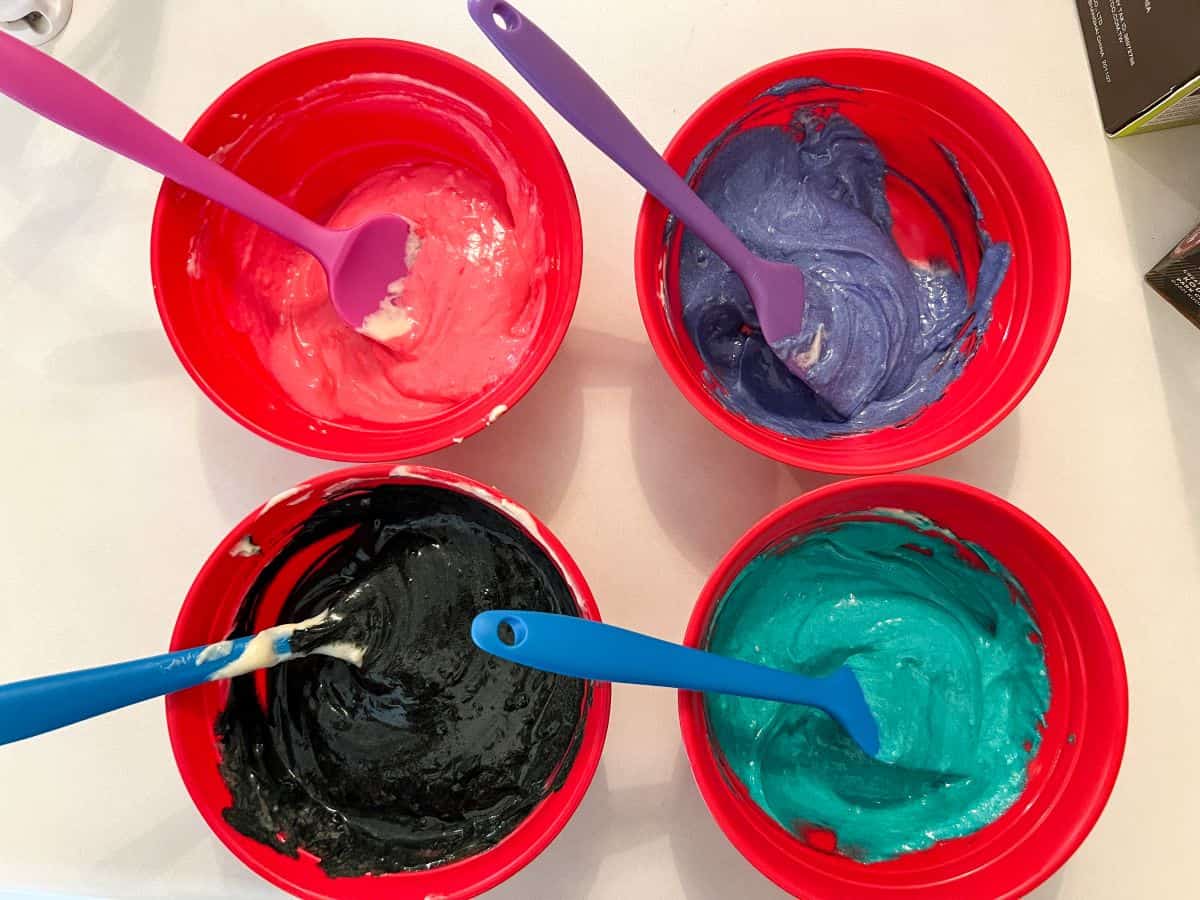
Since I was using smaller cake pans (6-inch), I just needed 3 colors. I chose pink, teal and purple. For 8- or 9-inch round pans, you may need 5 colors. The original video also uses yellow and orange.
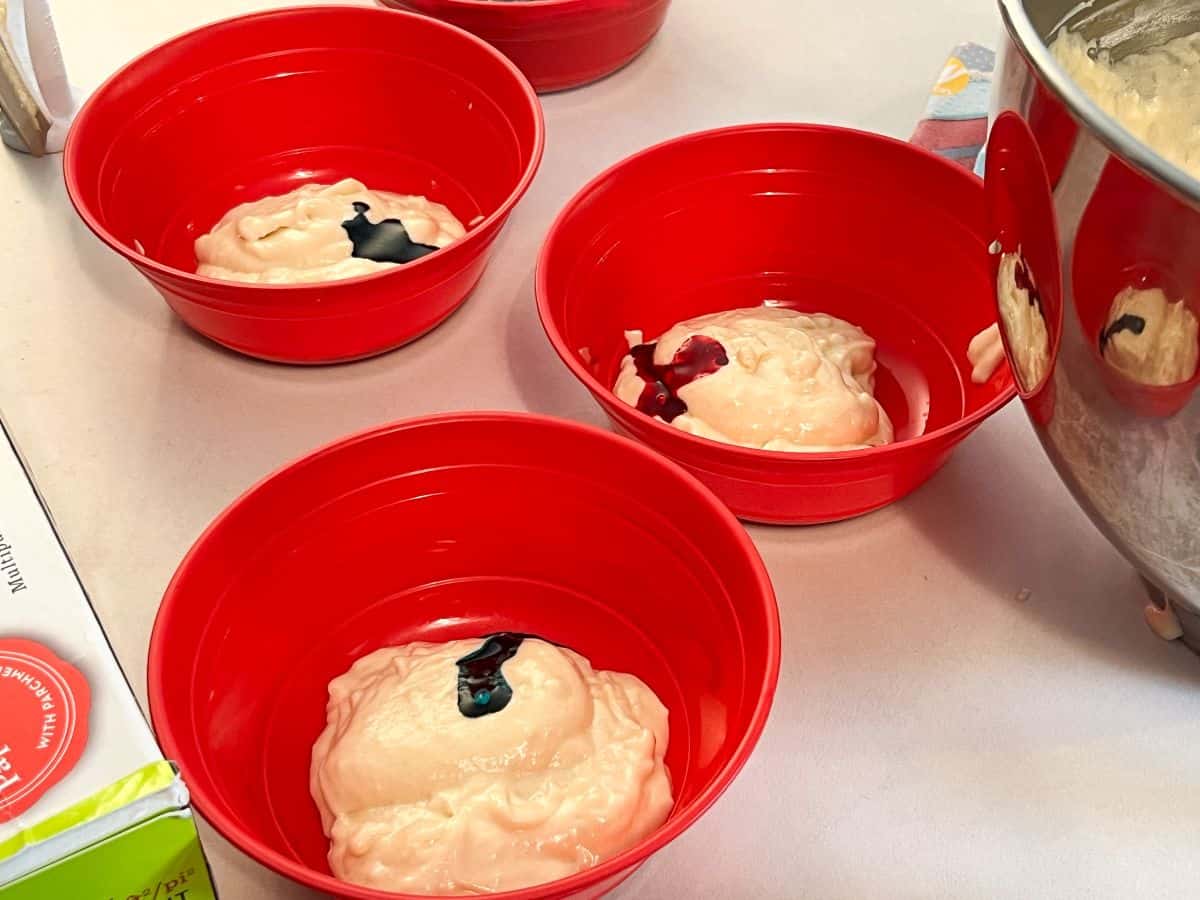
Remove 1 cup of batter to one bowl and ¼ to ½ cup of batter to each of 3 bowls. Tint the bowl with 1 cup of batter with black food coloring gel. Tint the 3 bowls containing ½ cup batter with your chosen colors.
If you are making this cake in 8- or 9-inch round cake pans and using 5 colors, simply add batter to two more bowls and tint them accordingly.
Transfer the black and colored batters to disposable piping bags, secured at the top with a rubber band. Place the remaining untinted batter into a piping bag.

Pipe the Batter
Prepare two round cake pans by spraying the insides with baking spray containing flour. I made two 6-inch cake layers because this was part of larger cake. I did not need the entire batch of batter for this, so I used some of it for the tiger stripe cake and the zebra stripe cakes.
If you're only making the leopard print cake, you can use either four 6-inch cake pans and use 3 colors of batter or three 8-inch pans and use 5 colors of batter.
Place a parchment round into the bottom of each pan and spray the top of the paper with baking spray.
Add moist baking strips to the outside of each pan to ensure even baking. I get such even cake layers with these strips I very rarely have to level the cakes.
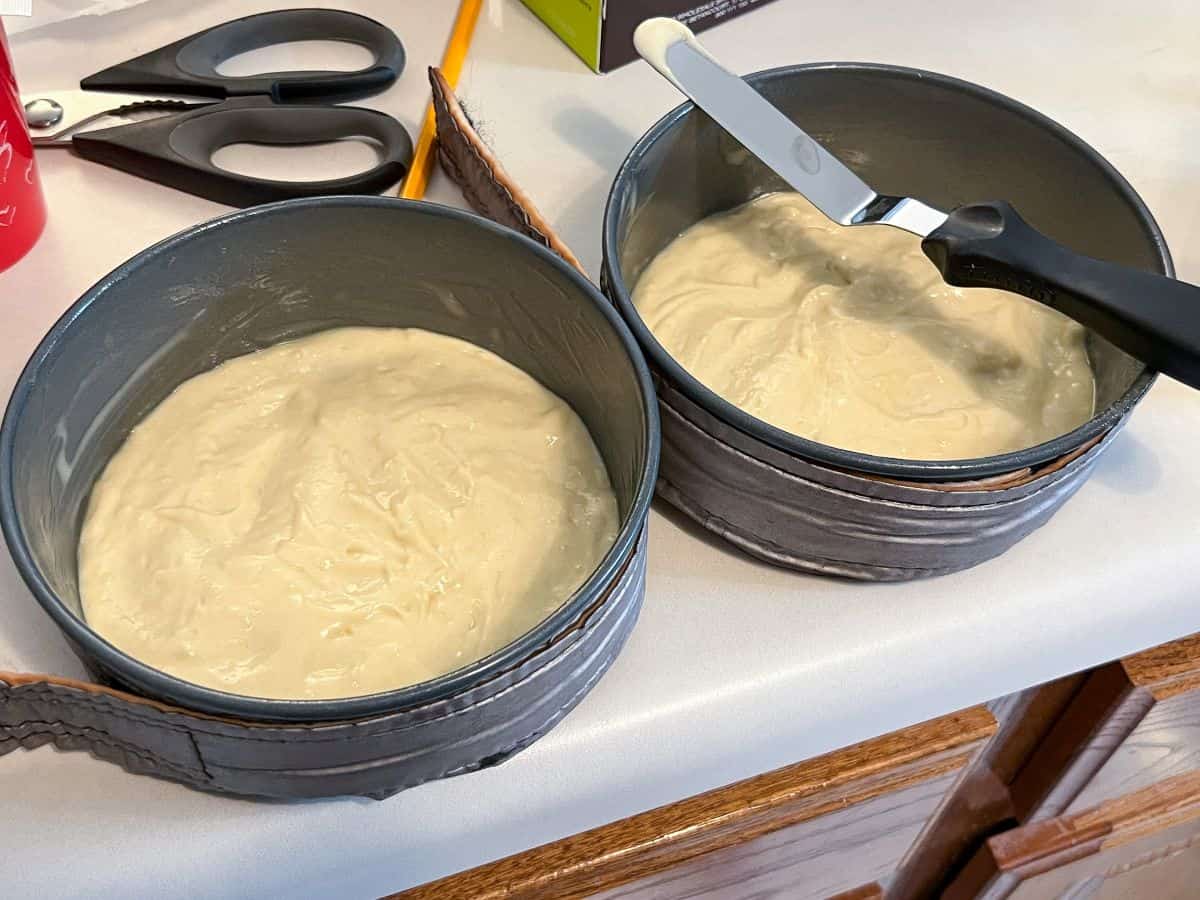
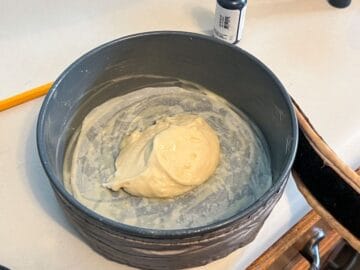
Place ½ cup of vanilla cake batter into the bottom of each pan.
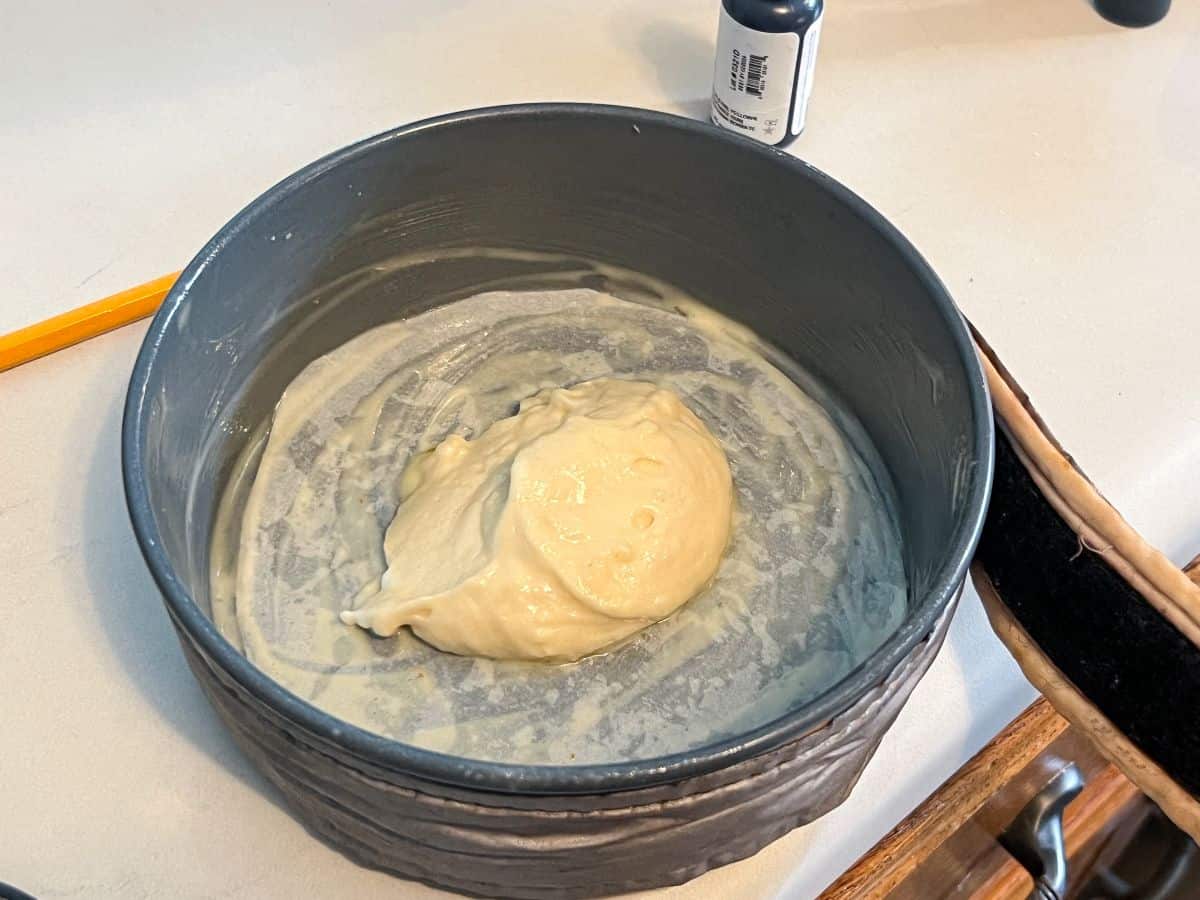
Use an offset spatula to smooth the batter, covering the entire bottom of each pan.
Snip off tips of the piping bags to create a small circular shaped opening. You want the opening for the black to be slightly smaller than for the colors.
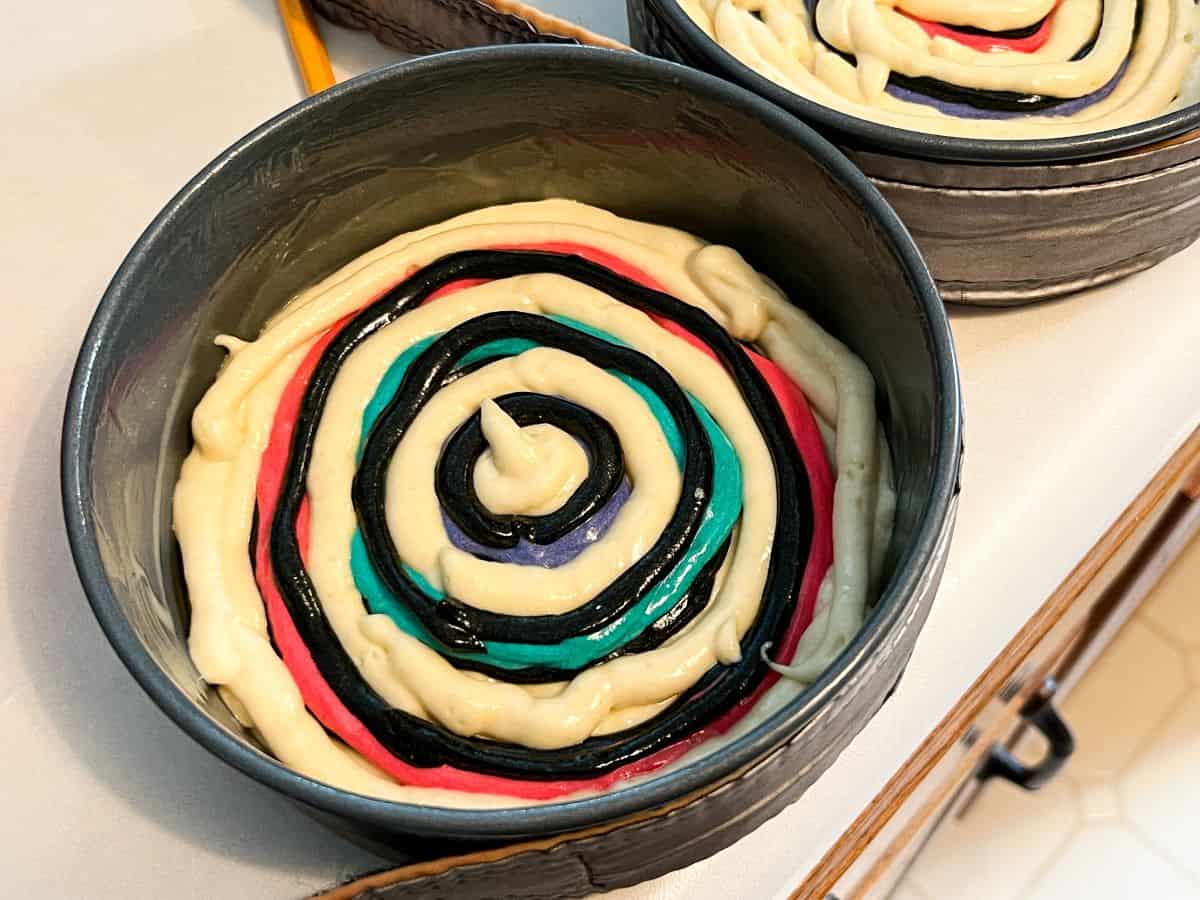
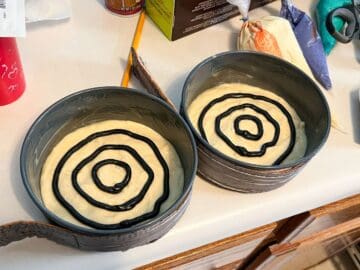
Using the black cake batter, pipe 3 circles (for 6-inch pans) or 5 circles (for 8- or 9-inch pans) on top of the untinted cake batter layer, starting about ½" from the edge of the pan, and working towards the center.

Use the pink batter to pipe on top of the black outer ring of one pan and the inner ring of the other pan. This will ensure the colors are staggered when the cakes are eventually stacked. Cover the black twice with the pink.

Repeat this process with the blue, piping it on the outer ring of one pan and the middle ring of the other pan. Then, repeat with the purple on the inner ring of one pan and the middle ring of the other pan. Again, you want the colored circles go around twice.

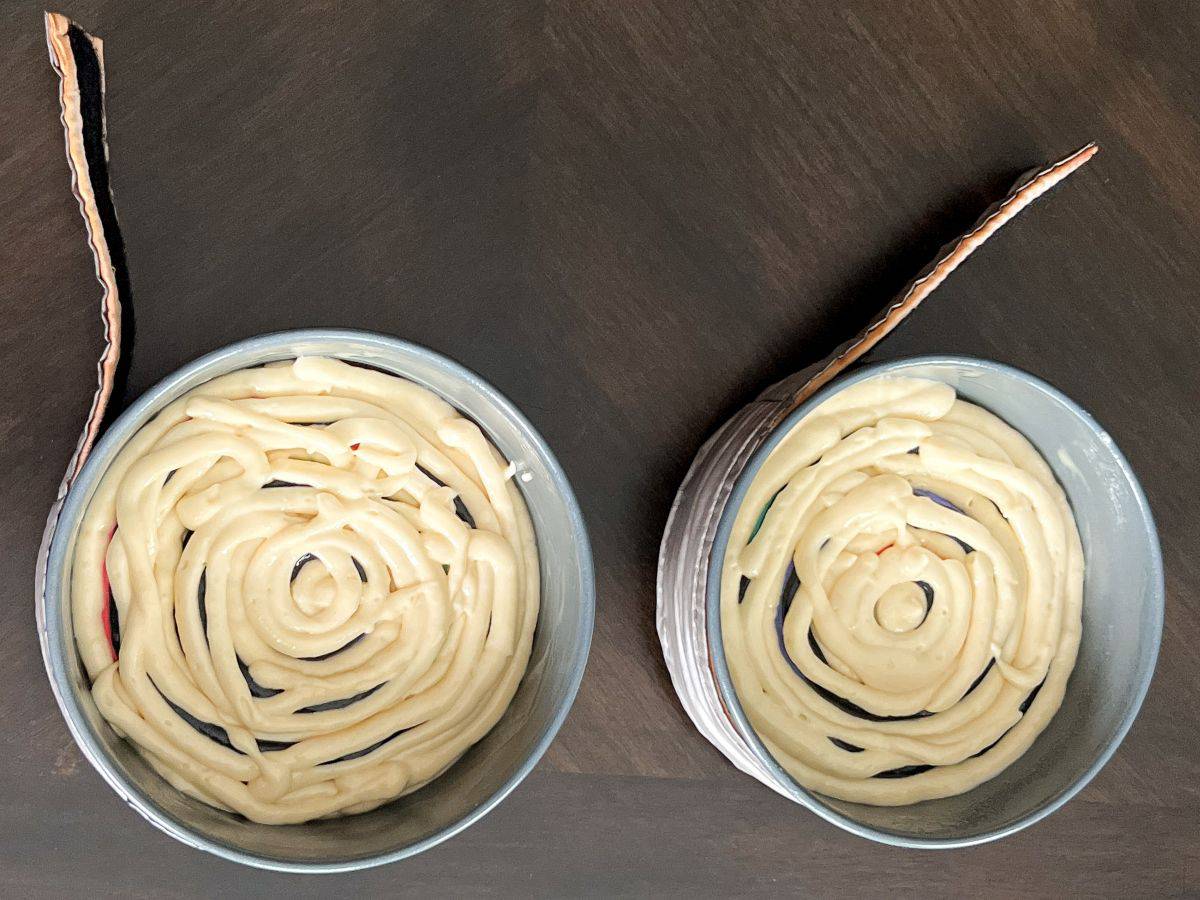
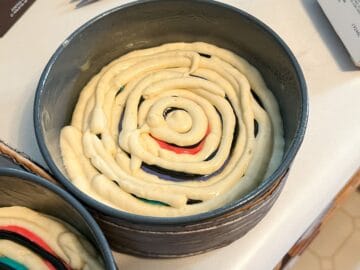
Using the black cake batter, pipe a single circle on top of all of the colored circles. Then, pipe the untinted batter between all of the black circles and in the center and perimeter of the pan. This should create an even layer of cake batter.
With plain vanilla batter in a piping bag, fill empty spaces between circles with batter. Then, pipe the batter on top of all of the circles to cover up the color.
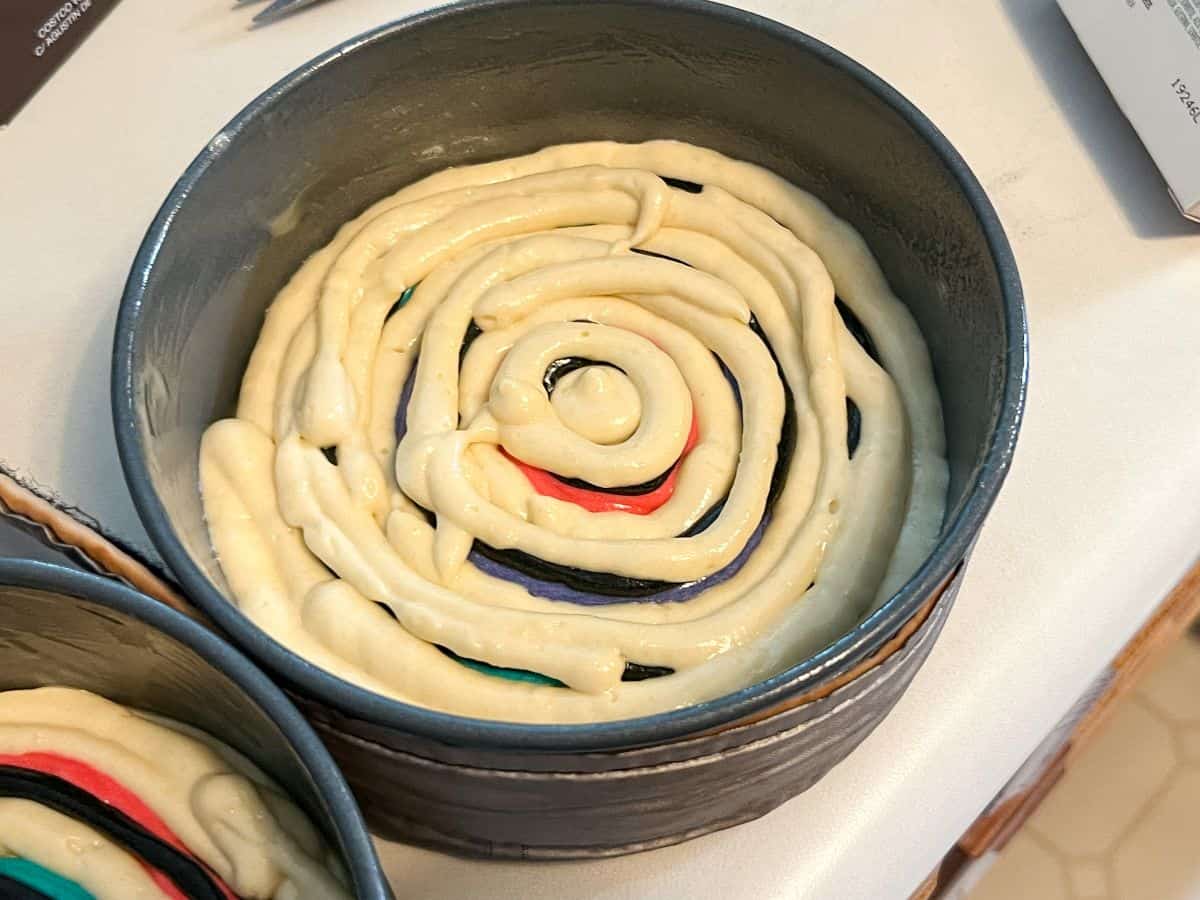
No need to smooth with a spatula or you risk smearing the colored batter.
Bake the Cakes
Bake the cakes for 25-30 minutes or until a toothpick inserted into the center comes out clean. This time will vary depending on the size of your cake pans and the thickness of the batter. Reduce the baking time for thin layers. You do not want to overbake this cake, or it will taste dry.
Remove the pans from the oven and allow them to cool for 10 to 15 minutes, then invert the cakes onto cooling racks to cool completely.
Frost and Decorate the Cake
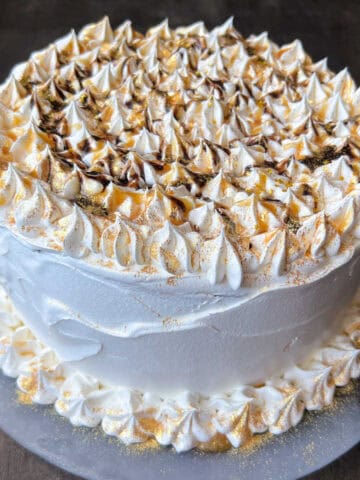
Once cooled, you can assemble the cake by covering a cake with Easy Vanilla Buttercream and stacking the layers. Cover the entire cake with buttercream.
The video shows a really cool way to decorate the cake if you want to check that out. For my Zoo Cake, I just used untinted buttercream to represent ice since this was the polar bear exhibit.
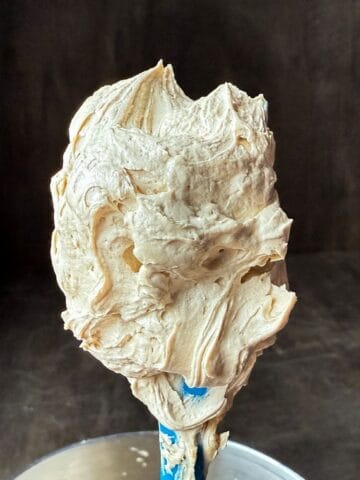
I needed just one batch of Easy Vanilla Buttercream for two 6-inch layers. For an 8-inch three layer cake, you will need at least 6 cups of buttercream.
Storage
Store the cake at room temperature or in the refrigerator until ready to serve. If refrigerated, allow the cake to come to room temperature before serving.
Cake should be consumed with 2-3 days, ideally earlier.
Gluten Free Option
Use a gluten free 1 to 1 baking flour, such as Bob's Red Mill, in place of all purpose flour for the cake batter. When preparing the pans, use butter and gluten free flour to dust the pans rather than baking spray with flour.
📖 Recipe
Rainbow Leopard Print Cake
Equipment
- disposable piping bags
- rubber bands or piping bag clips
- 6-inch round cake pans or 8- or 9-inch round pans
- small metal offset spatula
Ingredients
For the Cake Batter:
- 3 cups all purpose flour
- 1 tablespoon baking powder
- ½ teaspoon salt
- ½ cup butter (at room temperature)
- ½ cup vegetable or canola oil
- 1½ cups sugar
- 4 large eggs (at room temperature)
- 1 tablespoon vanilla extract
- 1¼ cup buttermilk (at room temperature)
For the Leopard Print Pattern:
- gel food coloring in black, pink, purple and teal (yellow and orange if using 8- or 9-inch pans)
Optional Frosting:
- 3 batches Easy Vanilla Buttercream (see note)
Instructions
- Preheat oven to 350°F.
Prepare the Cake Pans:
- Spray 6-inch or 8-inch round pans with non-stick baking spray containing flour, such as Pam for Baking. Alternatively, line the bottoms of the pans with parchment paper and grease and flour the sides of the pan and the parchment. This recipe will make enough batter for four 6-inch layers or three thin 8-inch layers.
- Add wet cake baking strips around the outsides of the pans.
- Set aside the pans.
Make the Cake Batter:
- In a medium bowl, sift together the flour, baking powder, and salt. Set aside.
- In the bowl of stand mixer, beat the butter, oil, and sugar until fully combined.
- Add the eggs one at a time. Beat thoroughly after each egg.
- Add the vanilla extract and mix until fully incorporated.
- Using a large rubber spatula, fold in ⅓ of the dry ingredients.
- Add half of the buttermilk and fold until combined, then add another ⅓ of the dry ingredients, followed by the remaining buttermilk and ending with the rest of the dry ingredients. Small lumps of flour will remain. Take care not to overmix.
Color and Pipe the Batter:
- Remove 1 cup of batter to a bowl and tint it with black icing gel by carefully folding the gel into the batter to achieve a deep black color.
- Remove ¼ to ½ cup of cake batter to each of 3 bowls (for a 6-inch cake) or 5 bowls (for an 8-inch cake). Add one color gel to each bowl and fold into the batter carefully.

- Colour batter as required and put batter into piping bags.

- Transfer the black and colored batters to disposable piping bags, secured at the top with a rubber band. Place the remaining untinted batter into a piping bag.
- Place ½ cup of vanilla cake batter into the bottom of each prepared cake pan.
- Use an offset spatula to smooth the batter, covering the entire bottom of each pan.

- Snip off tips of the piping bags to create a small circular shaped opening. You want the opening for the black to be slightly smaller than for the colors.
- Using the black cake batter, pipe 3 circles (for 6-inch pans) or 5 circles (for 8- or 9-inch pans) on top of the untinted cake batter layer, starting about ½" from the edge of the pan, and working towards the center.
- Use the pink batter to pipe on top of the black outer ring of one pan and the inner ring of the other pan. This will ensure the colors are staggered when the cakes are eventually stacked. Cover the black twice with the pink.

- Repeat this process with the blue, piping it on the outer ring of one pan and the middle ring of the other pan. Then, repeat with the purple on the inner ring of one pan and the middle ring of the other pan. Again, you want the colored circles go around twice.

- Using the black cake batter, pipe a single circle on top of all of the colored circles. Then, pipe the untinted batter between all of the black circles and in the center and perimeter of the pan. This should create an even layer of cake batter.

- With plain vanilla batter in a piping bag, fill empty spaces between circles with batter. Then, pipe the batter on top of all of the circles to cover up the color. No need to smooth with a spatula or you risk smearing the colored batter.
Bake the Cakes:
- Bake the cakes for 25-30 minutes or until a toothpick inserted into the center comes out clean. This time will vary depending on the size of your cake pans and the thickness of the batter. Reduce the baking time for thin layers. You do not want to overbake this cake, or it will taste dry.
- Remove the pans from the oven, take off the cake baking strips, and allow them to cool for 10 to 15 minutes, then invert the cakes onto cooling racks to cool completely.

Leave a Reply