
These Nut Free Valentine's Day Macarons are made with oat flour with a vanilla buttercream filling. They are also gluten free.

Since having success with Nut Free French Macarons, I now want to make them for every occasion. Traditional French macarons are made with almond flour, but these are made with oat flour so they are safe for people with tree nut allergies. Like traditional macarons, they are also gluten free.

These don't last long around our family. I made over 50 for a party, and they were gone in under an hour!

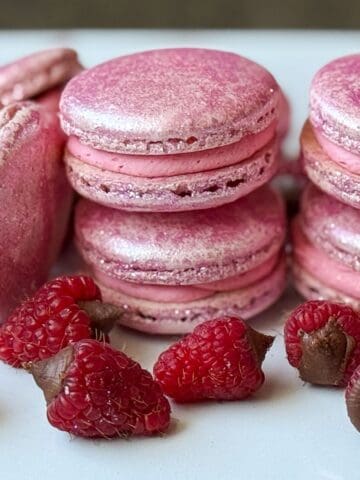
For this Valentine's Day set, I tinted the macaron shells pink, then painted some with pink luster dust. I filled them with Easy Vanilla Buttercream.

I added a single heart sprinkle to the top of some of the macarons.

These were so festive and cute!
For another flavor combination perfect for Valentine's Day, check out my Nut Free Raspberry Truffle Macarons!
Jump to:
Supplies
- 2 disposable piping bags
- 1 medium round tip, such as a #12
- 2 plastic tip couplers
- 2 macaron baking mats
- 2 half sheet pans
For Decorating (optional):
- 1 paint palette dedicated to food use
- 1 plastic transfer pipette
- 1 food grade paint brush
- 1 large piping tip such as a Wilton 2D
- Wilton heart sprinkles
Make the Macaron Shells
First, prepare a piping bag fitted with a large round tip and place it in a tall drinking glass so you can easily add the macaron batter to the bag when you are ready. Set this aside while you prepare the batter.
Sift together the oat flour and powdered sugar, then set it aside.
Beat the egg whites until foamy, then add the cream of tartar. Next, add the granulated sugar one spoonful at a time as the eggs continue beating. This helps the sugar dissolve into the eggs. Add the vanilla and food coloring and continue to beat the whites until the meringue has formed stiff peaks.

Carefully fold ⅓ of the flour/powdered sugar mixture into the meringue. Once it is incorporated, form in the rest of the flour mixture. This process of folding in the dry ingredients into the meringue is called "macaronage" and by far the trickiest part of making macarons.
If you under mix it, it will be too thick; whereas, if you over mix it, it will be too thin. Either results in a macaron shell that doesn't look right, so it's important to get the consistency right.
I still consider myself a beginner to macaron making, so I will refer you to the experts at America's Test Kitchen and Le Cordon Bleu for more information on macaronage and what to look for when the batter is ready.
Once your batter gets to just before the figure 8 stage, it's ready to transfer to the piping bag.

I use a macaron mat on a rimmed baking sheet, but you can draw 1-inch circles on parchment paper and then flip it over and pipe the batter on top. You can also do this by eye without the guides. I just find that the guides help me more be more consistent in my piping.
Pipe 1-inch circles of batter onto the mat. Then, slam the tray down hard on the counter several times to cause air bubbles to rise to the surface. Use a toothpick to pop any large bubbles and smooth batter over the hole.

Repeat with the second tray.
Allow the batter to sit for 40 minutes to dry at room temperature before baking. Meanwhile, preheat the oven to 300°F.
Bake the macarons shells, one tray at a time, for 12-15 minutes, rotating once after 7 minutes.
Remove the shells from the oven and allow them to cool completely on the mat before removing.

Meanwhile, make the buttercream.

Make the Filling
You can play around with fillings. I've considered adding jams or curds in the center with buttercream around the edges.
These would be good with a red seedless jam like raspberry.
I used my Easy Vanilla Buttercream, which is a classic American buttercream, to fill these since it's always a hit. Vanilla Swiss Meringue Buttercream would also be great. It's not as sweet as American buttercream and smoother with a texture more similar to butter.
Fill the Macarons
Macarons are essentially sandwich cookies, which means you will need to pair them up. For the best looking result, pair them up as closely in size as you can. I spend a little time moving them around to match the shells and then group them on my mat before I fill them. It's kind of like a game.
Note: if you plan to dust your shells with luster dust, you can do this now before filling them or wait until after.
To fill, take one of the shells from a pair and flip it so the flat side is facing up. Be careful doing this so as not to crush the top of the shell.

Pipe the buttercream in the center of the cookie. You can use a large round tip or a decorate tip, depending on how you would like the completed macarons to look from the side. I used a large flower tip here. We like a lot of filling so I tend to fill the space. You can certainly use less.

Carefully place the flat side of the other shell on top to create the sandwich cookie. You can pick up both cookies and do this by holding the edges of the shell to ensure you don't crush them.
Repeat this process with the remaining pairs of shells until all of them have been sandwiched.
Decorate the Macarons
This step is completely optional, but this is where I have the most fun being creative.
I made a suspension of pink luster dust in Everclear in the well of a food grade paint palette. I then applied the suspension to the macaron shell using a food grade paintbrush. I get my luster dust locally but I have heard that Truly Mad Plastics has good ones.
This will dry very quickly because of the high alcohol content. You can add another layer if desired. You can also paint the sides of the shell if you'd like. I only painted the top shell of the macaron "sandwich" because I was just serving these to family and I knew they wouldn't mind.
As I mentioned above, you can paint the shells with luster dust before you fill them if you think that would be easier.

I left some without luster dust and some with. Having them side by side made the ones without the luster dust seem so dull!
For some of them, I added a Wilton heart sprinkle to the top center. Note: these need to be put on AFTER the macaron shells are baked. I tested them in the oven and they melted and made a mess. One type of matte heart sprinkle I tried did not melt, so it just depends on how the sprinkle is made. These shiny ones did melt.
You can attach the sprinkle using a small amount of buttercream or royal icing if you have it. I just used buttercream.

Storage
Store the assembled cookies in an airtight container in the refrigerator for up to several days. This allows the macarons to mature. They are still good the day they are made, but giving them a day or two in the refrigerator assembled can sometimes improve the texture of the shells.
If refrigerated, allow the cookies to come to near room temperature before serving so the buttercream can soften.
Gluten Free Option
These cookies are naturally gluten free if you use a certified gluten free oat flour like Bob's Red Mill. Check your package of oat flour for possible gluten contaminants.
📖 Recipe

Nut Free Valentine's Day Macarons
Equipment
- 2 disposable piping bags
- 1 medium round tip such as a #12
- 2 plastic tip couplers
- 2 macaron baking mats
- 2 half sheet pans
- 1 toothpick
- 1 food grade paint palette
- 1 plastic transfer pipette
- 1 food grade paint brush
- 1 large piping tip such as a Wilton 2D
Ingredients
For the Macaron Shells:
- 126 grams oat flour
- 126 grams powdered sugar
- 100 grams egg whites (at room temperature, see note)
- ¼ teaspoon cream of tartar
- 90 grams granulated sugar
- 1 teaspoon vanilla extract (regular or clear)
- pink food coloring gel
For the Filling:
- 10 tablespoons salted butter
- 1 dash salt
- 5 ounces powdered sugar (see note)
- 1½ teaspoons vanilla extract
- 1 tablespoon heavy cream
For Decorating (optional):
- pink luster dust
- Everclear or vodka
- heart shaped sprinkles
Instructions
Prepare the Batter:
- Prepare a piping bag fitted with a large round tip or with the tip of the bag cut off. Place the bag in a tall drinking glass so it will be easier to fill. Set aside.
- In a small bowl, sift together the oat flour and powdered sugar. Set aside.
- Add the egg whites to the bowl of a stand mixer fitted with the whisk attachment. Beat the egg whites on medium-high speed. Once the egg white are foamy, add the cream of tartar. Then, slowly add the granulated sugar, one spoonful at a time.
- Add the vanilla and food coloring, if using, and continue to beat until the meringue has formed stiff peaks.
- Transfer the batter to the piping bag. Pipe 1-inch circles of batter onto the macaron mat or parchment with 1-inch circles drawn on the under side of the paper. Slam the tray down hard on the counter to cause air bubbles to rise to the surface. Use a toothpick to pop any large bubbles and smooth batter over the hole. Repeat with the second tray.
- Allow the batter to sit for 40 minutes to dry at room temperature before baking. Meanwhile, preheat the oven to 300°F.
Bake the Macaron Shells:
- Bake the macarons shells, one tray at a time, for 12-15 minutes, rotating once after 7 minutes.
- Remove the shells from the oven and allow them to cool completely on the mat before removing. Meanwhile, make the buttercream.
Make the Buttercream Filling:
- In standing mixer fitted with the whisk attachment, beat butter at medium-high speed until smooth, about 20 seconds. NOTE: If using a hand-held mixer, increase mixing times by at least 50%.
- Add powdered sugar and salt, and beat at medium-low speed until most of the sugar is moistened, about 45 seconds.
- Scrape down bowl and beat at medium speed until mixture is fully combined, about 15 seconds; scrape bowl, add vanilla extract and heavy cream, and beat at medium speed until incorporated, about 10 seconds.
- Increase speed to medium-high and beat until light and fluffy, about 4 minutes, scraping down bowl once or twice. This step is important to create a smooth and whipped buttercream.
Assemble the Macarons:
- Because the macarons will be sandwiched, pair up the shells by size. You want the top and bottom of the sandwich cookie to match as closely in size as possible.
- Add the buttercream to a piping bag fitted with a round or decorative tip. Pipe the buttercream on the flat side of one shell and carefully place the flat side of the other shell on top. Repeat with remaining pairs until all have been sandwiched.
Decorate the Macarons (optional):
- For luster dust, add a small amount of dust to a painters palette. Use a disposable transfer pipette to add a few drops of Everclear or vodka to the dust. Stir the dust with a food grade paintbrush to make a liquid suspension of the dust. Carefully paint the dust on the outside tops of the macaron shells. Prepare more dust suspension as needed.
- To add a heart sprinkle on top, carefully add a tiny amount of buttercream on one side of the sprinkle and place it in the middle of the top of a macaron sandwich cookie. Repeat as desired.
Storage:
- Store the assembled cookies in an airtight container in the refrigerator for up to several days.
- If refrigerated, allow the cookies to come to near room temperature before serving.


Soni says
Hello👋
About how long do you whip the meringue for usually? Also when you say to stop just before the figure 8 stage, does the mixture still flow like lava?
Meghan says
Hi! I whip the egg whites until stiff peaks. It usually takes me about 5 minutes using a stand mixer, but this time can vary depending on several factors including strength of the mixer, whether egg whites are at room temperature, if cream of tartar is used, if the mixer bowl has any trace oil, etc. I have read that macaron batter with oat flour or all purpose flour can go from not ready to too thin more quickly than batter made with almond flour. For that reason, the batter is ready a little before the point where it would flow like lava- you want the dry ingredients to be mixed in, but the batter can break off in chunks when lifted up with a spatula- it doesn’t have to form a ribbon. Just the act of transferring it to the piping bag will mix it more and it will become runnier. I hope that helps!