Snowflake Cookies
Snowflake Cookies are decorated with a soft icing and a minimal amount of royal icing so the frosting stays soft.
Servings 24
Equipment
- 1 snowflake cookie cutter
- 1 disposable transfer pipette
- 1 food grade paintbrush
- 1 food safe paint palette
- disposable piping bags
- small round tip plus coupler
Ingredients
- 1 batch your favorite shortbread or sugar cookies rolled and cut into snowflakes
For the Icing Glaze:
- 2 cups powdered sugar
- ¼ cup milk
- ½ teaspoon vanilla extract
- pink liquid food coloring
For the Royal Icing:
- 6 ounces warm water ¾ cup
- 5 tablespoons meringue powder
- 1 teaspoon cream of tartar
- 2¼ pounds powdered sugar
- 1 teaspoon vanilla or almond extract
Optional Decoration:
- gold luster dust plus Everclear
- sparkly sanding sugar
- pink or white sugar pearls
Instructions
Glaze the Cookies:
- To make the glaze, stir together the powdered sugar, milk, and vanilla extract in a medium sized bowl. If necessary, add more milk or powdered sugar to achieve a dippable consistency.
- Add a small amount of pink food coloring liquid if desired. Cover bowl with a damp paper towel to prevent crusting.
- Place a wire rack over a parchment or waxed paper lined cookie sheet or work surface.
- Gently stir the glaze to make sure it's fully mixed. Dip the top surface of each cookie into the icing and place the cookies on the wire rack to allow excess glaze to drip off. Use a toothpick to pop any bubbles on the surface of the glaze immediately after dipping.
- Allow glaze to fully set before decorating. Meanwhile, make the royal icing.
Make the Royal Icing:
- In the bowl of an electric mixer, pour in the warm water and the meringue powder. Mix it with a whisk by hand or with the whisk attachment until it is frothy and thickened, about 30 seconds.
- Add the cream of tartar and mix for 30 seconds. Pour in the powdered sugar and, using the paddle attachment, mix slowly on the lowest speed for a full 10 minutes. The icing will get thick and creamy. Cover the bowl with a dampened tea-towel to prevent crusting and drying, or store in an airtight container, until ready to decorate.
Add Gold Luster Dust (optional)
- Add some edible gold dust powder to the well of a food-safe paint palette. Use a disposable transfer pipette to place a few drops of Everclear in the well and mix with a food-safe paint brush.
- Gently brush the gold liquid across the surface of the cookie in broad brush strokes until the surface is covered. You may need multiple coats.
Add Snowflake Details:
- To thin the royal icing, remove about ½ cup of the icing base to a small bowl. Add small amounts of warm water (~1 teaspoon at a time) to reach the desired consistency that is easy to pipe but not runny. If you have gone too far and it's too thin, add more of the original "stock" to make thicker.
- Transfer the icing into a disposable piping bag fitted with a #2 tip. A tip coupler is helpful for securing the tip on the bag. It also allows you easily to switch tips if the #2 tip is too small and you want to bump it up to a #3 or even a #5.
- Locate your sugar pearls and sanding sugar so you can use them immediately after piping the icing. Depending on the temperature and humidity of your kitchen, the icing can set quickly so you want to get them on immediately.
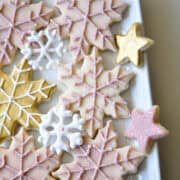
- Carefully pipe the lines across the the cookie, crossing over in the center. For snowflake cookie cutters with 6 points, this required 3 lines that cross the center of the cookie. Then pipe small "v" shapes along the lines to make the snowflake pattern.
- If you are adding sanding sugar, immediately sprinkle it over the whole cookie, specifically over the royal icing, then shake off the excess in a small bowl. This will allow you to reuse the excess sugar that doesn't stick to the cookie for subsequent cookies.
- Immediately place a sugar pearl in the very center of the design, right into the royal icing.
- Set the cookie aside on a baking rack to allow the icing to dry and repeat with remaining cookies.
- Because you are working quickly and doing only 1 cookie at a time, you may need to cap off your piping tip between cookies or place the tip in a tall glass with a moist paper towel in the bottom. This should help prevent the icing from crusting over the tip. Make sure to check your tip for crusting each time before you begin piping the design.
Notes
Vanilla Shortbread Cookies Recipe HERE
Cut Out Sugar Cookies Recipe HERE
Brown Sugar and Spice Cookies HERE
Tips for painting cookies with gold luster dust HERE
You're Gonna Bake It After All
bakeitafterall.com