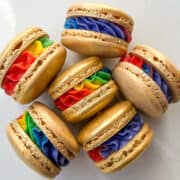
Gold Macarons with Rainbow Buttercream
These beautiful shiny Gold Macarons have a brightly colored rainbow buttercream filling. They are nut free and gluten free.
Servings 28 cookies (approx.)
Calories 108kcal
Equipment
- digital kitchen scale
- Piping bag holder optional
- disposable piping bags
- medium round piping tip such as a #12
- Plastic tip coupler optional
- 2 macaron mats
- 2 Baking sheets
- Paint palette dedicated to food
- food grade paintbrush
- disposable transfer pipette
- small silicone spatulas
- plastic wrap
- large star tip such as a #6B
Ingredients
For the Macaron Shells:
- 126 grams oat flour
- 126 grams powdered sugar
- 100 grams egg whites see note
- ¼ teaspoon cream of tartar
- 90 grams granulated sugar
- 1 teaspoon vanilla extract
- gold food coloring gel
- Gold luster dust
- Everclear or vodka
- edible gold glitter optional
For the Filling:
- Easy Vanilla Buttercream or Vanilla Swiss Meringue Buttercream see note
- Food coloring gel in red, yellow, and blue (orange and purple optional)
Instructions
Make the Macaron Batter:
- Place a macaron mat on each of 2 baking sheets. You can also use parchment paper with 1-inch circles drawn on underneath. Set these aside.
- Place a large round tip, like a #12, in a disposable piping bag. Twist the bag above the piping tip and clip it closed with a small binder clip. Fold over the top of the bag and place it in a tall glass or in a piping bag holder so it will be easy to fill with the batter. Set aside.
- Sift together the oat flour and the powdered sugar in a medium-sized bowl, then whisk to combine them completely. Set this bowl aside.126 grams oat flour, 126 grams powdered sugar
- Place the egg whites in the bowl of a stand mixer fitted with the whisk attachment and beat on medium-high until frothy.100 grams egg whites
- Add the cream of tartar, then slowly add the granulated sugar, one spoonful at a time, with the mixer still running.¼ teaspoon cream of tartar, 90 grams granulated sugar
- Add the vanilla extract and gold food coloring gel. Keep in mind that the color of the batter will deepen after the dry ingredients are incorporated. Continue to beat the mixture until the meringue forms stiff peaks. Remove the bowl from the mixer.1 teaspoon vanilla extract, gold food coloring gel

- Using a small silicone spatula, carefully fold ⅓ of the flour/powdered sugar mixture into the meringue. Then add the remaining ⅔ of the flour mixture and continue folding until you reach the figure 8 stage. See note.
Pipe and Bake the Macaron Shells
- Once the batter is the proper consistency, transfer it to the prepared piping bag.

- Pipe 1-inch circles of batter onto the first macaron mat. Slam the tray down hard on the counter or a table several times to force any air bubbles to the surface. If desired, take a toothpick and pop large bubbles then smooth out the hole left after the bubble pops.

- Pipe the batter onto the second macaron mat. You will not fill the entire mat. Repeat the process of slamming the tray and popping bubbles.
- Allow the batter to dry at room temperature for 40 minutes. Meanwhile, preheat the oven to 300°F.
- Bake the macaron shells for 12-15 minutes, rotating the pan once about 7 minutes into the bake. Only bake one pan at at time.

- Allow the shells to cool completely on the mats before removing them. To remove more easily, push up on the mat from underneath to help them pop off. If you have trouble with them sticking, that may mean they are underbaked. Some of the shells in the center of the tray may have a little bit of sticking. Very carefully use a stiff metal spatula to pry them off the mat, taking care not to rip the shell.
- After your macaron shells have completely cooled, you can paint them with a gold luster dust suspension immediately or store the shells in an airtight container in the refrigerator or freezer to paint later.
Paint the Shells Gold
- Add some gold luster dust to the well of a food-dedicated paint palette.

- Pour some Everclear or vodka into a small bowl.
- Use a plastic transfer pipette to add a few drops of alcohol to the well with the gold dust. Stir it around with a food grade paintbrush to make the gold suspension. You may need to add more luster dust or more alcohol depending on the consistency of the suspension.

- Dip the paintbrush into the liquid gold, and then quickly brush it across the surface and sides of the macaron shells. Paint the underneath (flat) side of the shells as well, or at least the perimeter that may not be covered with filling.

- As you use the suspension on the macaron shells, you will need to remake more in the same well. The alcohol evaporates quickly, so if you don't use it right away, you will need to add another drop or two of alcohol to get the suspension back to the original consistency.
- Sprinkle the shells with edible gold glitter for extra sparkle, if desired.
- Because the alcohol evaporates very quickly, the shells will be dry quickly.
Make and Pipe the Rainbow Buttercream
- Divide the buttercream evenly among 6 bowls.
- Color the bowls as follows: red, orange, yellow, green, blue and purple. If you do not have orange gel, add equal parts red and yellow. If you do not have purple gel, add equal parts red and blue. Stir completely with small silicone spatulas.

- Transfer each color to a disposable piping bag. Squeeze the buttercream toward the tip and snip off an opening of about ½-inch in diameter.

- Pipe lines of each color buttercream, in rainbow order, measuring about 8 inches long on a large piece of plastic wrap.

- Carefully roll the buttercream together to form a log with no space in the center so all of the colors of buttercream touch. Twist the ends of the plastic wrap.

- Snip off one end of the rolled plastic wrap and place the entire log into a piping bag fitted with a large star tip, such as a #6B. Squeeze out some buttercream on a paper towel until all of the colors are coming out of the tip.

- Pair up the macaron shells by size. Pipe a large mound of buttercream into the center of one shell.

- Lift the other shell by the edges and place it on top of the buttercream, twisting slightly as you press down. Repeat with the remaining pairs until all of the macarons have been filled.

Notes
Easy Vanilla Buttercream recipe HERE, Vanilla Swiss Meringue Buttercream recipe HERE
I highly recommend weighing the ingredients listed in grams. French macarons are notoriously finicky and require precise measurements.
I recommend using cracked whole eggs, not store bought egg whites.
100 grams of egg whites is the equivalent of the whites from about 3 ⅓ large eggs.
Clear vanilla extract can be used in place of traditional vanilla extract if you want a lighter batter that is easier to tint with food coloring. You could also use a different flavor of extract if you prefer, such as almond extract or imitation almond extract to keep the macarons nut free.
Macaronage: The process of incorporating the dry ingredients into the meringue is called macaronage. I recommend reading about this at America's Test Kitchen to familiarize yourself with how the batter should look. This step is critical for the shells forming "feet" properly. You want the batter to flow off the spatula like a ribbon, and when you draw a figure 8 with the batter that flows off, you want it to slowly go back into the batter still in the bowl but not too quickly.
Storage: Store the assembled cookies in an airtight container in the refrigerator for up to several days. If refrigerated, allow the cookies to come to near room temperature before serving.
Nutritional information is only an estimate and will vary based on your ingredients and substitutions.
You're Gonna Bake It After All
bakeitafterall.com
Nutrition
Serving: 1cookie | Calories: 108kcal | Carbohydrates: 11g | Protein: 1g | Fat: 0.4g | Saturated Fat: 0.1g | Polyunsaturated Fat: 0.1g | Monounsaturated Fat: 0.1g | Sodium: 7mg | Potassium: 27mg | Fiber: 0.3g | Sugar: 8g | Calcium: 3mg | Iron: 0.2mg