
Bumble Bee Oreos
Bumble Bee Oreos have a cute royal icing bee with a black dashed bee path for a Winnie the Pooh party or a bee themed party.
Servings 12 cookies
Equipment
- disposable piping bags
- piping bag holders, optional, or tall drinking glasses
- small round piping tips, like #2
- plastic tip couplers, optional
- black food coloring pen or marker, such as FooDoodlers
- thin food safe paintbrush, optional
Ingredients
- 1 package white fudge covered Oreos
- Easy Royal Icing see note
- black royal icing powder or black food coloring gel
- yellow and black food coloring gel
Instructions
Prepare the Royal Icing
- Make piping consistency royal icing in untinted white, yellow, and black.
- Add the icings to disposable piping bags fitted with small round tips, like #2, or just snip off a tiny amount of the tip.
Pipe the Bee Body and Wings
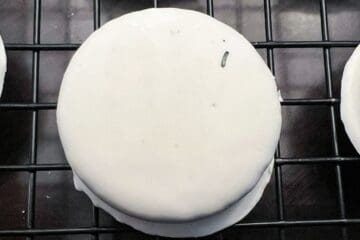
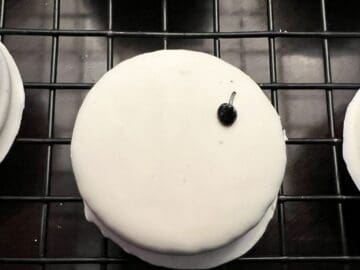
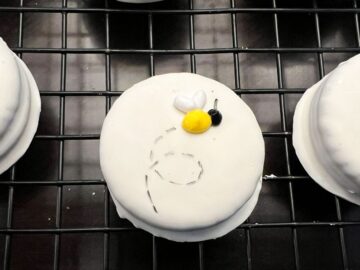
- Use a black food coloring pen to draw a single antenna where the face of the bee will be.
- Pipe a dot of black royal icing at the bottom of the antenna to make the bee's head.
- To the left of the head, pipe a yellow oval to represent the bee's body.
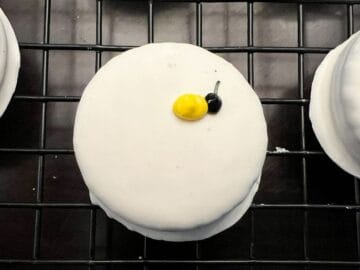
- Pipe two white wings on top of the yellow body.
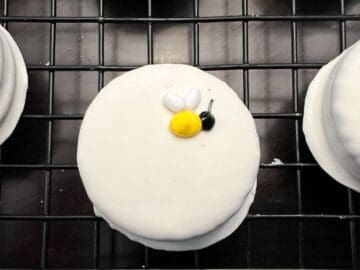
- Allow the icing to dry at room temperature. You can add the bee path immediately or after the icing has dried completely.
Add the Bee Path
- Use a black edible marker, black royal icing in a disposable piping bag with a small round tip, or black food coloring gel with a thin food safe paintbrush to draw a dotted line bee path from the side of the cookie to the back of the bee's body. You can do a straight path or have it make a circle or two.
Add the Bee Stripes
- Once the yellow body has dried, you can add the black stripes. Pipe two thin, vertical black stripes on the yellow body.

- Allow the icing to dry completely, about 24 hours, before stacking or packaging.