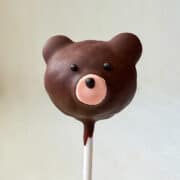
Teddy Bear Cake Pops
These Teddy Bear Cake Pops are filled with a rich chocolate cake. They are adorable and delicious and perfect for a teddy bear themed birthday party or baby shower!
Servings 24 cake pops
Equipment
- food safe nitrile gloves
- plastic reusable cake pop sticks
- disposable piping bags
- Plastic tip coupler optional
- small round piping tip, like #5 optional
- small fondant rolling pin
- large sized round tip like 2A
- food grade paintbrush optional
Ingredients
- 1 8-inch round cake from a boxed mix or homemade chocolate cake, see note
- ¼-½ cup store bought or homemade frosting such as Easy Chocolate Buttercream, see note
- 1 package Ghirardelli bittersweet chocolate chips or dark chocolate melting wafers
- 72 M&M's candies 3 per cake pop
- black icing powder or white royal icing with black royal icing gel
- white rolled fondant
- brown food coloring gel
- powdered sugar
- water or clear alcohol like clear vanilla extract, vodka or Everclear, optional
Instructions
Form the Cake Spheres:
- Break the cooled cake into pieces and place them in the bowl of a stand mixer fitted with the paddle attachment. Add the buttercream and mix just until a dough forms.

- Wearing food safe nitrile gloves, scoop a ball of dough with a 1-inch dough scoop and roll it in your hands until it is round. Repeat until all of the cake has been formed.

- Chill the balls of cake for at least 4 hours, or freeze for at least 30 minutes.
Add M&M's and Sticks:
- Place a small amount of dark chocolate in a glass. Melt the chocolate in the microwave at 50% power for 30 second intervals, stirring after each interval, until melted and smooth.
- Dip an M&M in the chocolate and insert it into the top of a cake ball to make an ear. Repeat with a second M&M to make the other ear. Then, do the same with a third M&M and place it flat on the top of the cake ball to make the bear's nose.
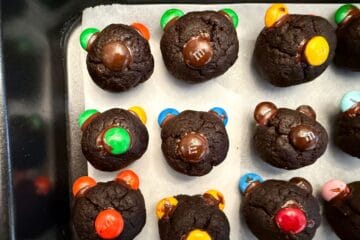
- Chill the bear faces in the refrigerator for about 30 minutes to set the chocolate.
- Reheat the chocolate in the glass by microwaving it at 50% power in 30-second intervals until just melted.
- Dip the end of a cake pop stick, about ¼- to ½-inch, in the melted chocolate and then insert it into the bottom of a bear head. Repeat with all the bear heads.

- Refrigerate them for 1 hour to set the chocolate.
Dip the Cake Pops:
- Line two baking sheets or cookie sheets with waxed paper and set aside.
- Fill a tall glass or mason jar about half way with chocolate. Melt the chocolate in the microwave at 50% power in 30 second intervals, stirring after each interval, until the chocolate is just melted. Add more chocolate if necessary to achieve a depth that is deep enough that you can submerge the entire cake pop in the chocolate.
- Holding a cake pop by the stick, carefully submerge the ball of cake in the chocolate until it completely covers the cake and meets the stick,. Pull up and allow as much of the melted chocolate to run off, swirling and gently shaking to remove as much excess as possible.
- Place the cake pop, snout side up, on the waxed paper lined baking sheet. If you have a cake pop holder and can stand them up, that's fine too.
- Move the cake pop around on the waxed paper one or two times by lifting with the stick. This prevents the coating from pooling around the bottom of the cake pop. The waxed paper will look messy when you're finished, but it will be thrown away.
- Repeat with the remaining cake pops until all are coated.
- Refrigerate the cake pops until the chocolate is completely set, then carefully peel the cake pops off of the waxed paper and move them to clean waxed paper in a cake pan to store them in the refrigerator.
Add the Details:
- Wearing food safe nitrile gloves, break off a piece of white rolled fondant and add a tiny amount of brown food coloring gel to it. Use your hands to work the color evenly into the fondant to achieve a light brown/tan color.
- On a flat surface lightly dusted with powdered sugar, roll the fondant into a thin, even layer with a small fondant rolling pin. Use a large round piping tip, like a 2A, to cut small circles of light brown fondant.

- Brush the surface of the circles with water or clear alcohol (like clear vanilla extract, vodka or Everclear) to remove the excess powdered sugar. It's important to use the circles right away to prevent them from getting too hard.

- Mix up a small amount of black royal icing and transfer it to a disposable piping bag fitted with a tip coupler and small round tip, such as a #5, or with the tip of the bag cut off.
- Pipe a single dot of icing in the middle of the nose, which is already protruding because of the M&M under the chocolate coating.

- Carefully place a tan fondant circle on top of the icing and press down lightly to adhere, making sure the edges mold to the shape of the M&M. Repeat with all of the cake pops.
- Use the same bag of black royal icing to pipe on two black dots for eyes.
- Lay the cake pops down on waxed paper, face up, to allow the icing to set. Refrigerate if necessary.
- Once the icing is set, use a damp paper towel to wipe down the cake pop sticks to remove any chocolate that got on the sticks during the assembly.

- If you're packaging the cake pops, make sure that the icing is completely dry before packaging.
Notes
Chocolate Layer Cake recipe HERE
Easy Chocolate Buttercream recipe HERE, Easy Vanilla Buttercream recipe HERE
Storage: Store the cake pops in the refrigerator for up to 1 week or in the freezer for up to 3 months, for best quality. If freezing, chill the cake pops in the refrigerator before freezing to help prevent the coating from cracking. Freezing does risk cracking the coating chocolate. Allow chilled or frozen cake pops to come to near room temperature before serving.
You're Gonna Bake It After All
bakeitafterall.com