
Alice in Wonderland Petit Fours
Alice in Wonderland Petit Fours represent the small cake that Alice encounters in the story that says "Eat Me." These no bake petit fours are semi-homemade, using store bought pound cake to save some time.
Servings 12 or more
Ingredients
For the Cake:
- 1 frozen pound cake such as Sara Lee
- ½ cup buttercream such as Easy Vanilla Buttercream
- ½ cup seedless raspberry jam
For the Poured Fondant:
- ¼ cup white candy melts 35 grams
- ¼ cup pink candy melts 35 grams
- 2 cups powdered sugar 227 grams
- 2 tablespoons light corn syrup 39 grams
- 2 tablespoons hot water 29 grams
- ½ teaspoon vanilla extract
For Decoration:
- ¼ cup black royal icing
Instructions
Assemble the Cake:
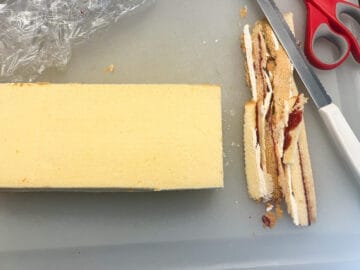
- Remove the pound cake from the aluminum foil container. Turn it on its side and trim off the rounded top to make it flat. Then, cut the cake into 3 equal layers.

- Spread out a large pieces of plastic wrap. Spread out the 3 layers and allow them to thaw for a bit so the buttercream and jam will stick better.


- Carefully stack one of the layers on top of the buttercream. Spread a thin layer of jam on top of the second layer.

- Carefully transfer the third layer on top of the cake and gently press down to get all the layers to stick together.

- Tightly wrap the stacked cake in plastic wrap. Add another piece of plastic wrap to double wrap the cake. Place the cake in the freezer until frozen solid, about 6 hours.

- Use a sharp knife to trim the ends and edges off the cake, and make sure the cake is completely flat on all sides and squared off.
- Slice the cake into uniformly sized cubes. You can make the cakes larger or smaller, depending on your preference. Wrap the cakes back up in the plastic wrap and place it back in the freezer until ready to coat in fondant, at least 1 hour.

Make the Poured Fondant:
- Add both the white and pink candy melts to a microwave safe container like a mason jar.

- Microwave at 50% power for 30 second intervals, stirring after each interval, until melted and smooth.

- Place a pot of water on a stove burner and turn it on to simmer.
- Sift the powdered sugar into a large glass or heat-proof bowl that will fit on top of the pot of water without touching the water. Add the corn syrup and hot water. Stir until smooth, being careful not to introduce too much air into the mixture, or it will create bubbles.
- Add the melted candy melts and vanilla to the sugar mixture. Place the bowl on top of the pot of simmering water and carefully stir to completely combine the mixture.

- It is easiest to work with around 100°F. You want the fondant to be thin enough that it will run over the top and sides of the cakes when dipping. If the mixture is too thick, stir in 1 to 3 tablespoons additional water.
- Place a piece of waxed paper on top of a cooling rack or cookie sheet. You will need to work quickly when coating the cakes.
- Take 1 cake out of the freezer. Place the cake on a fork, lower the fork close to the top of the fondant in the bowl and ladle a big scoop of the flowing fondant on top of the cake, making sure to get the sides as well. It will begin to set quickly so work as fast as possible.
- Once the cake is coated, carefully slide it off the fork onto the waxed paper. Repeat with the remaining cakes, one at a time.

- Place the cakes in the refrigerator to chill. Once the fondant is chilled, you can use a sharp knife to cut off any excess fondant around the bottom of each cake.
Add the Decorative Writing:
- Add small amounts of warm water to black royal icing to achieve outline consistency icing.
- Transfer the royal icing to a disposable pastry bag fitted with a small round tip like a #7.
- Carefully write the words "EAT ME" on the top of each cake.
