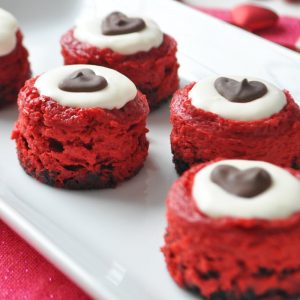
Mini Red Velvet Cheesecakes
Mini Red Velvet Cheesecakes have chocolate cookie crust and red velvet cheesecake filling with a cream cheese topping. Gluten free option and instructions for how to make chocolate heart decorations. Cute and festive for the holidays or Valentine's Day!
Equipment
- two 12-cup mini cheesecake pans or one 24-cup mini muffin pan
Ingredients
For the Crust:
- 12 chocolate sandwich cookies (such as Oreos or gluten free Glutino)
- butter, melted
For the Filling:
- 12 ounces cream cheese (1 1/2 packages)
- 3/4 cup sugar
- 2 eggs
- 1/2 cup sour cream
- 1/4 cup buttermilk (see note)
- 1 1/2 tablespoons unsweetened cocoa powder
- 1 teaspoon vanilla extract
- 1/2 teaspoon white vinegar
- 1/2 ounce red food coloring gel (or 2 ounces red food coloring liquid)
For the Chocolate Heart Decorations:
- 1 ounce semisweet chocolate
For the Frosting:
- 4 ounces cream cheese (1/2 package)
- 2 tablespoons butter
- 1 cup powdered sugar
- 1/2 teaspoon vanilla extract
Instructions
Make the Crust:
- Preheat the oven to 325°F. If using a mini muffin or standard size muffin pan instead of a mini cheesecake pan, line each cup with a paper or aluminum cupcake liner.
- Crush the cookies to crumbs in a food processor or with a meat tenderizer.
- Combine cookie crumbs with melted butter until well mixed. Divide the crumbs among the wells of a mini cheesecake, mini muffin pan, or standard size muffin pan. Use a small cup or your fingers to press down the crumbs evenly. If you have extra crumbs, add them to a separate small dish to bake.
- Bake for 10 minutes or until fragrant. Set aside to cool and make the filling.
Make the Filling:
- Beat the cream cheese and sugar in the bowl of an electric mixer until well combined. Add the eggs and the remaining ingredients on low speed until just combined.
- Layer the batter on top of each crust, filling the wells 3/4 full. Do not overfill, as the cheesecake will rise during baking. Bake extra batter in a separate dish or discard.
- Bake for 15 - 25 minutes, until the cheesecake is set. Baking time will depend on the size of the wells and how full each well is. Cool completely.
Make the Chocolate Heart Decorations:
- Lay a piece of parchment or waxed paper on a baking sheet.
- Melt the chocolate at 50% power in 30-second intervals, stirring between each heating interval, until just melted. Transfer the melted chocolate to a disposable piping bag with a plastic coupler and small metal tip or to a resealable gallon sized plastic bag with a corner cut off.
- Pipe the chocolate into heart shapes onto the paper. Allow the chocolate to set. You may refrigerate or freeze it to speed up this process.
- Once set, carefully remove the chocolate hearts from the paper and store in an airtight container at room temperature or in the freezer.
Make the Frosting:
- Beat cream cheese and butter at medium speed with an electric mixer until smooth.
- Gradually add powdered sugar and vanilla, beating until smooth.
Finish the Cheesecakes:
- Carefully remove the mini cheesecakes from the pan by pushing up from the bottom. Gently pry off the metal bottom from underneath the crust. If using a muffin pan, remove the cheesecakes and take off and discard the cupcake liner.
- Spread the frosting evenly over the top of the cheesecakes. Add a chocolate heart decoration on top of the topping, if using.
Notes
Substitute for buttermilk: combine 1/4 cup milk mixed with 1 teaspoon white vinegar, mix and let sit for 5 to 10 minutes.
Source: Adapted from Southern Living
You're Gonna Bake It After All
bakeitafterall.com